Overview
Once an EQuIS database has been created, at least one facility must be added. Based on the EDMP, select the EDD format(s) that will be used for each facility. If data already exists for a facility, a plan to migrate historical data will be needed. As new data is collected, reference values may need to be updated. These exercises are designed to demonstrate some of the steps that may be used to setup a new project within EQuIS.
|
Start implementing the Environmental Data Management Plan for your project. |
|
Exercise Objectives |
•Create a New Facility
•Determine the Necessary EDD Formats
•Add New Locations
Skills, Software and Permissions Required
•EQuIS Professional 7 must be installed on the workstation
•.NET Framework 4.6 or higher must be installed on the workstation
•Access to the Standard EQuIS Library
•Read/write (or Editor) permissions are required to a create new facility.
|
Objective: Create a New Facility |
|
Administrators may also create new Facilities in EQuIS Enterprise from the Explorer widget. See the Online Documentation for more details. |
1.Open the Windows Start menu and choose All Programs or Apps> EarthSoft> EQuIS Professional.
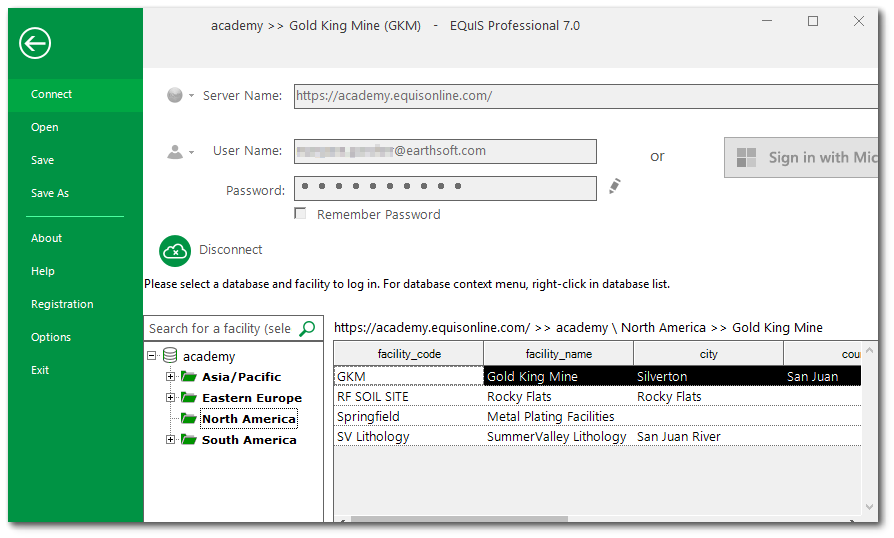
2.If a connection to the desired EQuIS Database has already been established, proceed to the next step. If not, see how to Create an EQuIS Database Connection.
3.Login to the desired EQuIS Database and an already existing Facility (such as the initial default Facility created when the Database is setup).
|
Logging into an already existing Facility is required to create a new Facility. |
4.Select Forms ![]() from the Open group on the Home ribbon.
from the Open group on the Home ribbon.
5.Double-click to open the Facility form in the workspace.
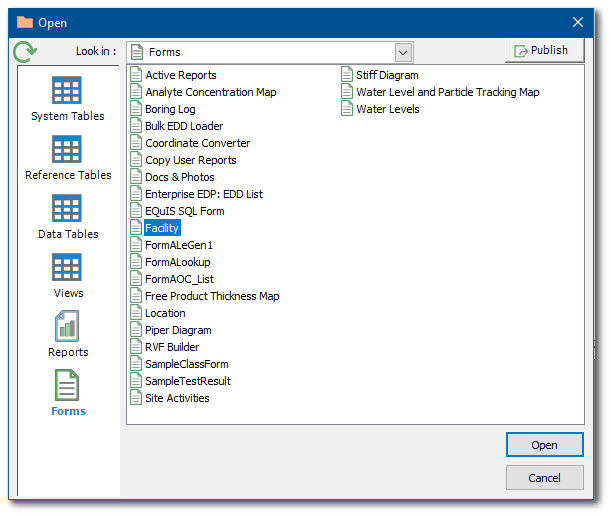
6.The current Facility's information is displayed. Select Create a new facility ![]() from the Facility tab toolbar to open a new form.
from the Facility tab toolbar to open a new form.
7.Enter in the new Facility Code (required) and any other desired information. Use the Name field for a more descriptive name to be associated with the facility. The facility code only allows 20 characters, whereas facility name allows 60 characters. The EQuIS Login window displays both facility code and name. If no facility name exists, only the facility code is displayed.
For this exercise, give the new Facility a Code of "PFOA Project <your initials>."

8.Select Save ![]() from the Facility tab toolbar.
from the Facility tab toolbar.
9.Close EQuIS Professional.
10.Open the Windows Start menu and choose All Programs or Apps> EarthSoft> EQuIS Professional.
11.Expand the EQuIS Connection and Database.
12.Note the new Facility is now available. Double-click to open the new Facility.
|
Consider setting permissions to the new Facility in EQuIS Enterprise. Revisit the Managing Roles and Users exercises for additional information. |
|
Objective: Determine the Necessary EDD Formats |
The EDD format file is the essence of data checking in EQuIS. Structured in XML, the EDD format file set contains the definitions and restrictions for each individual field in available EQuIS database tables. The format files control data checks, such as range checking, formatting and enumerations, and include a reference value file.
When setting up new facilities, selecting or developing an appropriate EDD format is one of the first and most important steps. EarthSoft publishes and distributes several different standard EDD formats as well as formats with custom Schemas. In many cases, the existing, published EDD formats will meet the required data criteria, and using an existing format can considerably reduce the start-up time to load and report data. In other cases, it may be necessary to customize an existing format to reflect specific data needs.
When selecting an EDD format, consider the following:
•The selected format(s) should meet the scope of the required data. Some workflows may be well suited to using one EDD format, whereas others may require more than one EDD format to load different types of data.
•The format(s) should be capable of importing both laboratory and field data as appropriate.
•EDD formats range in complexity. Use an EDD format that meets all the required data needs but does not offer unnecessary complexity.
For more detailed information on selecting an appropriate EDD format, see Selecting a Format File. The following exercise is meant to provide a more comprehensive review of the standard formats available with EQuIS to assist with the EDD selection process.
Examine Standard EarthSoft Format Files
1.Select the EDP button ![]() in the Import group on the Home ribbon of EQuIS Professional. EQuIS Professional EDP opens in a separate window.
in the Import group on the Home ribbon of EQuIS Professional. EQuIS Professional EDP opens in a separate window.
2.Select Format ![]() in the Open group of the EDP Home ribbon.
in the Open group of the EDP Home ribbon.
3.Browse to the Standard EarthSoft Format directory, typically located in the EQuIS install folder
C:\Program Files\EarthSoft\EQuIS\Formats\EarthSoft.
4.Select a standard format file to open. After the format opens in EDP, review the available tables and fields.
5.Create a blank EDD file and an EDD description file for the selected format (refer to Blank EDD and Description Files for specific instructions).
6.Repeat steps 4 and 5 with other Standard EarthSoft format files.
Once the EDD format has been selected, project data can be added to the EQuIS database using the format. Typically, location data is entered first (the next exercise) since most other data types are related to the location. As new and historical data are added to the EQuIS database, new reference values may need to be added. Refer to the Add Reference Values section of Appendix A to decide the best way to update reference values in the EQuIS database.
|
Objective: Add New Locations |
Locations are uniquely designated sampling points that can be identified spatially by x, y and z coordinates. Each location is stored in EQuIS as a SYS_LOC_CODE in the DT_LOCATION table. Locations can be added to the EQuIS database three ways: 1) Use the Location form in EQuIS Professional to add a single location, 2) Add records directly to DT_LOCATION, and 3) Use EDP to upload an EDD with the Locations section populated with data. These exercises will explore all three options for adding locations.
Prior to adding any specific location data, certain reference values should be established. These can include but are not limited to LOCATION_TYPE_CODE, COORD_TYPE_CODE, and ELEV_DATUM_CODE. If Location Groups are planned, then these need to be established prior to adding a location (see the Create Location Groups exercise for details).
Tasks
•Add Locations in EQuIS Professional
•Add Locations using EDP
Add Locations in EQuIS Professional
Using the Location form or accessing the DT_LOCATION table directly in EQuIS Professional are both easy ways to add a single location or a few locations. To add many locations to the EQuIS database, use EDP to load an EDD.
|
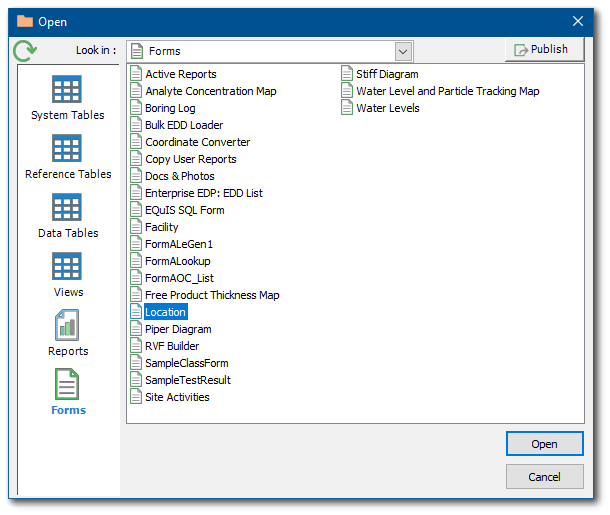
1.Select Forms 2.Double-click to open the Location form in the workspace. |
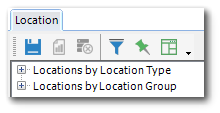
1.A new location can be added "by Location Type" or "by Location Group". Select the desired type or group and the select Add Location |
|
1.Enter a concise and unique identifier in the SYS_LOC_CODE field (required). A more detailed name can be added to the Location Name box. The Location Type field will be populated based on the location type selected in Step 3.
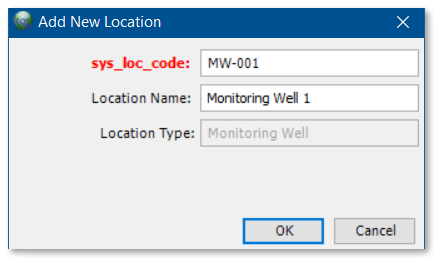
2.Select the OK button to add the new location to the Location form.
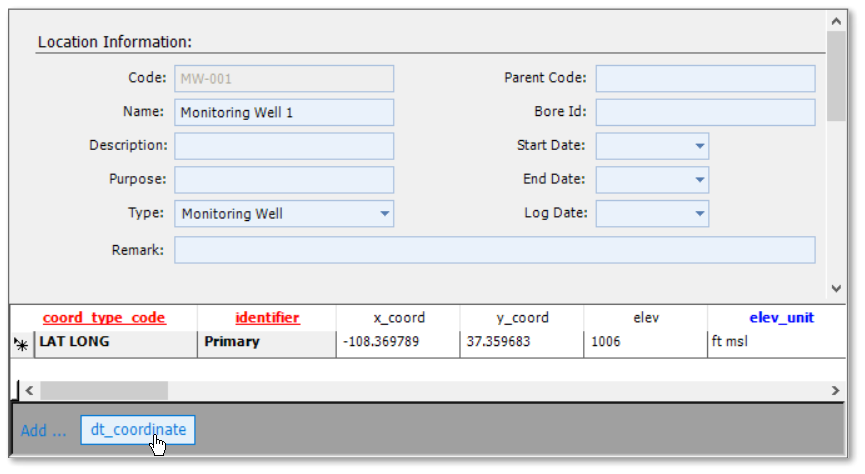
3.Add any other desired location information to the Location form. Coordinate information can be added by selecting the Add... DT_COORDINATE button to create a new record row.
4.Select Save ![]() from the Location tab toolbar to add the new location to the EQuIS database.
from the Location tab toolbar to add the new location to the EQuIS database.
5.Select Tables ![]() from the Open group on the Home ribbon of EQuIS Professional, and choose Data Tables on the left side-bar menu. Open the DT_LOCATION table.
from the Open group on the Home ribbon of EQuIS Professional, and choose Data Tables on the left side-bar menu. Open the DT_LOCATION table.
6.Find the new location in the DT_LOCATION table.
7.Add another new location to the EQuIS database by selecting the Add... DT_LOCATION button to create a new record row.
8.Enter information into all required fields as well as any other desired information. Note that the coordinate information in not part of the DT_LOCATION table.
9.Select Save ![]() from the DT_LOCATION tab toolbar to add the new location to the EQuIS database.
from the DT_LOCATION tab toolbar to add the new location to the EQuIS database.
10.Select Tables ![]() from the Open group on the Home ribbon of EQuIS Professional, and choose Data Tables on the left side-bar menu. Open the DT_COORDINATE table.
from the Open group on the Home ribbon of EQuIS Professional, and choose Data Tables on the left side-bar menu. Open the DT_COORDINATE table.
11.Find the new location in the DT_COORDINATE table and enter the desired coordinate information.
12.Select Save ![]() from the DT_COORDINATE tab toolbar to add the coordinate information to the new location.
from the DT_COORDINATE tab toolbar to add the coordinate information to the new location.
Add Locations using EDP
Use EDP to load an EDD to add many locations to the EQuIS database. The EDD file must be created with the correct format and all the needed location information prior to uploading via EDP.
1.Select EDP ![]() in the Import group on the Home ribbon of EQuIS Professional. EQuIS Professional EDP opens in a separate window.
in the Import group on the Home ribbon of EQuIS Professional. EQuIS Professional EDP opens in a separate window.
2.Select Format ![]() in the Open group of the EDP Home ribbon.
in the Open group of the EDP Home ribbon.
3.Browse to the desired Format directory and select the Format to open. Standard EarthSoft formats are typically located in the EQuIS install folder, C:\Program Files\EarthSoft\EQuIS\Formats\EarthSoft.
For this exercise, browse to the EQEDD Format directory in the EQuIS install folder, typically
C:\Program Files\EarthSoft\EQuIS\Formats\EarthSoft and open "EQEDD.zip".
4.Select EDD ![]() from the Open group of the EDP Home ribbon.
from the Open group of the EDP Home ribbon.
5.Browse to the desired EDD file (typically an .xls, .zip or multiple .txt files) and double-click on the file to open it.
An EDD with example locations may be found in the Training Materials directory. Download and open the"New_Project Location EQEDD" file in the New Project Resources sub-directory.