Overview
The first step in the DQM data qualification process is to create a DQM event. For each DQM event, the analytical data sets requiring qualification and the DQM QAPP specific checks must be selected. During the Start Event step, the automated checks for the selected DQM QAPP are run and DQM adds several new columns to the Analytical Results output table, including DQM_QUALIFIER, DQM_REMARK, APPLY_QUALIFIER and APPLY_REMARK. When DQM discovers an exception to a DQM rule, both QUALIFIER columns are populated with that rule's qualifier. The DQM_QUALIFIER and DQM_REMARK columns cannot be edited to preserve a record of the DQM suggested qualifier.
Once the DQM event is started, data validators can review the DQM generated flags by check, sample, or other filter. The APPLY_QUALIFIER column and the APPLY_REMARK column can be edited on the DQM Event Review form. Any in-process events can be saved for future reference and can be edited at a later time. These changes are stored in a variety of DQM tables in the EQuIS database but changes to other data tables does not occur until the DQM event is complete.
Finally, completing a DQM event saves the qualified updates to the DT_RESULT table and moves the event to the history list. When the DQM event is completed, the APPLY_QUALIFIER column is saved to the VALIDATOR_QUALIFIER and/or INTERPRETED_QUALIFIER columns in DT_RESULT according to the options selected.
At any point during or after the data validation review, a variety of reports can be exported to an Excel spreadsheet. These reports include: a summary-level report, an exceptions report by check, and a report containing all analytical results and associated qualifiers in the data set.
Exercise Scenario
The laboratory analysis has been completed for some GKM samples and the results have been uploaded to the EQuIS database. Using DQM, our data validator needs to review and qualify the results according to the project QAPP.
|
Use the project DQM QAPP to qualify an analytical data set with DQM and then update the results in the EQuIS database. |
|
Exercise Objectives |
•Start a DQM Event
•Apply Qualifiers to Data
•Reopening a DQM Event
•Completing and Exporting a DQM Event
•View Qualification Histories
Skills, Software and Permissions Required
•EQuIS Professional 7 must be installed on the workstation with DQM enabled during installation
•Schema.DQM.xme applied and EarthSoft.Reports.Library.63867.dll (i.e., DQM report .dll file) published to the EQuIS database (see Install and Configure DQM).
•DQM configured with desired project QAPP (see Install and Configure DQM).
•.NET Framework 4.7.2 or higher must be installed on the workstation
•Access to the Premier Data or Premier Data & Graphics EQuIS Libraries
•Read/write permissions are required for the desired facilities
|
Objective: Start a DQM Event |
1.Open the Windows Start menu and choose All Programs or Apps> EarthSoft> EQuIS Professional.
For this exercise, login to the Gold Kine Mine facility in the Training database.
2.Select the DQM ribbon and then select Create Event to open the DQM Start Event form.
![]()
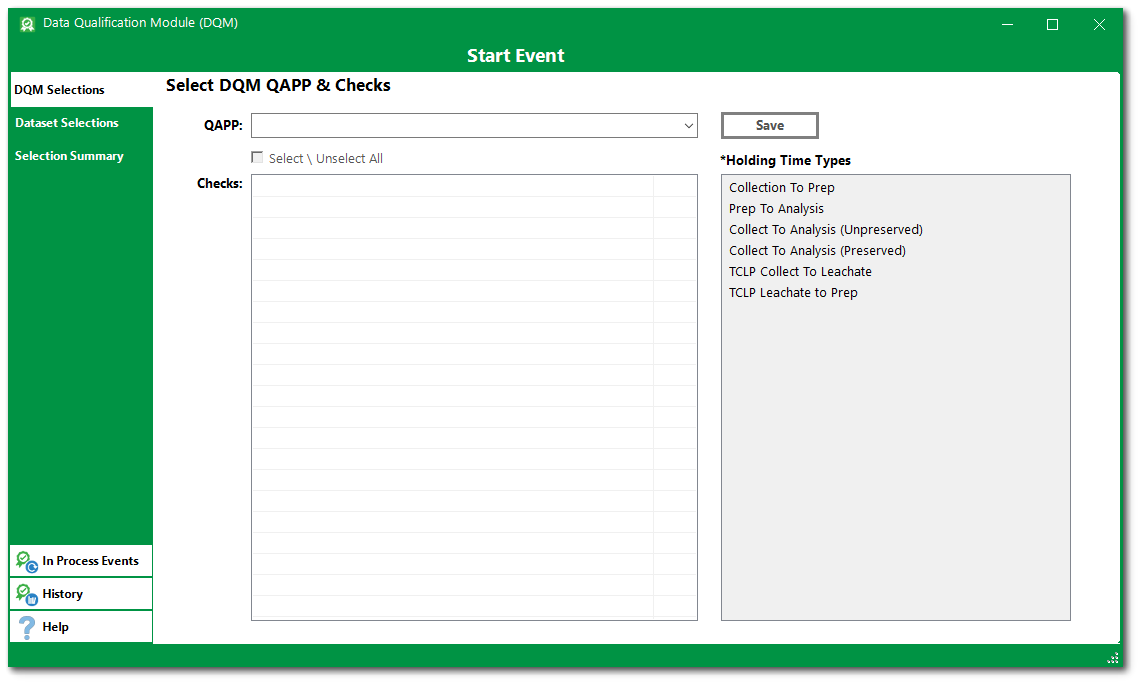
3.On the DQM Selections tab, select the desired DQM_QAPP_CODE from the QAPP drop-down menu.
For this exercise, select the GKM v7 DQM QAPP.
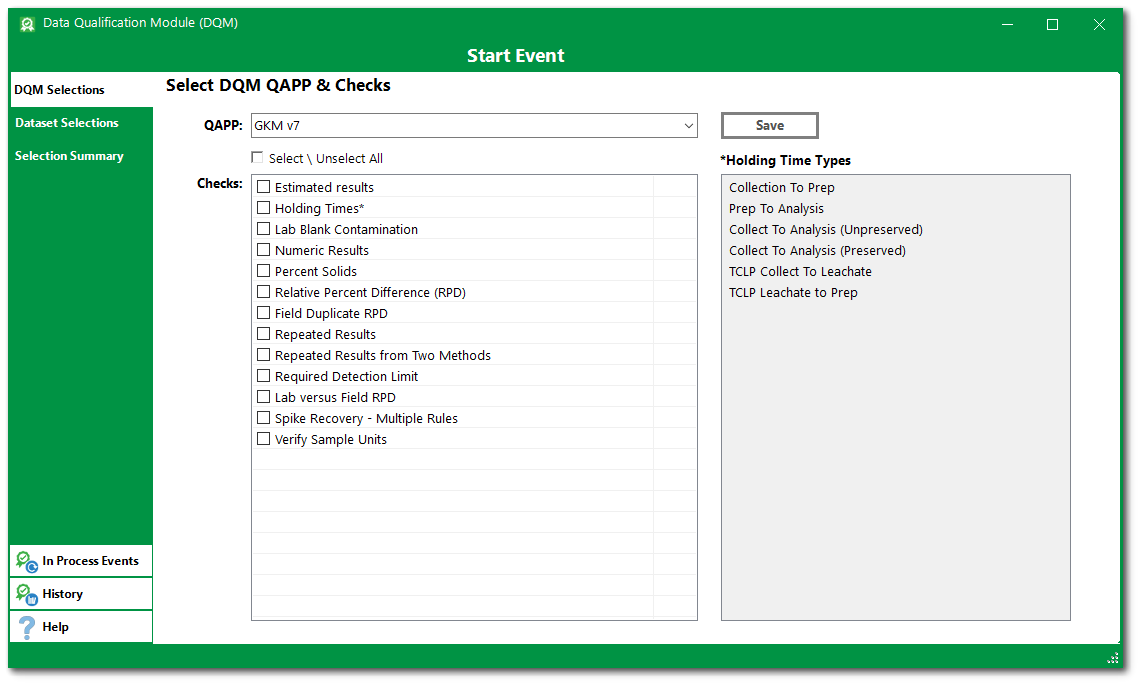
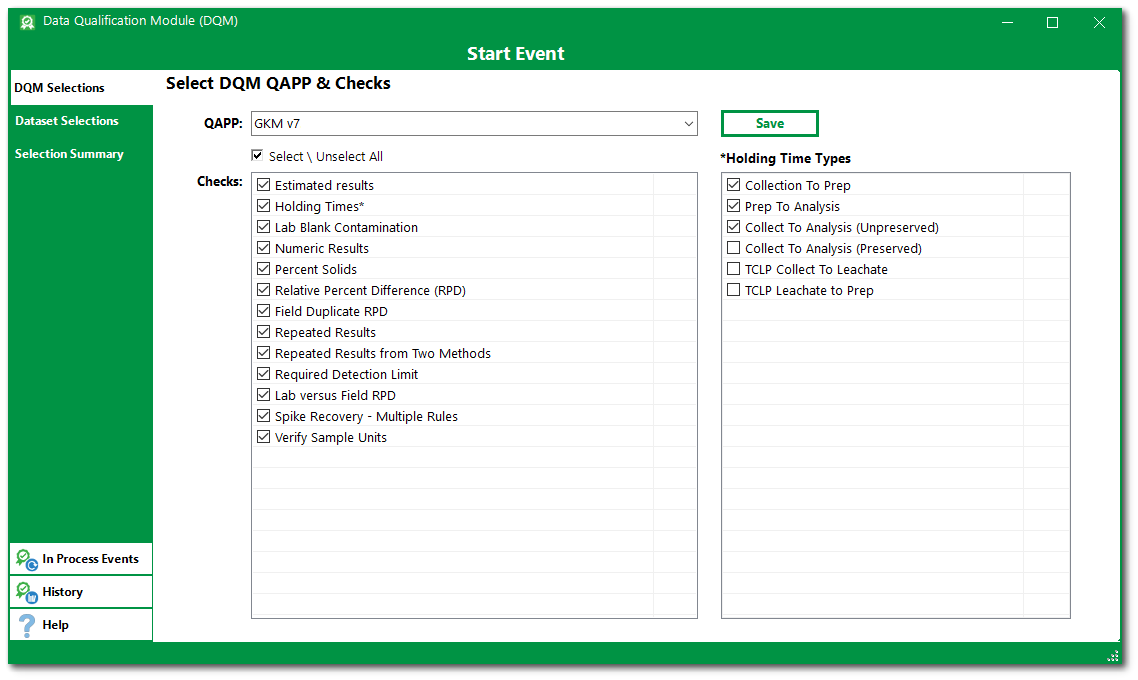
4.Click the check boxes to select the desired DQM Checks from the list associated with the selected DQM QAPP. If Holding Times is one of the selected DQM checks, then at least one of the Holding Time Types check boxes must also be selected.
For this exercise, click the check box for Select \ Unselect All to check the boxes next to all checks in the DQM QAPP. The Holding Time Types list will be active. Click the check box for Collection to Prep, Prep to Analysis, and Collect to Analysis (Unpreserved).
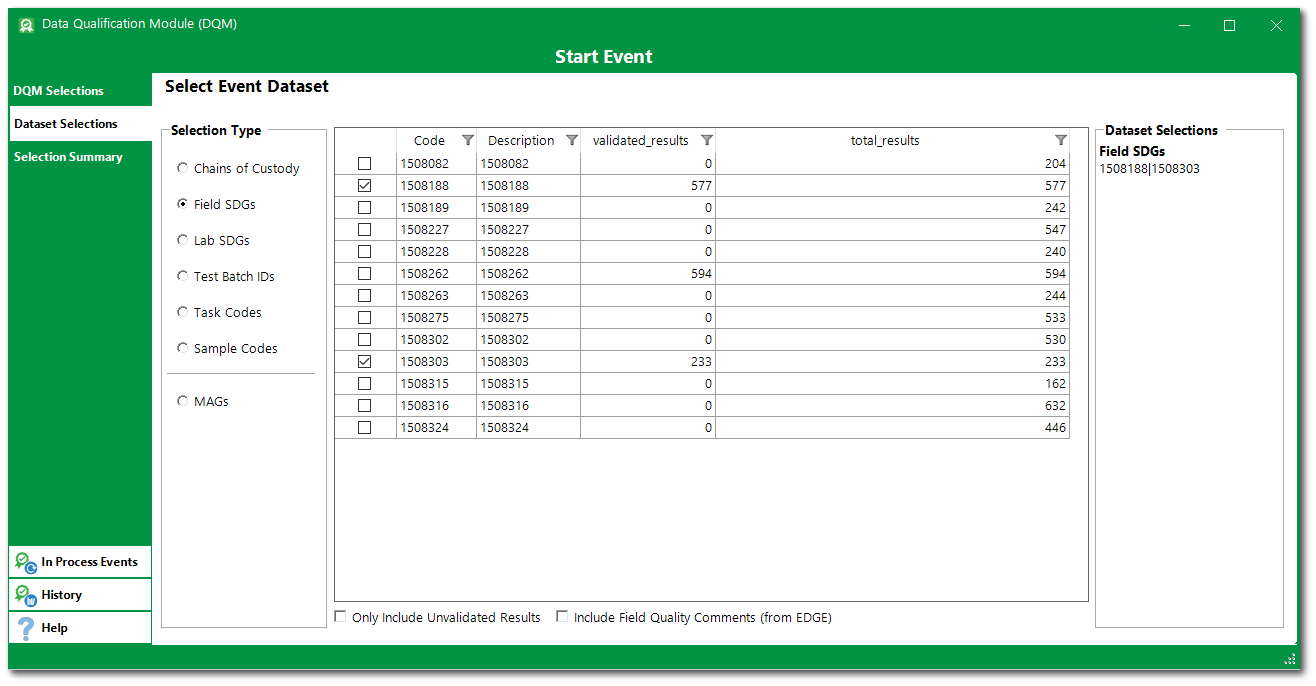
5.Analytical results requiring qualification can be selected by a variety of means, which are denoted in the Dataset Selections tab of the DQM Start Event form. These include:
•Chains of Custody
•Field SDGs
•Lab SDGs
•Test Batch IDs
•Task Codes
•Sample Codes
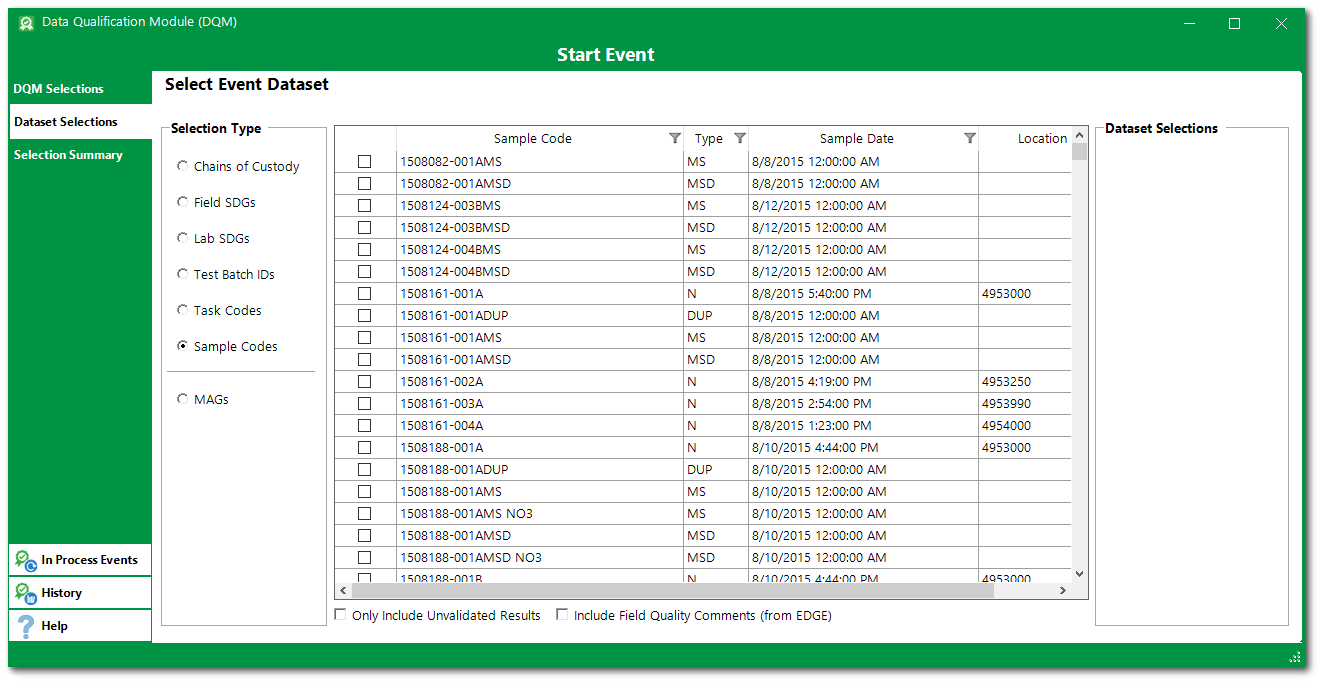
When one of the radio buttons is selected, all available data sets pertaining to that option will display in the selection pane. At least one data set must be selected from the list above to start a DQM event. Multiple data sets of each type can be selected. Data sets from different types can be incorporated into the same DQM event. As analytical data sets are selected, their identifiers will appear in the boxes on the form that correspond to the data type. This provides a summary of all the data sets selected.
|
Unlike most other EQuIS reports, these selections are additive. Therefore, when multiple selections are made, the DQM event will include samples that have one OR another of the selections, not just the samples that have all of them. |
6.Select the desired option(s) from the Selection Type and then click the check boxes for all the data sets that are needed for the data qualification event. If numerous data sets are available in the selection pane, the Filter List text box can be used to find the desired data set(s). The filter defaults to the "Starts With" operator, but entering the wild card asterisk (*) as the first character changes the filter operator to "Contains".
For this exercise, select Field SDGs and then select 1508188 and 1508303.
7.Data sets can also be restricted by using the MAGs option.
|
Unlike the additive property of the Selection List options, selecting a MAG will restrict the results in the event to only those matching the MAG. |
8.Review all selections before initiating the DQM checks in the Selection Summary tab to confirm all intended selections are included.
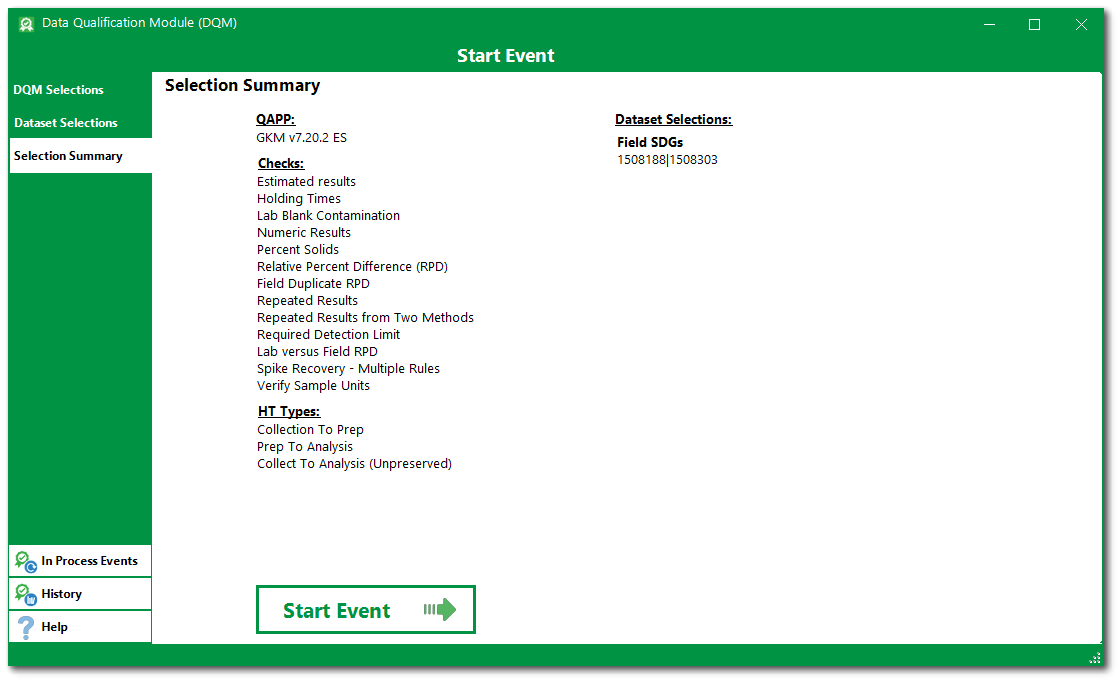
9.Click the Start Event button to initiate the DQM process and start the Event. When the qualification finishes, the Event Review Form opens.
|
Objective: Apply Qualifiers to Data |
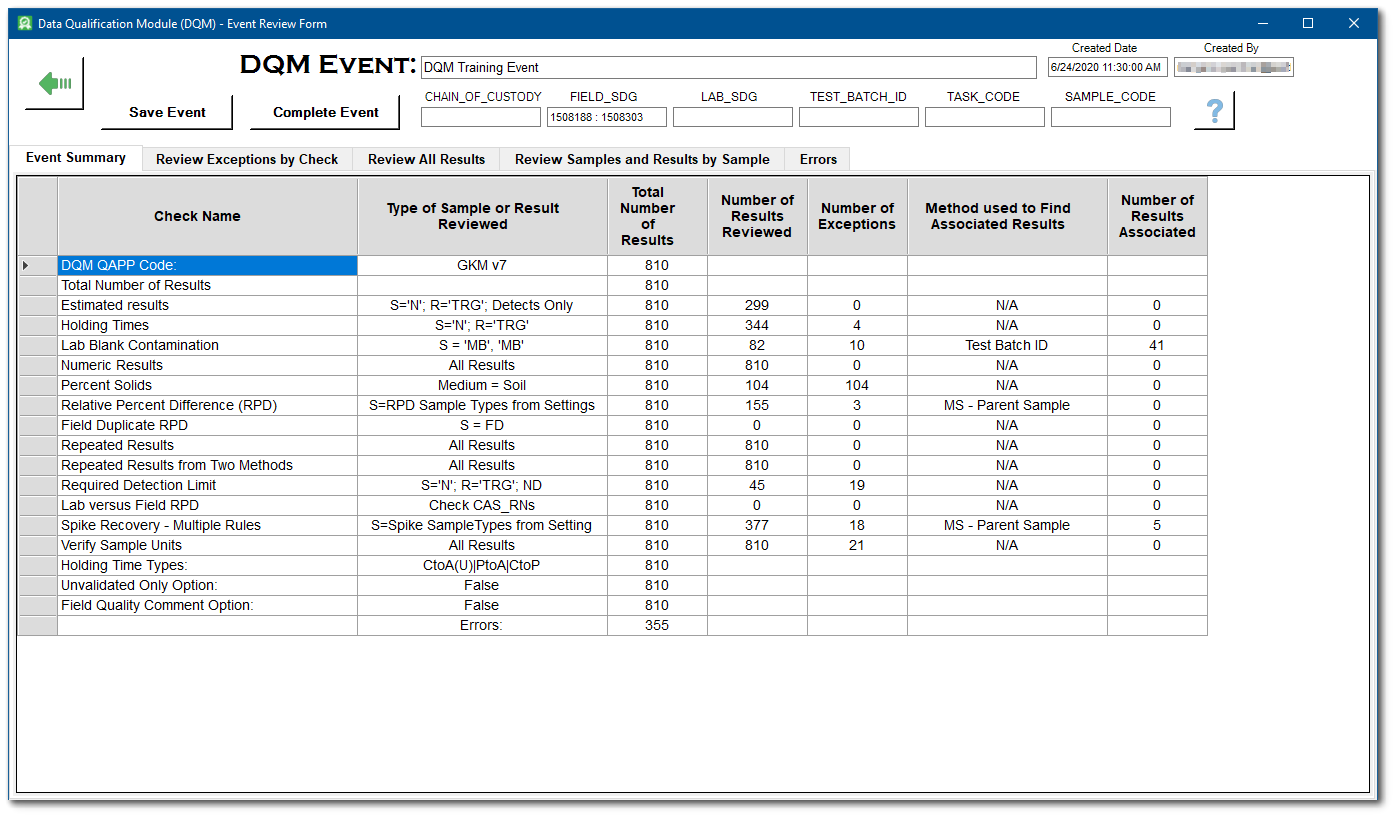
When the Start DQM Event process finishes, the DQM Event Review Form opens and displays results in a series of tabs: Event Summary, Review Exceptions by Check, Review All Results, Review Samples and Results by Sample, and Errors. The Event Summary tab displays a summary of the DQM, the number of results evaluated, and the number of exceptions to the checks. Qualifiers and remarks can be revised on the Review Exceptions by Check, Review All Results, and Review Results by Sample tabs.
|
If errors are encountered during the creation of an event, the Errors tab is displayed first rather than the Event Summary tab. |
1.If errors are denoted on the Errors tab, review and resolve the errors, as possible, before proceeding to the next steps. Once the needed changes are made to resolve the errors, the DQM event will need to be re-started. Some items listed in the Errors tab are informational but related to checks that could not be completed because of the data or QAPP configuration. For example, if the sample concentration of a field sample chosen for MS/MSD exceeds the spike amount times the multiplier, the recovery cannot be calculated and will be included in the list of errors.
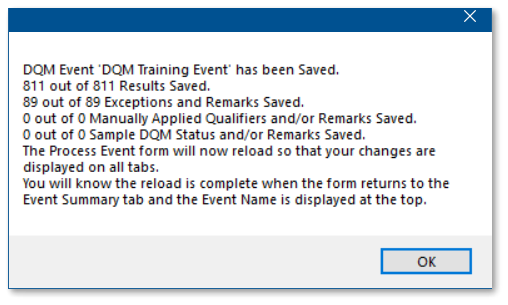
2.The event has not been saved. To leave the event without saving and start a different DQM event, click the Back Arrow ![]() button and then select the Yes button when prompted. To save the newly started event, select the Save Event button, enter an event name in the DQM Event Name window (a default name will populate), and select the OK button. After the event has saved, a screen will appear with details of the save operation. Select the OK button on this screen to reload the DQM Event Review form.
button and then select the Yes button when prompted. To save the newly started event, select the Save Event button, enter an event name in the DQM Event Name window (a default name will populate), and select the OK button. After the event has saved, a screen will appear with details of the save operation. Select the OK button on this screen to reload the DQM Event Review form.
For this exercise, select the Save Event button and enter "DQM Training Event" as the event name.
3.Review the Event Summary tab to determine if DQM found any exceptions to the DQM checks applied to the data set.
For this exercise, note that there are 10 exceptions to the Lab Blank Contamination check.
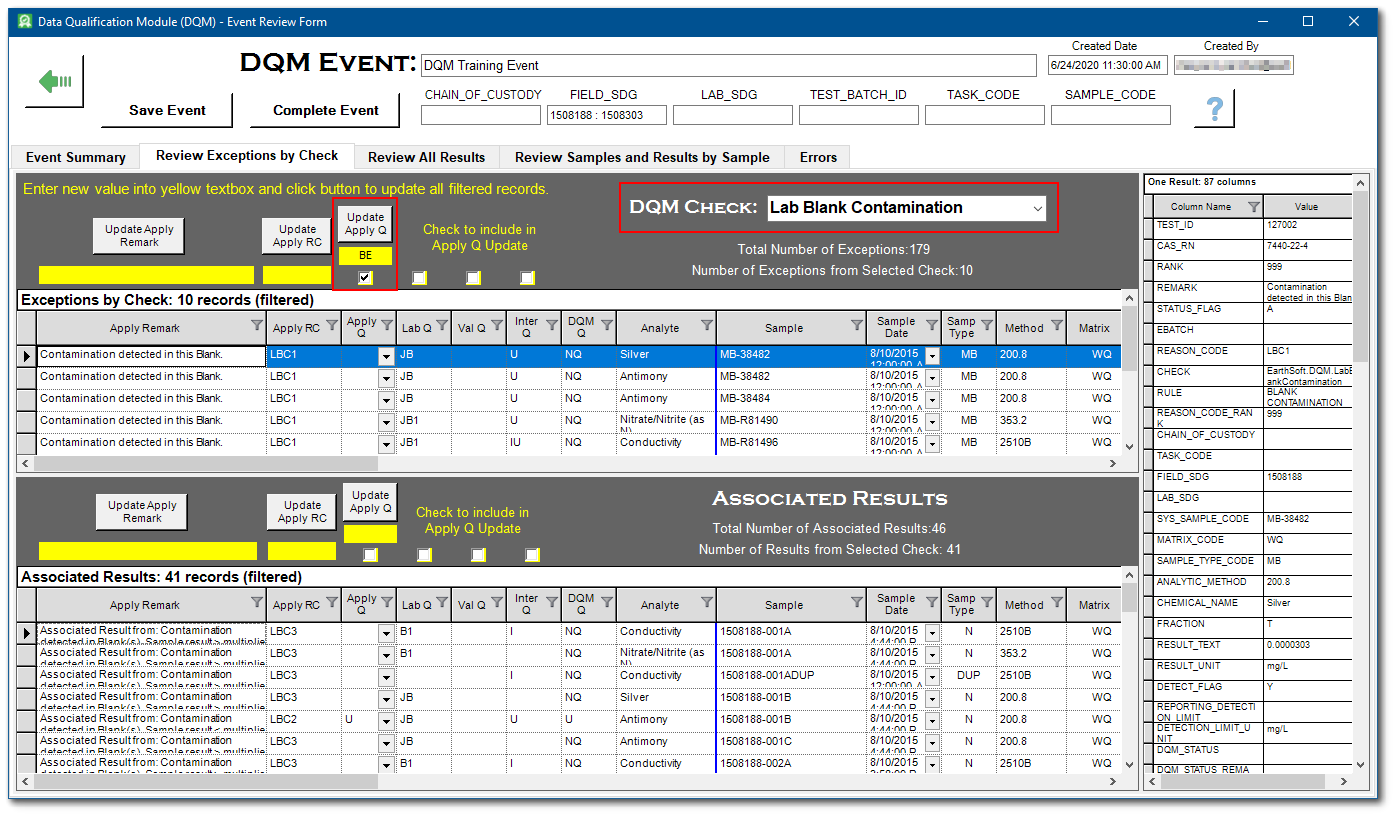
4.If there are exceptions, select the Review Exceptions by Check tab.
5.For each DQM check with an exception, review and change the suggested qualifiers as needed. Only checks with exceptions will be listed in the drop-down menu. If there are no exceptions, the tab will be empty. For additional details related to each exception, scroll to the far right of the table view and review the REMARK field.
6.Use the DQM Check drop-down menu to filter by check. The exceptions are displayed in the upper pane. The associated results are displayed in the lower pane. The result association criteria vary by check and are summarized on the Event Summary tab in the “Method used to Find Associated Results” column. The right-hand vertical pane displays the associated data from the DT_RESULT table for the record selected in either the upper or lower panes.
For this exercise, select LabBlankContamination from the DQM Check drop-down menu.
7.Make any desired qualifiers changes in the Apply Q column. Note, if any filters are applied to the data, only the visible results qualifiers will update with the Apply Q column.
8.Use the Include check boxes, enter a value in the yellow-background text box. Checking the boxes corresponding to the qualifier column below will merge any qualifiers listed in these fields with values in the Apply Q field.
For this exercise, enter "BE" in the yellow text box directly under Update Apply Q, check the box for the Apply Q column
9.Click the Update Apply Q button.
|
Changes can be made to individual records by clicking on the desired column in the record row. To bulk clear qualifiers, filter on the records to be cleared and delete any values in the Update Apply Q field and click Update Apply Q. DQM will restrict qualifiers based on the valid values in the RT_QUALIFIER table. |
|
The Save Event button turns red when changes have been made to Apply Qualifiers and/or Apply Qualifier Remarks fields. The Save Event button turns black after the changes have been saved. |
10.Select the Save Event button. After the event has saved, a screen will appear with details of the save operation. Select the OK button on this screen to reload the DQM Event Review Form.
|
When changing any of the Apply Qualifiers and/or Apply Qualifier Remarks, Save is required before you leave that tab or the changes will be lost. |
11.Select the Review All Results tab. All records from the Analytical Results Report run during the Start DQM Event are displayed. The right-hand vertical pane displays the associated data for the record selected.
12.Filter the results to narrow focus on desired samples by clicking the Filter ![]() button on any column header.
button on any column header.
For this exercise, click on Filter icon in the Analyte column to open the Selection window. Click the Select All box to clear all the selections and then click on Lead. Select the OK button to apply the filter.
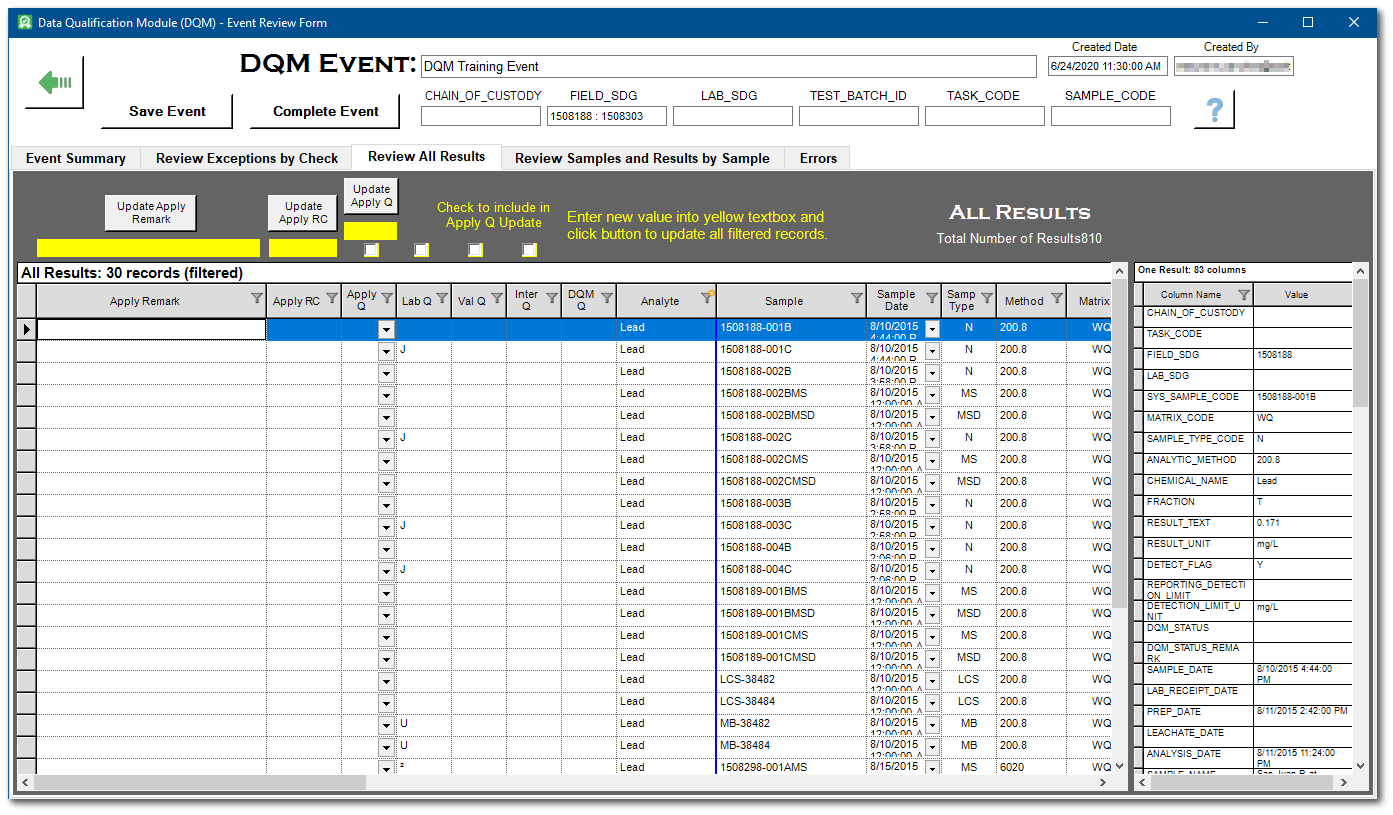
13.Review and edit qualifiers and remarks as needed.
14.If changes were made, select the Save Event button.
15.After the event has saved, a screen will appear with details of the save operation. Select the OK button on this screen to reload the DQM Event Review form.
16.Select the Review Samples and Results by Sample tab. Each sample from the Analytical Results output is listed in the upper pane. The results for each selected sample are displayed in the lower pane. When a result record is selected, all associated data from the Analytical Results Report are displayed in the vertical pane.
The DQM_STATUS and DQM_STATUS_REMARK columns in DT_SAMPLE allow samples with problems during the collection process to be marked. The DQM_STATUS can be updated by entering a value in the yellow-background text box under the Update DQM Status button and then clicking the Update DQM Status button, or by entering a new value directly in the DQM Status column of a sample row. The DQM_STATUS_REMARK can be updated by entering a value in the yellow-background text box under the Update DQM Status Remark button and then clicking the Update DQM Status Remark button, or by entering a new value directly in the DQM Status Remark column of a sample row.
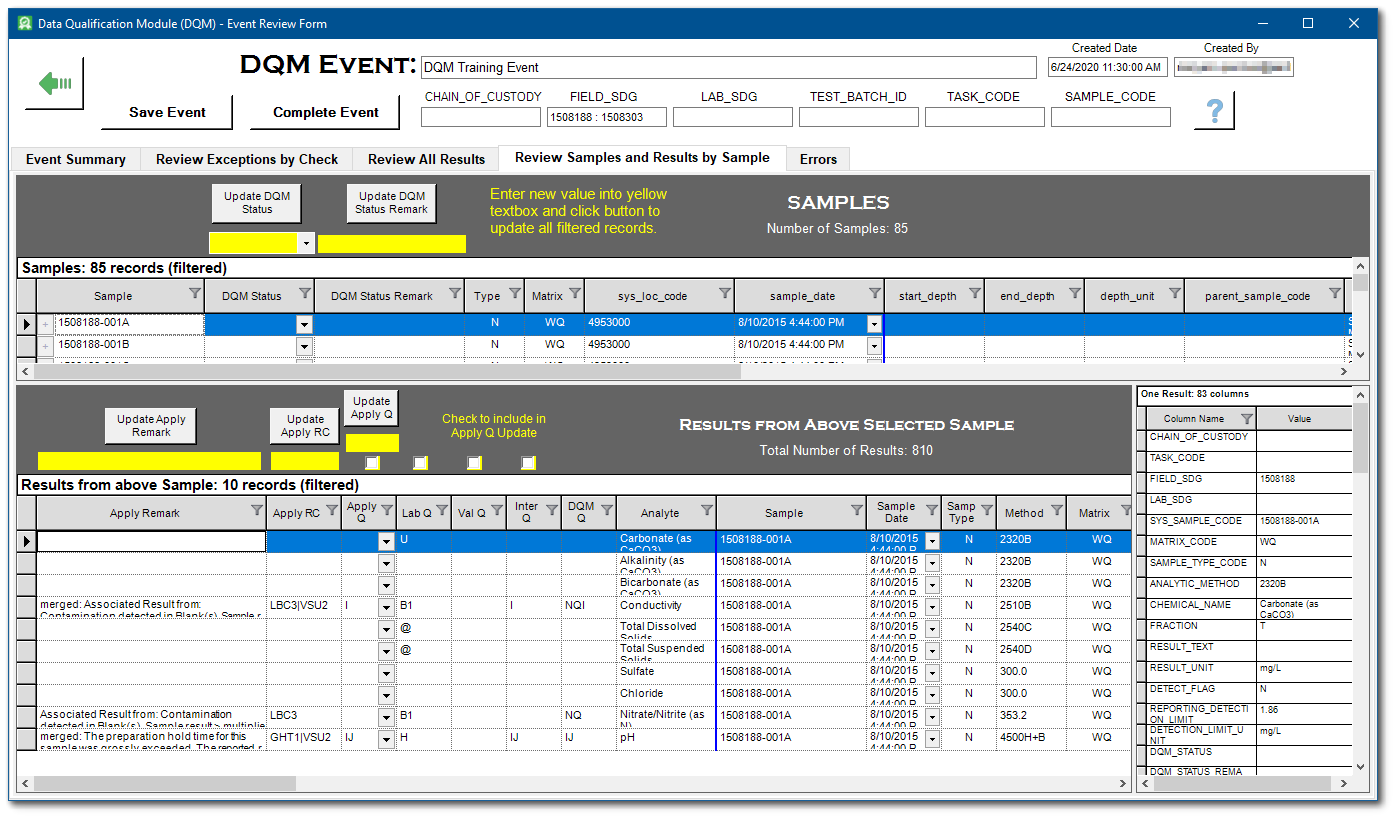
17.For each sample selected in the upper pane, qualifier changes should be made in the Apply Q column in the lower pane.
a.Remark changes should be made in the Apply Remark column.
b.To make changes to remarks across all records, enter the new remark in the yellow-background text box and then click the Update Apply Remark button.
c.Changes can be made to individual records by clicking on the desired column in the record row.
d.To make changes to qualifiers across all records, use the Include check boxes, enter a value in the yellow-background text box, and click the Update Apply Q button.
18.If changes were made, select the Save Event button. After the event has saved, a screen will appear with details of the save operation. Select the OK button on this screen to reload the DQM Event Review form.
|
Objective: Reopening a DQM Event |
A DQM event can be re-saved repeatedly during the validation process and reopened to continue the review. This can be critical for data sets with numerous records that may require multiple days to review.
1.When returning to work on an event, click In Process Events from the DQM ribbon to open the
DQM In Process Events form.
![]()
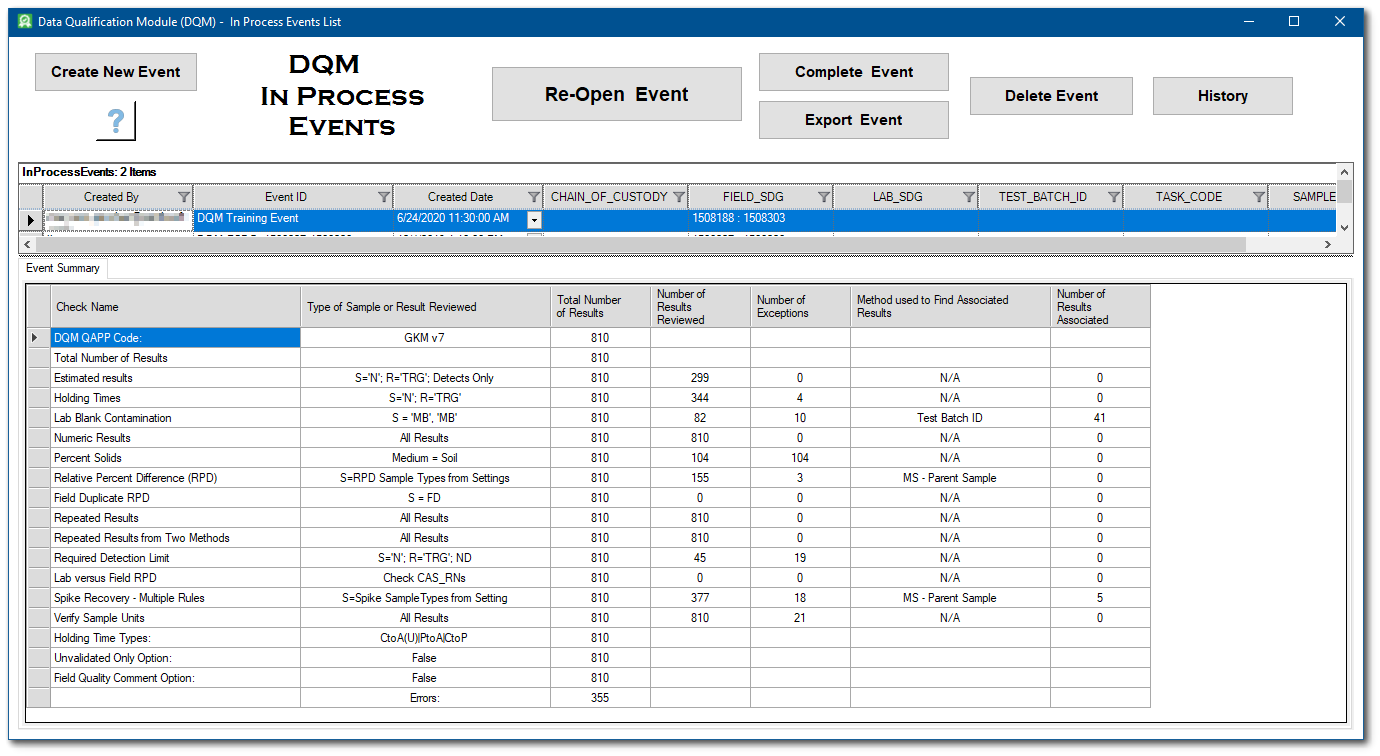
2.The In Process events are listed in the upper pane of the DQM In Process Events form. These events can be sorted and/or filtered by any of the column headers.
3.The bottom of the DQM In Process Events form displays the Event Summary for the selected event, and updates automatically as a different event is selected. Select the desired event to continue the data validation review.
For this exercise, select the DQM Training Event.
4.Select the Re-Open Event button to open the selected event in the DQM Event form.
5.Continue with the data validation effort. Remember to save any changes.
6.Clicking the Back Arrow ![]() button will return the user to the DQM In Process Events form.
button will return the user to the DQM In Process Events form.
|
Objective: Completing and Exporting a DQM Event |
1.At any point during or after the data validation review, click the Export Event button (from either the In Process Events form or the History form) to open the Export Event form.
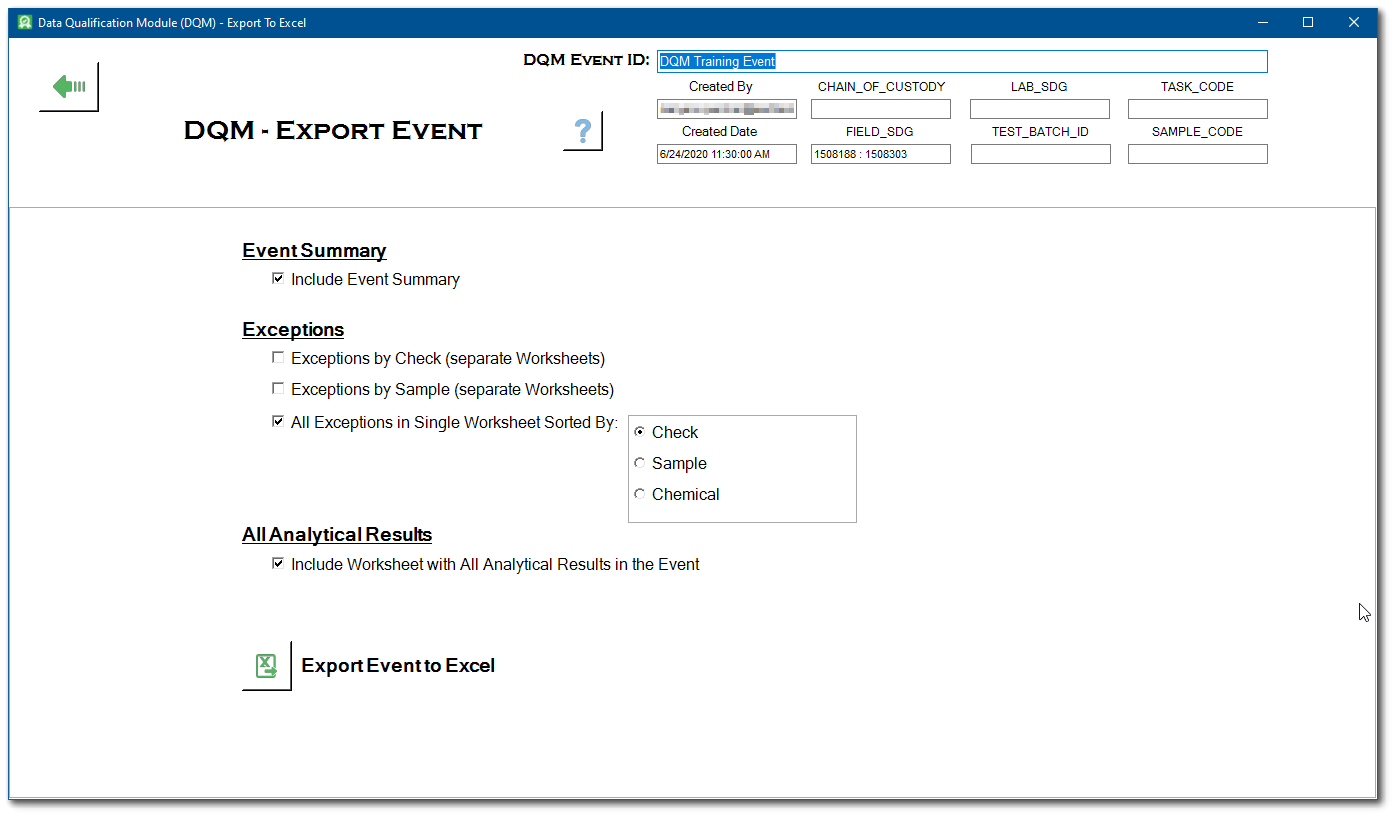
The Export Event form provides several options for exporting data from the DQM event to a Micrsoft Excel spreadsheet. These options include: an event summary report; an exceptions report by check, sample or chemical; and a report containing all analytical results and associated qualifiers in the event. Select all of the desired reporting options.
2.Select the Export Event to Excel button to open the Save As window.
3.Browse to the desired directory and rename the file as desired. Select the Save button to open the report in Excel.
4.When the data validation review is complete, click the Complete Event button from either the DQM Event form or the DQM In Process Event form to open the Complete Event form.
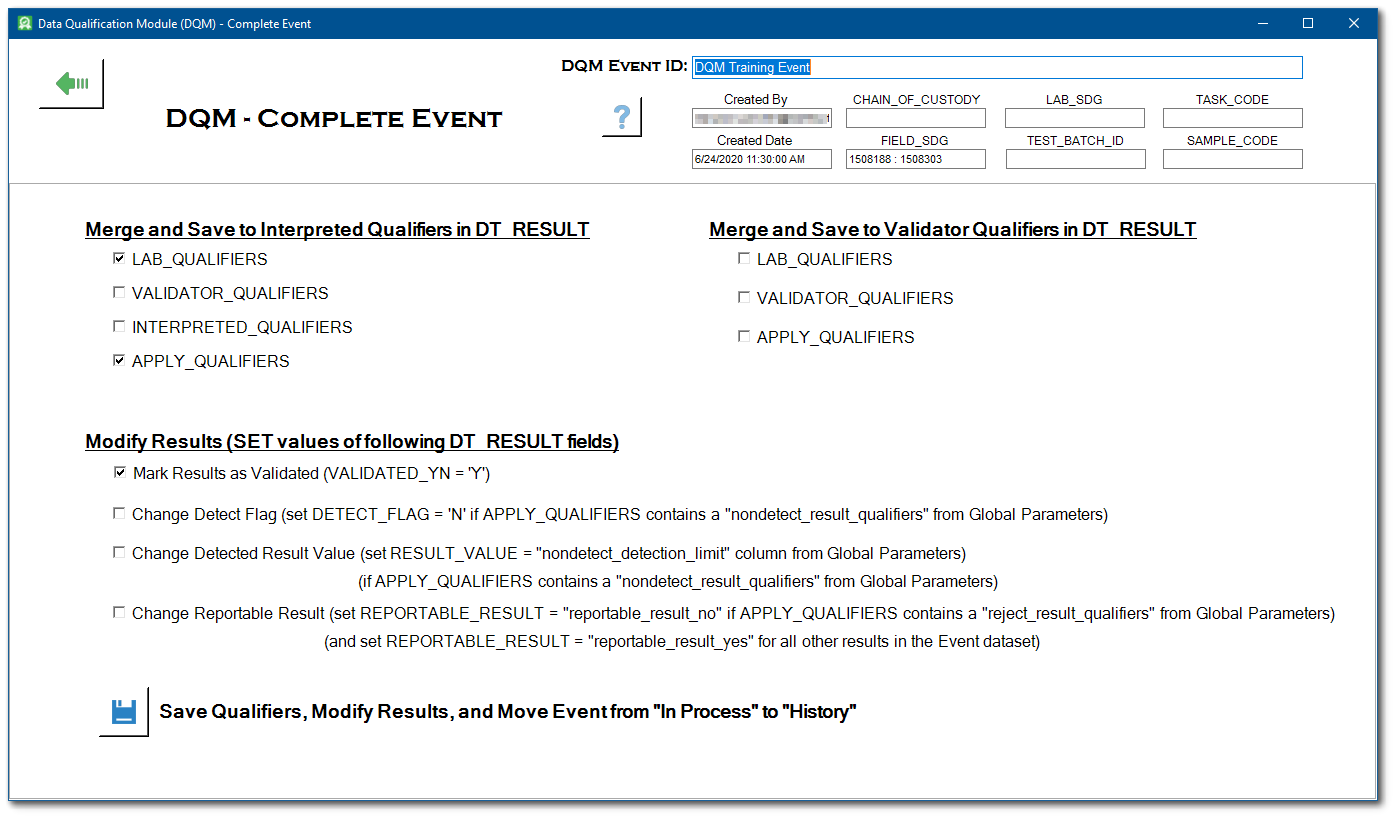
The Complete Event form provides several options for saving qualifiers to the DT_RESULT table and making other changes to DT_RESULT based on those qualifiers. For the Merge and Save to Interpreted Qualifiers option, the selected qualifiers are merged and saved to the INTERPRETED_QUALIFIERS column in the DT_RESULT table. For the Merge and Save to Validator Qualifiers option, the selected qualifiers are merged and saved to the VALIDATOR_QUALIFIER column in the DT_RESULT table.
Regardless of which option is chosen, the selected qualifiers are merged together such that no qualifier is repeated before they are saved to either the VALIDATOR_QUALIFIERS or INTERPRETED_QUALIFIERS column. For example, if the LAB_QUALIFIERS = "U", the VALIDATOR_QUALIFIERS = "J", and the APPLY_QUALIFIER = "UJ", the merged value = "UJ".
5.Check the merge and save options to meet the data validation requirements.
For this exercise, select the INTERPRETED_QUALIFIERS and APPLY_QUALIFIERS in the Merge and Save to Interpreted Qualifiers option.
6.There are four options for how to set fields in the DT_RESULT table for the validated results. The default is Mark Results as Validate (VALIDATED_YN is set to "Y"). At least one option must be selected, but all four options can be selected.
For this exercise, keep the default option.
7.Select Save to complete the event. When this button is clicked, the event is completed with the selected changes made to the DT_RESULT table. If the changes to the database are successful, then the event is moved to the History list (by changing the STATUS_FLAG of the User Report to "R" in ST_USER_REPORT). The records in ST_USER_REPORT_PARAMETERS, DT_NOTE, DT_RESULT_DQM and AT_DQM_RESULT are kept the same to allow the event to be viewed or reopened.
8.After the event has saved, a screen will appear with details of the save operation. Select OK on this screen to load the DQM Completed Events form.
|
Objective: View Qualification Histories |
The History form allows review of previous DQM events that have been processed and completed. The History form only displays DQM events that have been completed. Events that have been started but not completed are listed on the In Process form.
1.Select the DQM ribbon, then click History to open the DQM Completed Events form.
![]()
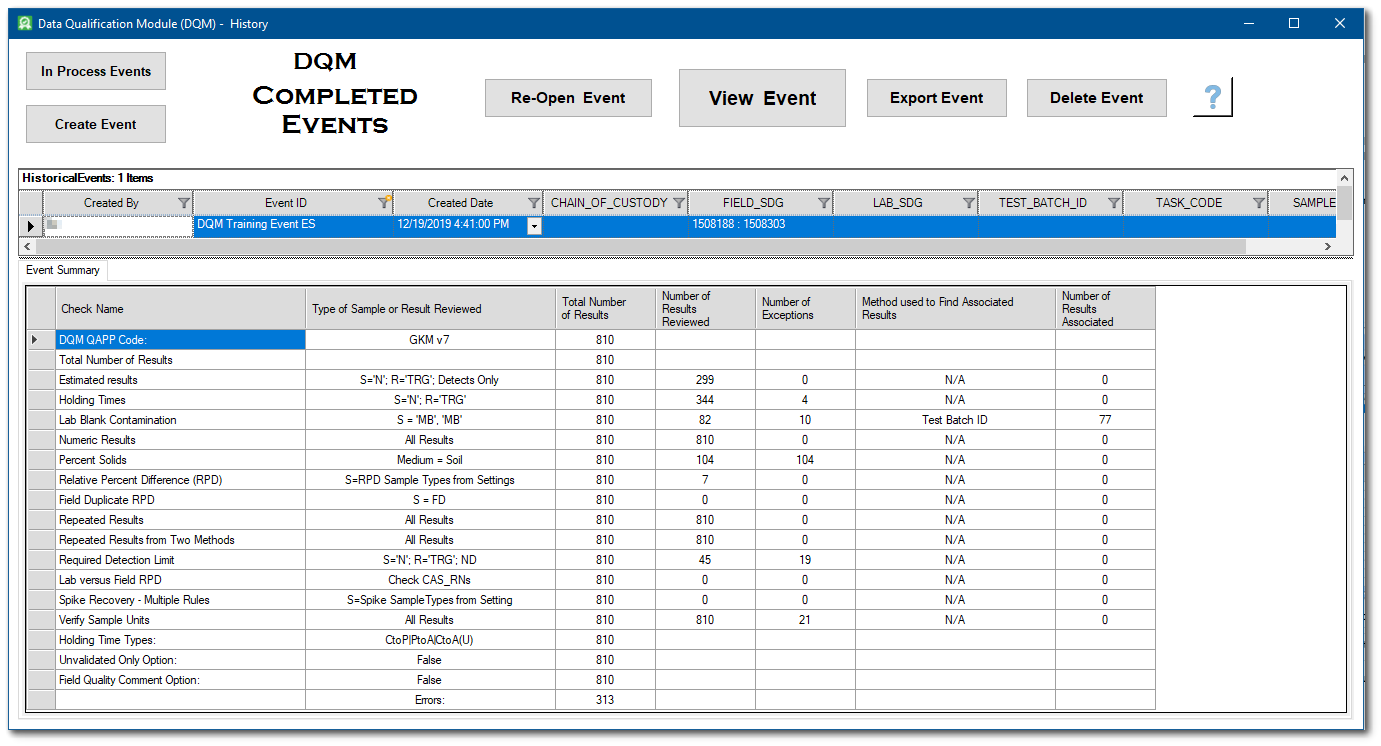
Historical events are listed in the upper pane of the DQM Completed Events form and can be sorted and/or filtered by any of the column headers. The bottom pane of the DQM Completed Events form displays the Event Summary for the selected event, and updates automatically as a different event is selected. Select the desired event to view, re-open, export or delete.
2.The View Event button will open the selected event in the In Process Event Form, but all data columns will be read-only and the Update buttons will be disabled.
3.The Re-Open Event button will change the status of the selected event back to "In Process" and will open the In Process Event form in edit mode.
4.To permanently discard a data validation effort, select the Delete Event button to delete the selected event from the ST_USER_REPORT table.