Overview
The Data Qualification Module must be installed and configured prior to usage. DQM only needs to be installed one time. Configuration of DQM check, rules and parameters must be completed for each project Quality Assurance Project Plan (QAPP). The DQM QAPP checks must be loaded by an EQuIS Administrator prior to creating an event in DQM and performing data validation. The initial checks may be loaded using EQuIS Professional EDP.
The Data Qualification Module is organized around a number of data quality checks that can be selected to run against a data set. Any or all of the checks can be selected to run against the data set. Each check has one or more rules that are applied to each result record in the data set to determine if a data qualifier should be applied to that record. Each rule has its own qualifier, but more than one rule can have the same qualifier. Each check also has a set of parameters, which allows DQM to be customized without changing any code.
DQM is organized around a primary key field, DQM_QAPP_CODE, which allows all of the DQM checks, rules, and parameters to have different values for different agencies, regions, individual QAPPs, etc. For each DQM_QAPP_CODE uploaded or copied, the user can modify the parameters, qualifiers, and remarks associated with each check/rule. Note that RT_DQM_CONTROL_LIMITS defines QAPP-specific control limits for certain checks.
Every DQM QAPP must have a Global Parameters "Check". The Global Parameters check holds the parameters used by all other checks within a given DQM QAPP and can be easily modified in the Parameters tab of the DQM Settings - Checks form. The Global Parameters check is not listed in the Check menu on the DQM Start Event form because it does not run an actual check.
Exercise Scenario
We have received a new project QAPP that includes data validation requirements. A new DQM QAPP needs to be created based on this information. As data validators and DQM administrators, we will review the DQM settings to ensure these meet the QAPP project requirements.
|
Prepare DQM to allow data validators to qualify data according to the desired project QAPP. |
|
Exercise Objectives |
•Install DQM
•Load EQuIS DQM Checks via EQuIS Professional EDP
•Configure EQuIS DQM Checks in the Settings Form
Skills, Software and Permissions Required
•EQuIS Professional 7 must be installed on the workstation with DQM enabled during installation
•.NET Framework 4.7.2 or higher must be installed on the workstation
•Access to the Premier Data or Premier Data & Graphics EQuIS Libraries
•Administrator permissions are required for the desired facilities
•Proficiency in EQuIS Professional EDP is recommended
•Understanding of project QAPP requirements
|
Objective: Install DQM |
The installation of DQM is a three-step process: 1) Install the DQM application files during the custom setup step, 2) Publish the DQM report .dll file (EarthSoft.Reports.Library.63867.dll) to the EQuIS database, and 3) Apply the DQM Schema to the EQuIS database. Steps 2 and 3 must be performed for each EQuIS database that will utilize DQM.
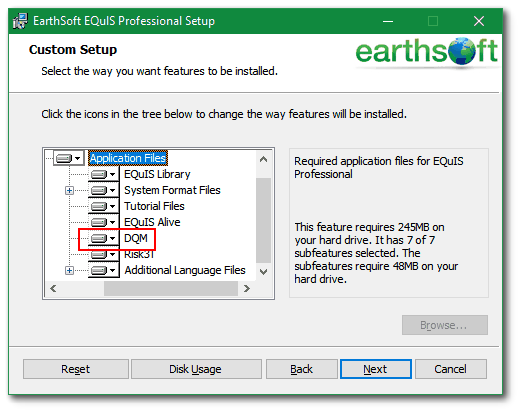
1.Select the DQM module during the installation of EQuIS Professional Version. If EQuIS Professional is already installed, the installer can be run again to add the DQM module.
2.When installation is complete, verify that EarthSoft.Reports.Library.63867.dll is in the EQuIS Professional folder (e.g., C:\Program Files\EarthSoft\EQuIS).
3.Open EQuIS Professional and publish the EarthSoft.Reports.Library.63867.dll to the EQuIS database. Instructions for publishing reports can be found in the Report Publisher article.
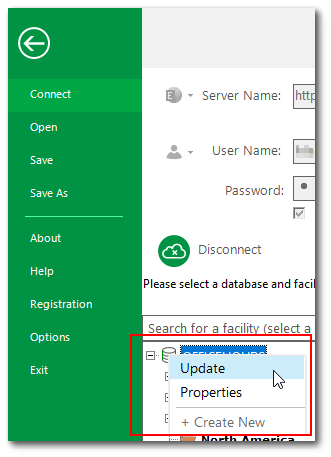
4.To apply the DQM Schema, select File to access the main EQuIS menu and then select Connect. Right-click on a database from the database list and then select Update. Administrative permissions are required to configure the EQuIS database.
5.Right-click anywhere in the Update Database(s) window and hover the mouse over Module(s). This will display all of the Schema update files available in the db directory of the EQuIS Professional installation, usually C:\Program Files\EarthSoft\EQuIS\db. Check the DQM Schema.
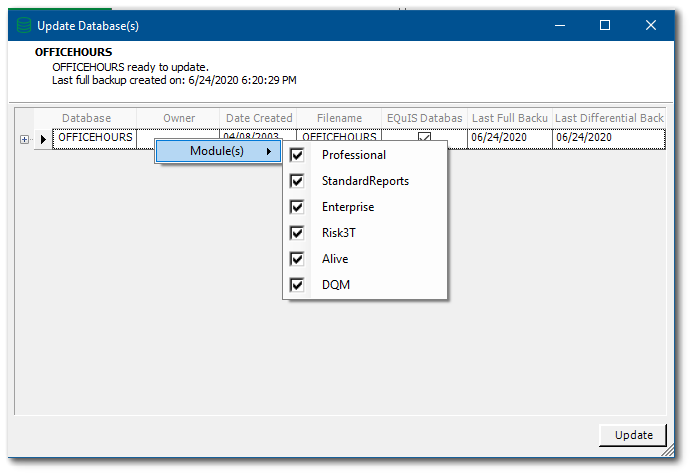
6.Select and highlight the EQuIS database record of interest with a left-mouse click. Multiple databases can be selected using the SHIFT + click, or CTRL + click functionality common to multiple selections with Windows.
7.With the database(s) highlighted, click on the Update button. See the Update EQuIS Database article for more details.
|
Objective: Load EQuIS DQM Checks via EQuIS Professional EDP |
A DQM QAPP EDD can be created and uploaded into the EQuIS database via Professional EDP. When creating a DQM QAPP EDD, utilize the template file DQM Starter QAPP.xlsx (typically located in C:\Program Files\EarthSoft\EQuIS\Formats\DQM).
Review and modify the template file, based upon the actual Project requirements. See the Reference material for descriptions of specific checks as well as excerpts of data from an example Project QAPP. Perform the following steps to create the new DQM QAPP EDD:
•Save the file with a new name that contains the name of the project or DQM QAPP.
•On the worksheet RT_DQM_QAPP, populate the DQM_QAPP_CODE with the name of the DQM QAPP. Populate the other fields in the worksheet as desired. Multiple DQM QAPP Codes can be defined in the same spreadsheet.
•Modify each tab of the EDD to match the new QAPP Codes by deleting and modifying as necessary.
•On the worksheet RT_MATRIX, populate the MATRIX_CODE and MATRIX_DESC with all the field matrices that are applicable to the project.
•Review and modify all qualifiers specified on the RT_DQM_RULE tab.
•Review and modify all parameters specified on the RT_DQM_CHECK_PARAM tab and the holding time limits on the RT_HOLDING_TIME tab.
•Review and modify the control limits on the RT_DQM_CONTROL_LIMITS tab.
1.Open the Windows Start menu and choose All Programs or Apps> EarthSoft> EQuIS Professional and login to the desired facility.
2.Select EDP ![]() from the Import group of the Home ribbon.
from the Import group of the Home ribbon.
3.Select Format ![]() from the Open group of the EDP Home ribbon.
from the Open group of the EDP Home ribbon.
4.Browse to and Open the DQM-refvals.zip format file (typically in C:\Program Files\EarthSoft\EQuIS\Formats\DQM).
5.Select EDD ![]() from the Open group of the EDP Home ribbon.
from the Open group of the EDP Home ribbon.
6.Select the desired DQM QAPP EDD file that supports the project QAPP.
7.Resolve any errors in the EDD and Create and Commit the EDD to the EQuIS database. When using the example DQM Starter QAPP.xlsx file as a template, errors can result due to differences in reference values, especially with respect to MATRIX_CODE and ANALYTIC_METHOD.
|
Objective: Configure EQuIS DQM Checks in the Settings Form |
After a DQM QAPP EDD has been committed to the EQuIS database, DQM settings can be changed further. Configure checks, rules, parameters and qualifier to meet specific project data validation objectives. See the Reference material for descriptions of specific checks as well as excerpts of data from an example Project QAPP.
1.Close EQuIS Professional EDP and return to EQuIS Professional.
2.From within EQuIS Professional, select the DQM ribbon.
3.Select Settings to open the DQM Settings tab in the workspace.
![]()
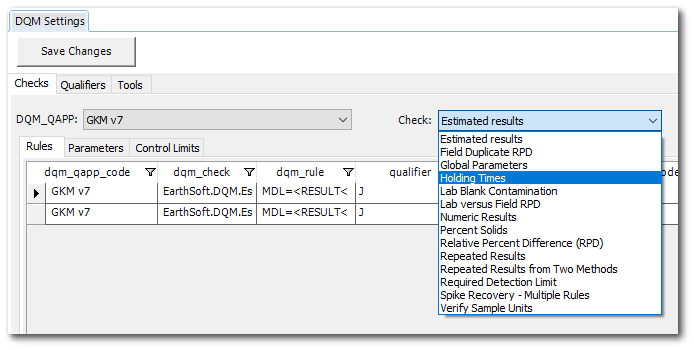
4.From the Checks tab, select the desired DQM QAPP from the DQM_QAPP drop-down menu.
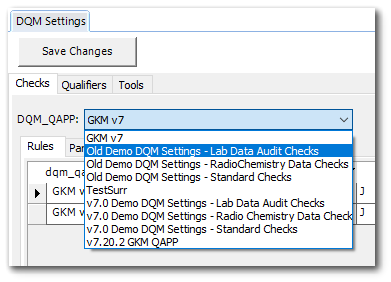
5.Select the desired Check from the drop-down menu.
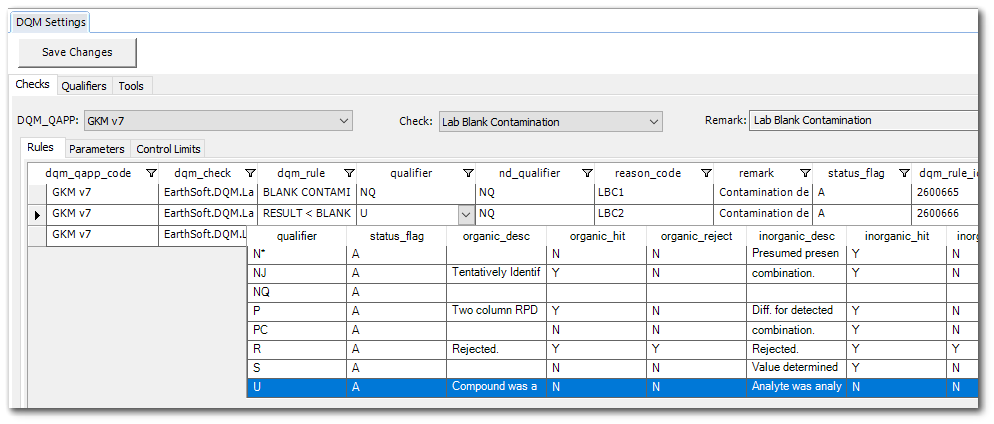
6.On the Rules tab for the selected Check, make changes to the QUALIFIER, ND_QUALIFIER, and REMARK fields as desired. Each rule has its own qualifier, which can be selected from the drop-down list on this tab. The ND_QUALIFIER is used as the DQM_QUALIFIER and APPLY_QUALIFIER during the DQM "Create Event" step when any exception or associated result is non-detect (i.e., DETECT_FLAG = 'N'). New qualifiers can be added in the Qualifiers tab.
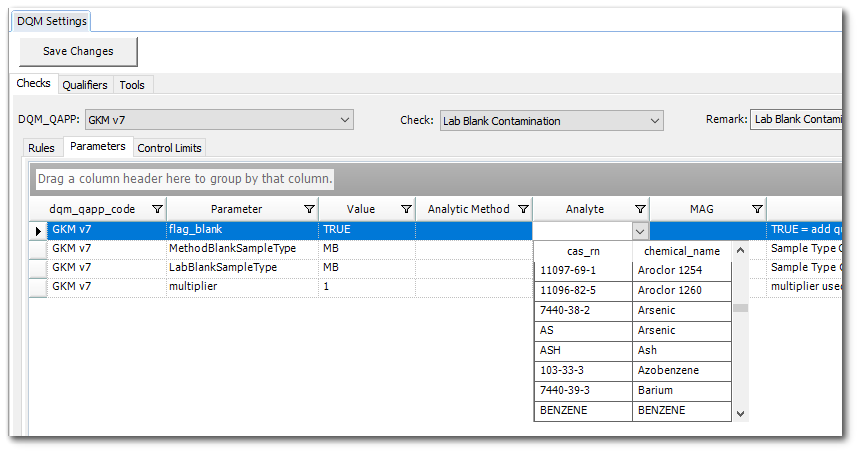
7.Select the Parameters tab for the selected Check. Change the Value, Analytic Method, Analyte, MAG or Remark fields for any parameter as desired. The Parameter and Value fields are required. The Analytic Method, Analyte, and MAG columns allow multiple values to be entered for specific methods and/or analytes for SOME parameters. Use the values to define the scope of the parameter. Leave the Analytic Method, Analyte, and MAG null to assign the value to any and all Analytic Methods, Analytes, and MAGs or use the pull-down menu for each field to select a specific item.
8.Repeat steps 4-7 for each of the checks that will be run in DQM.
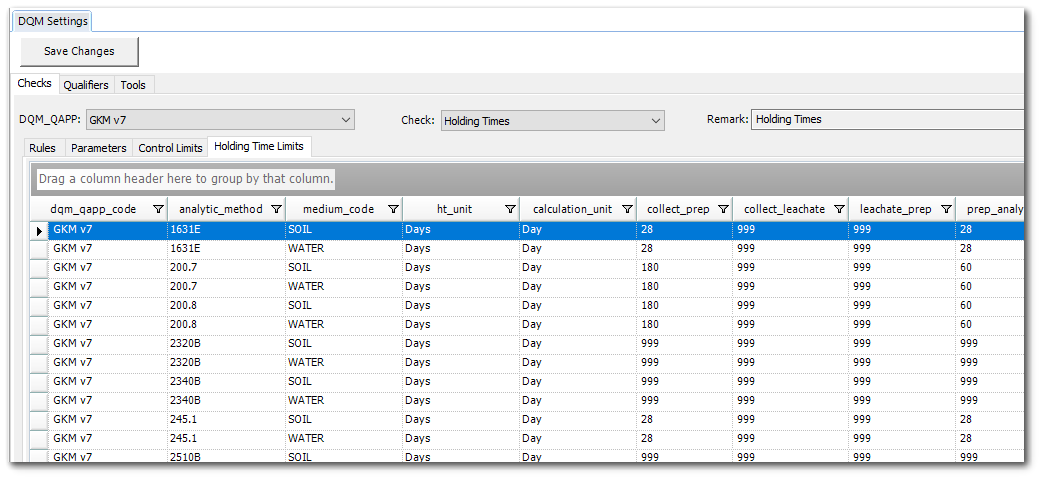
9.Note that the Holding Times Check is a special case. If selected, an additional HoldingTimeParameters tab will appear that allows the RT_HOLDING_TIME table to be edited directly from the DQM Settings tab. ANALYTIC_METHOD, MEDIUM_CODE, HT_UNIT, and CALCULATION_UNIT are required. The Holding Times Check will only be applied to the process steps that have a value in the respective column.
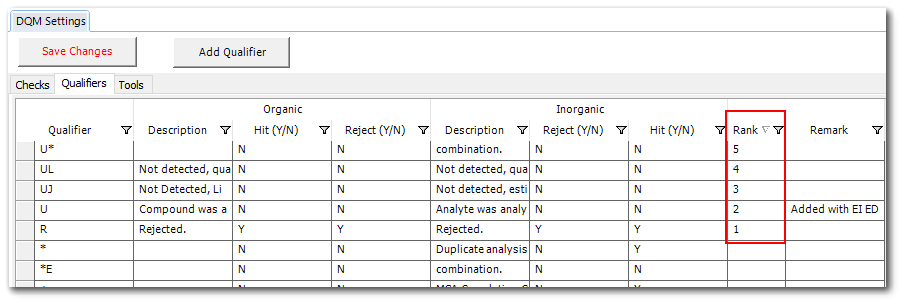
10.Select the Qualifiers tab of the DQM Settings tab. This tab displays the available qualifiers from the RT_QUALIFIER table.
11.Qualifiers can be added and edited on the Qualifiers tab. When several qualifiers are applicable, the rank values determine which qualifier should apply. The rank values are sorted in ascending order—a qualifier with RANK = 1 is the highest priority qualifier (e.g., a qualifier with RANK = 1 is applied when qualifiers of RANK = 2 or 3 are also suggested). The RANK column must be populated to ensure that qualifiers are applied properly when multiple qualifiers are applicable.
|
If Rank is NULL, there is no basis for selecting which qualifier to apply when multiple are suggested. In this scenario, the selection is random. |