Overview
The EQuIS Sample Planning Module (SPM) provides a planning tool for automated sampling events. SPM eliminates repetitive, manual, error-prone data collection. Plan, schedule and track recurring sampling events with SPM.
Exercise Scenario
We have received a Long-term Monitoring and Assessment Plan for the San Juan River in Utah, and we are required to conduct regular field sampling for the Gold King Mine facility. We are using an in-house field crew to collect the samples and perform field activities, and we have contracted a specific laboratory to perform analysis of the samples.
We need to use EQuIS SPM to set up the required sampling events, generate EDD templates for our field crews, and create COCs for the laboratory. We will then track the status of activities with Completeness Reports.
|
Step through the complete SPM workflow to learn how to plan and track recurring sampling events, all the way through sample completeness. |
|
Exercise Objectives |
•Define Sampling Events and Contracts
•Create Planned Tasks
•Schedule Sampling Events
•Prepare for Field Sampling with SPM
•Generate Completeness Reports
Skills, Software and Permissions Required
•EQuIS Sample Planning Module 7 must be installed on the Workstation
•.NET Framework 4.7.2 or higher must be installed on the Workstation
•Read/write permissions to the desired facilities
•Access to the Premier Data or Premier Data & Graphics EQuIS Libraries
|
Objective: Define Sampling Events and Contracts |
Tasks
•Launch SPM
•Define New SPM Plans and Plan Naming Schemas
•Setup Contracts
Launch EQuIS SPM
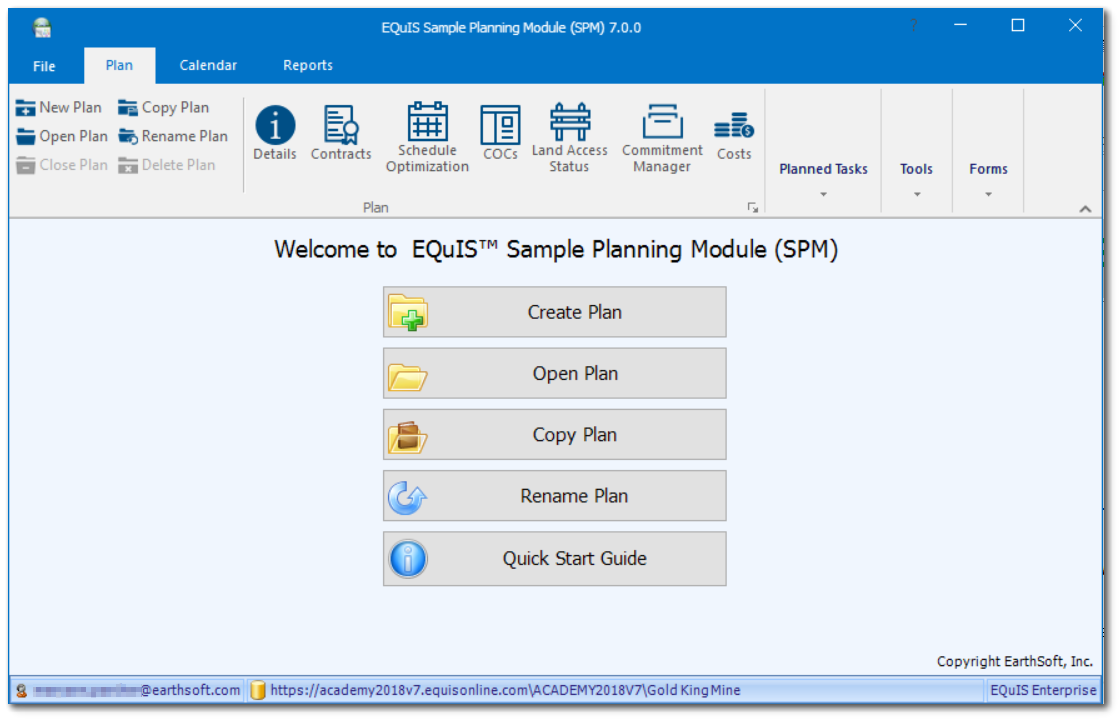
1.From the Start menu, select All Programs> EarthSoft> EQuIS Sample Planning Module.
2.On the EQuIS SPM backstage login to the desired database and facility.
For this exercise, login to the Training Database and then the Gold King Mine facility in the North America folder.
3.The EQuIS SPM Welcome window opens with the current user and EQuIS database connection displayed along the bottom toolbar.
Define New SPM Plans and Plan Naming Schemas
SPM allows naming schemas to be defined for the task code, sample code, and sample name. These schemas ensure that the task and sample codes generated by SPM will be unique within the facility. Forethought should be applied when defining naming schemas to ensure that all desired information is captured and that schemas result in unique identifiers.
1.Select Create Plan from the SPM Welcome window, or select New Plan from the main SPM window.
2.Enter in the desired Plan Code. Note that each plan within a single facility must have a unique Plan Code and the Plan Code is required.
For this exercise, we want to create a San Juan River Monitoring Plan for the Gold King Mine Facility. Enter “SJ River Monit <your initials>” in the Plan Code field of the Plan window as the name of the plan.
|
Required fields are displayed in bold within all EQuIS SPM windows. |
3.Enter other Plan Details information, as desired. Note that only bold items are required.
For this exercise, enter the following plan details:
Description: San Juan River Monitoring
Client: UT DWQ
Start Date: 01/01/2019
End Date: 01/01/2021
4.Select the Task Code drop-down and choose the desired task naming schema.
For this exercise, choose [PLANNED_TASK_CODE]_MMYY_TASK#.
5.Select the Sample Code drop-down and choose from a previously defined naming schema.
For this exercise, choose [TASK_NAME] _YYMMDD_SAMPLE#. Also select the Sample Name drop-down menu and choose [SYS_SAMPLE_CODE]_[SAMPLE_TYPE_CODE].
6.Include Cost units or additional information, as desired.
For this exercise, choose US DOLLARS.
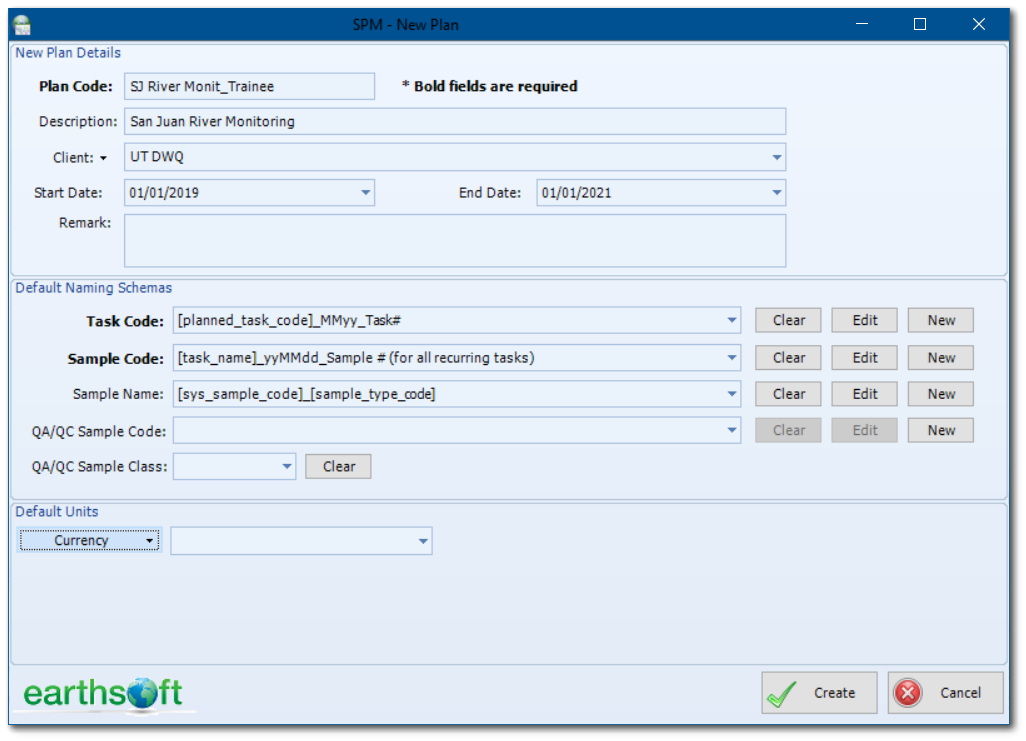
7.Select the Create button to finish the plan creation.
8.When the main EQuIS SPM window opens, edit the Plan’s details by selecting Details ![]() in the Plan group of the Plan ribbon.
in the Plan group of the Plan ribbon.
|
To improve readability within SPM windows, sections are collapsible. Use the |
Setup Contracts in EQuIS SPM
A plan may have multiple contracts, each defining details of analysis agreements with different laboratories. Contracts may describe analytes, analytical methods, containers and costs.
1.Select Contracts ![]() from the Plan group of the Plan ribbon to open the SPM Contracts window.
from the Plan group of the Plan ribbon to open the SPM Contracts window.
2.In the Contracts pane on the left side of the window, select Add ![]() >Plan Specific to add a new contract to the plan.
>Plan Specific to add a new contract to the plan.
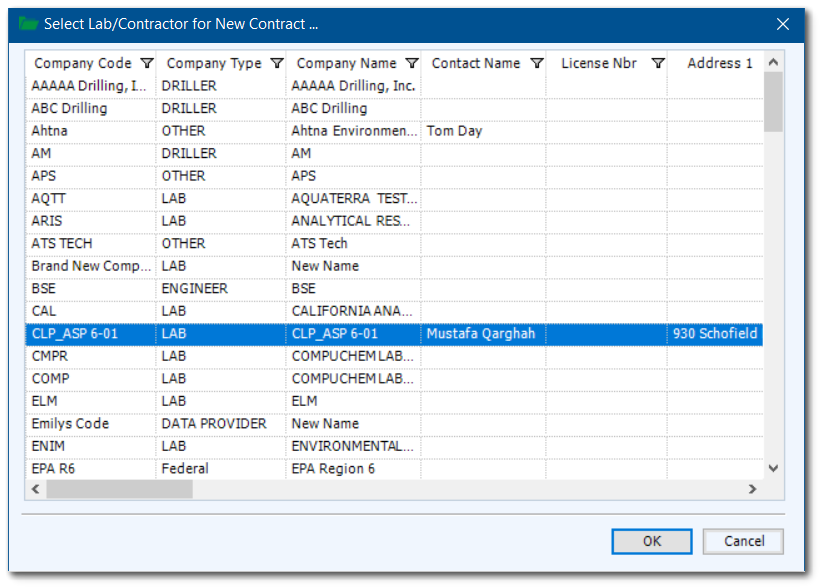
3.A list all of Labs/Contractors from RT_COMPANY will be displayed. Single-click on the desired company to add it to the new contract and then select the OK button.
For this exercise, select CLP_APS 6-01.
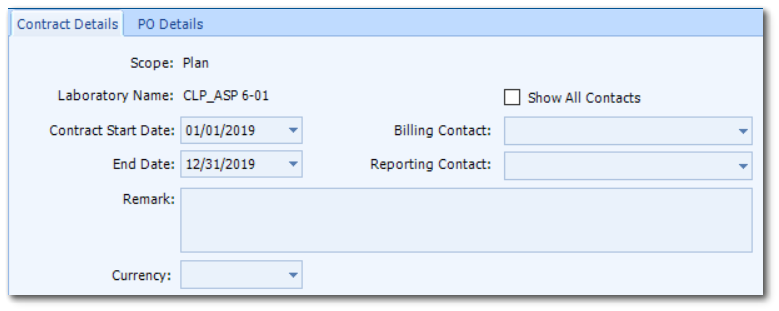
4.Highlight the Company Name on the left pane of the SPM Contracts window and enter the desired information about the contract in the Contract Details tab, such as Contract Start Date and End Date, Billing Contact and Reporting Contact.
For this exercise, enter the following contract details:
Start Date: 01/01/2019
End Date: 12/31/2019
Define Containers for Contracts
The Containers tab in the Contract Items pane stores information on the containers required for laboratory analysis. The container details are optional and used for calculating bottle request forms and container tracking on Chain of Custody forms.
1.Select Add ![]() on the Containers tab in the Contract Items pane.
on the Containers tab in the Contract Items pane.
2.Select the desired container from the list pulled from the RT_CONTAINER table.
For this exercise, select AMBER GLASS BOTTLE - UNPRESERVED_ORANGE_100ML.
3.Select the OK button.
4.Enter the desired details for the selected container in the SPM Contract Container window.
For this exercise, enter the following contract details:
Number of Containers: 1
Container Type: Metals Bottle
Container Size: 100.00
Unit: mL
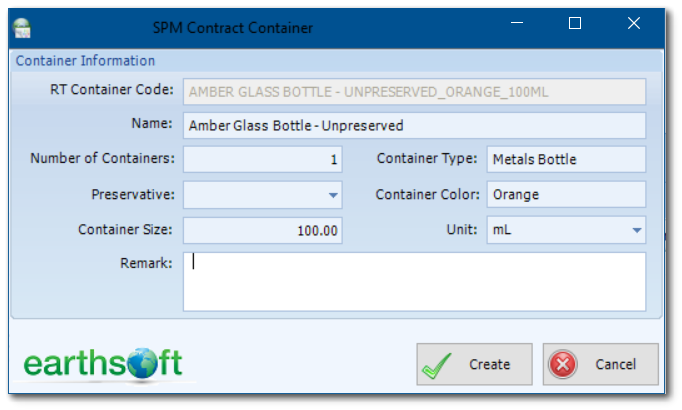
5.Select the Create button to complete the form and add the container requirement to the current contract.
Define Analytic Methods for Contracts
If the Analytic Methods used by the lab differ from the methods defined in the original Method Analyte Groups in EQuIS Professional, define the contract specific methods in the Analytic Methods tab.
1.Select the Analytic Methods tab in the Contract Items pane and then select Add ![]() to open the SPM Contract Method window.
to open the SPM Contract Method window.
2.Select the desired Analytic Method from the drop-down menu.
For this exercise, select 200.7.
3.Define the Contract-specific Name for the analytic method.
For this exercise, enter "ICP 200.7 Heavy Metals".
4.Enter in the other desired details about the method.
For this exercise, enter the following contract details:
Max Turnaround: 7 Days
Cost: 20.00
5.To associate the new container to a contract method, select Use Container to use the desired container for the selected analytic method.
For this exercise, select the Amber Glass Bottle previously defined. Make sure that the Share Container box is checked.
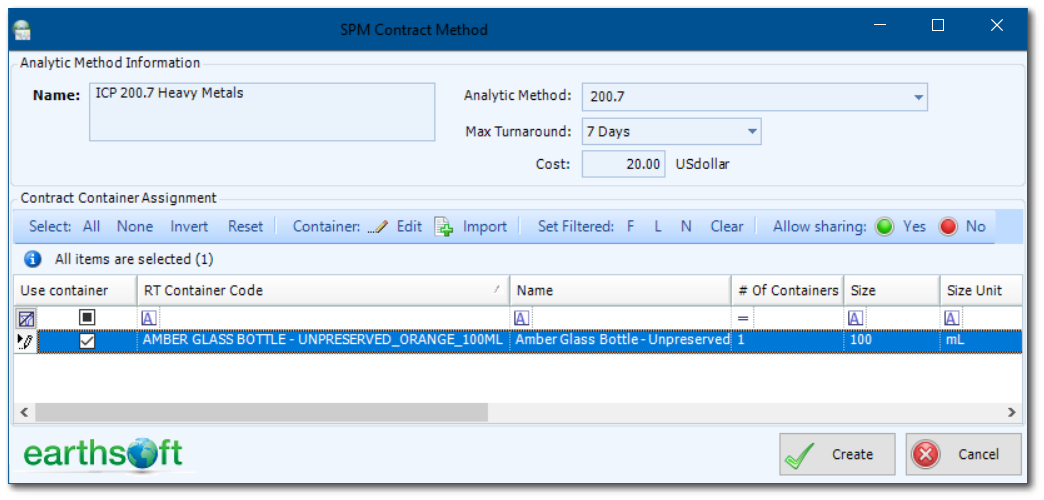
6.Select the Create button.
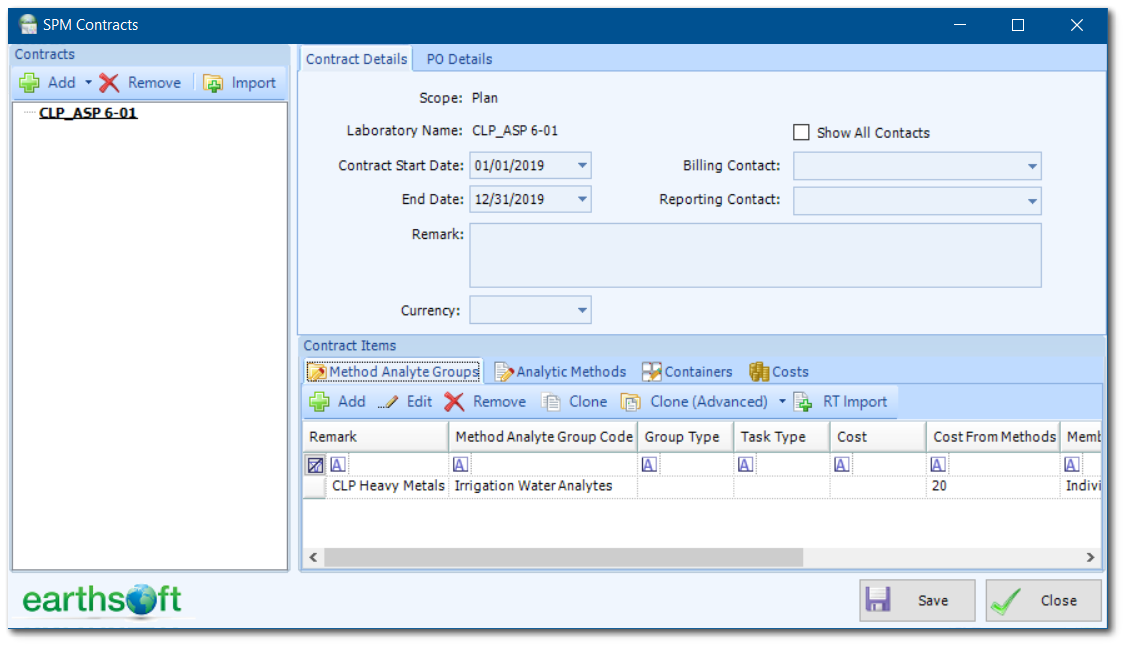
Define Method Analyte Groups for Contracts
To schedule tasks that include samples for laboratory analysis, the Method Analyte Groups (or analyte suites) must be defined.
1.Select Add ![]() from the Method Analyte Groups tab in the Contract Items pane to open the SPM Contract MAG window.
from the Method Analyte Groups tab in the Contract Items pane to open the SPM Contract MAG window.
2.From the drop-down list, select the Method Analyte Group (this is a required field).
For this exercise, select Irrigation Water Analytes.
3.Populate the other desired details for the contract MAG.
For this exercise, enter the Contract MAG Name of “CLP Heavy Metals”.
4.The Contract MAG Members pane lists all of the available analytes for selection. Place a check next to the desired Analytes.
Place a check in the Import Member column for aluminum, arsenic, cadmium, copper, and Lead.
5.Highlight the checked analytes and then select Assign on the Contract Analytical Method ribbon.
6.Select the OK button in the Assign Analytical Method window.
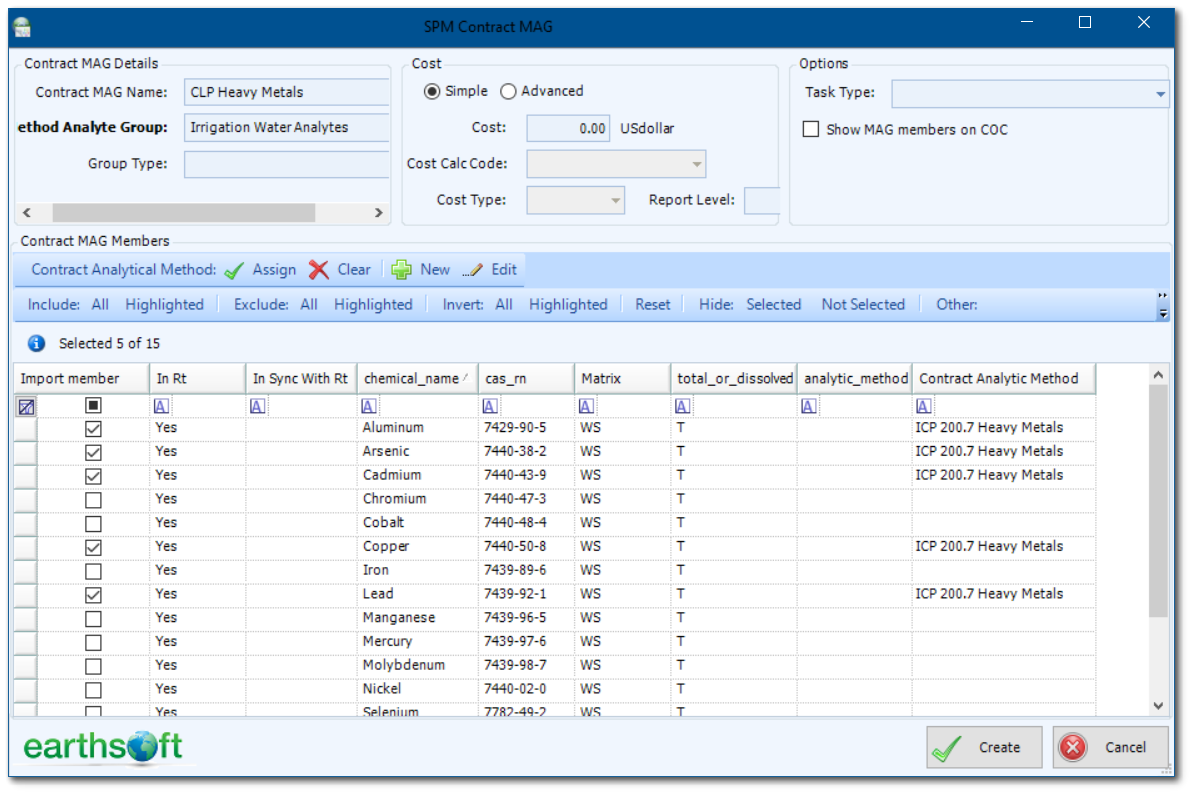
7.Note the population of the contract analytic method for the selected analytes and then select the Create button.
8.Repeat steps 1-7, as desired, to add additional MAGs to a contract.
Define Costs for Contracts (Optional)
The Costs tab in the Contract window stores information on the costs incurred during analysis. The cost details are optional and are used for the Cost Summary Report.
1.Select Add ![]() on the Costs tab in the Contract Items pane.
on the Costs tab in the Contract Items pane.
2.In the SPM Contract Cost window, choose whether the cost will be a Fee or a Discount.
For this exercise, select Fee.
3.Enter in the desired details regarding the cost.
For this exercise, enter "20.00" for the Amount.
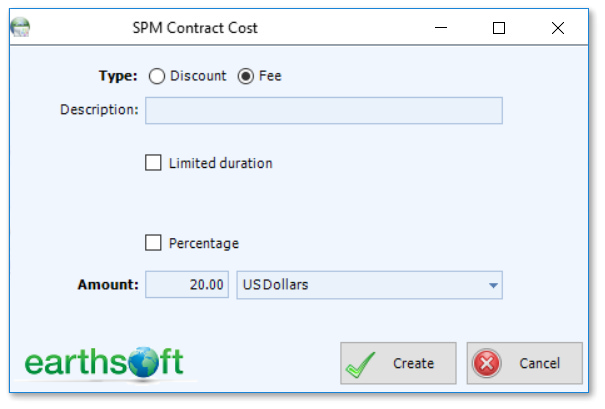
4.Select the Create button to complete the form and add the costs to the current contract.
Complete Contract Setup
1.When the contract is complete, select the Save button in the lower left corner of the SPM Contracts window. 2.Click on the Close button to return to the main Plan window. |
|
|
Objective: Create Planned Tasks |
There is only one planned task per set of recurring scheduled tasks (or field events). Planned tasks include the start date, end date and recurrence of a set of recurring tasks, as well as the task details (e.g., activities, samples, results, and containers).
Tasks
•Plan Tasks
•Set the Recurrence and Preview the Schedule of Planned Tasks
•Define Custom Dates
•Add Activities to Planned Tasks
•Add Samples to Planned Tasks
Plan Tasks
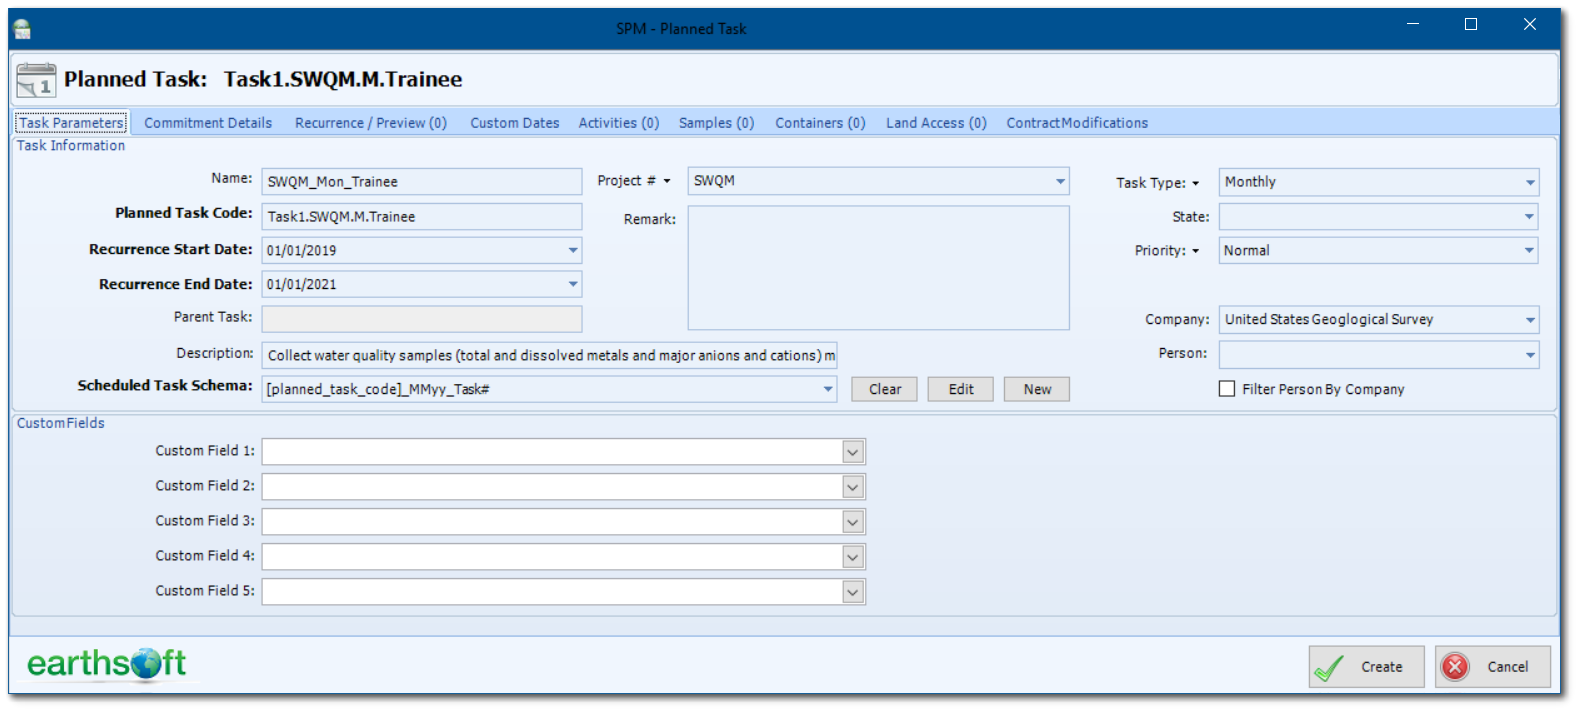
1.Select New ![]() from the Planned Tasks group of the Plan ribbon to open the SPM Planned Task window.
from the Planned Tasks group of the Plan ribbon to open the SPM Planned Task window.
2.On the Task Parameters tab, enter the desired Planned Task Code. This is a required field and should be descriptive of the task. Note that the entered Task Code now appears as the Planned Task name on the window frame.
For this exercise, enter “Task1.SWQM.M.<your initials>” for the Planned Task Code.
3.Enter the desired Recurrence Start Date and Recurrence End Date for the task.
For this exercise, set the Recurrence State Date to 01/01/2019 and the Recurrence End Date to 01/01/2021.
4.Populate the other fields in the Task Information pane as desired.
For this exercise, populate the other Task Information fields as shown below:
•Name: SWQM_Mon_<your initials>
•Project #: SWQM
•Description: Collect water quality samples (total and dissolved metals and major anions and cations) monthly
•Task Type: Monthly
•Priority: Normal
•Company: USGS
|
To setup and track commitments for sampling events, see the optional exercise Track Commitments for Sampling Events. |
Set the Recurrence and Preview the Schedule of Planned Tasks
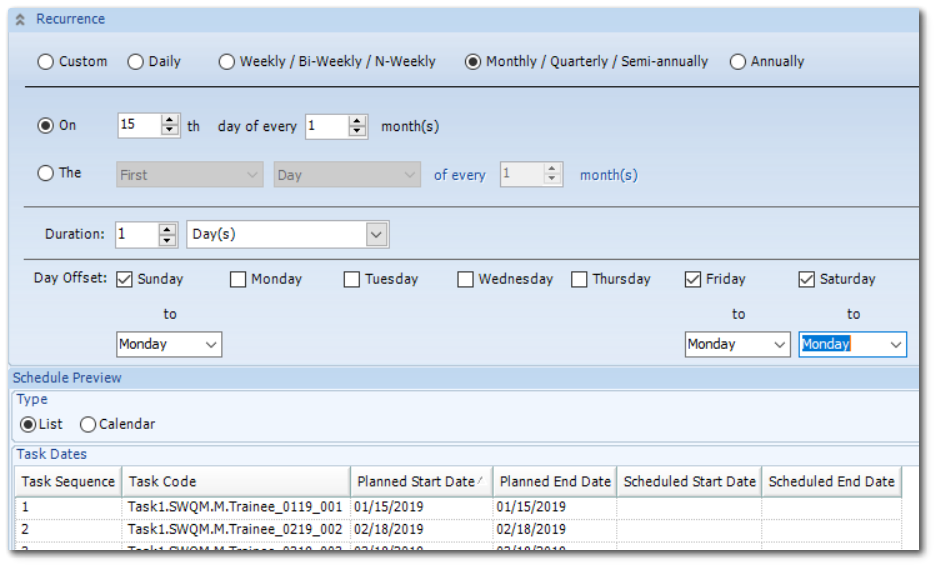
1.Select the Recurrence/Preview tab on the SPM Planned Task window.
2.Select the desired recurrence of the sampling event.
For this exercise, set the Recurrence of the sampling event to Monthly/Quarterly/Semi-annually.
3.Define the parameters of the recurrence.
For this exercise, define the parameters of the recurrence as "On the 15th day of every 1 month(s)”.
4.Select the desired Duration of the sampling event.
For this exercise, use the default Duration of 1 Day.
5.Reschedule Sunday, Friday, and Saturday to all offset to the following Monday.
6.View the schedule of the recurrence under the Schedule Preview pane and adjust the recurrence and Day Offset as needed.
Define Custom Dates
1.Select the Custom Dates tab on the SPM Planned Task window.
2.Choose dates from the Excluded Dates pull-down menu on the right to exclude any dates as necessary.
For this exercise, under Skip Months select March, April, May.
3.Return to the Recurrence/Preview tab and note the changes to the Schedule Preview pane.
4.Select the Create button to save the the Task Details and Recurrence for the Planned Task.
5.Select the OK button.
6.To return to the planned task, highlight the record in the Planned Task tab of the Plan Overview section of the main SPM window and select Edit ![]() from the Planned Task group of the Plan ribbon.
from the Planned Task group of the Plan ribbon.
Add Activities to Planned Tasks
During monitoring events, other activities may be required alongside the sampling. Such activities may include water level measurements and well condition surveys.
1.Select the Activities tab on the SPM Planned Task window.
2.Select ![]() Other to open the SPM Activities window.
Other to open the SPM Activities window.
3.In the Locations pane of the window, select the desired Locations or Location Group for the activity.
For this exercise, expand the Utah Location Group and single-click to highlight 4952942 and 4953250 for the activity.
4.Select the desired Activity (or Activities) from the Available Activities pane.
For this exercise, highlight the Turb Meter Inspection activities from the Available Activities pane.
5.Select the Add ![]() button from the Actions pane. The select locations will appear in the Assigned Activities pane.
button from the Actions pane. The select locations will appear in the Assigned Activities pane.
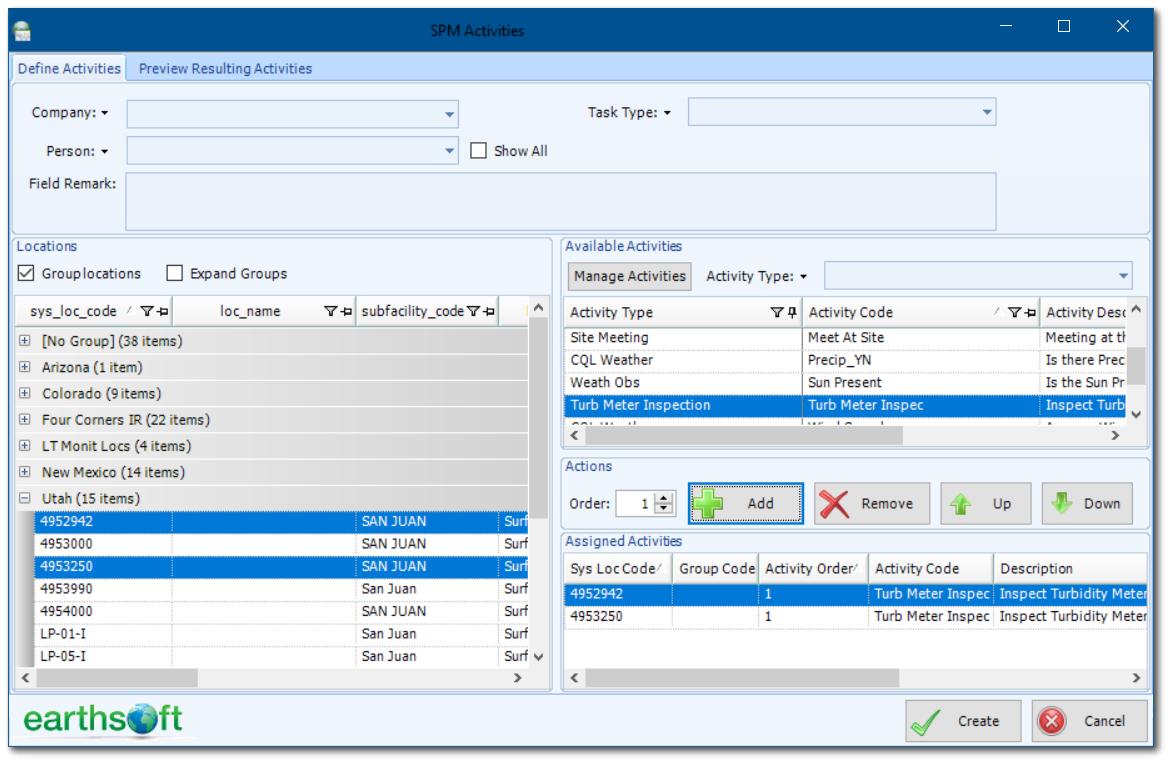
6.Select the Preview Resulting Activities tab to review the locations scheduled for the activity.

7.Select the Create button to schedule the activity.
Add Samples to Planned Tasks
1.Select the Samples tab on the SPM Planned Task window.
2.Select Add ![]() to add new samples and open the Select Sample Type window.
to add new samples and open the Select Sample Type window.
3.Choose the desired sample type from the RT_SAMPLE_TYPE list.
For this exercise, choose the “N” sample type.
4.Select the OK button to open the SPM Samples window.
5.On the Define Samples tab, add any known sample details about the sampling company and samples.
For this exercise, select USGS as the Sampling Company and WS as the Matrix.
6.From the bottom-left pane, expand the desired Location Group and multi-select the locations for sampling.
For this exercise, expand the Utah Location Group and select to highlight 4952942, 4953000, 4953250, and 4954000.
7.From the bottom-right pane, select the desired Contract Method Analyte Group(s) previously defined for the contract.
For this exercise, select the “CLP Heavy Metals” Contract Method Analyte Group(s) previously defined for the contract.
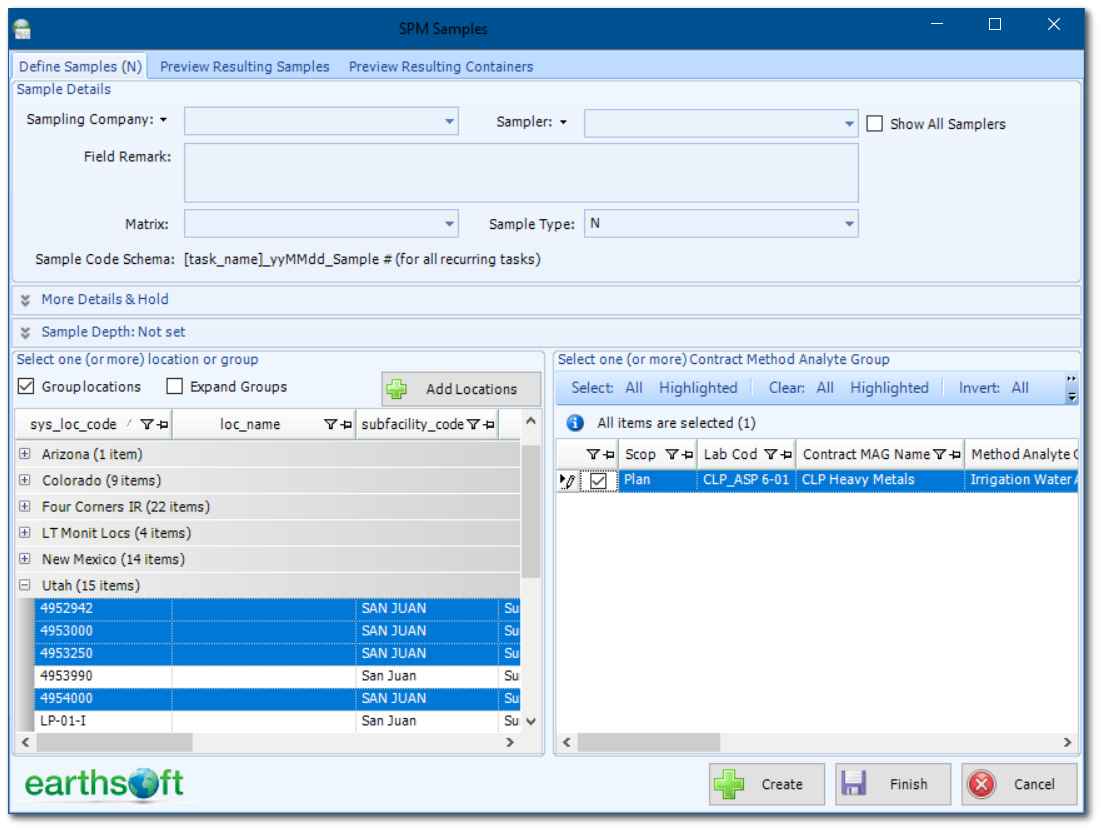
8.Select the Create button. SPM will take a few moments to create the samples and return a message with information on the number of samples created.
9.Select the OK button.
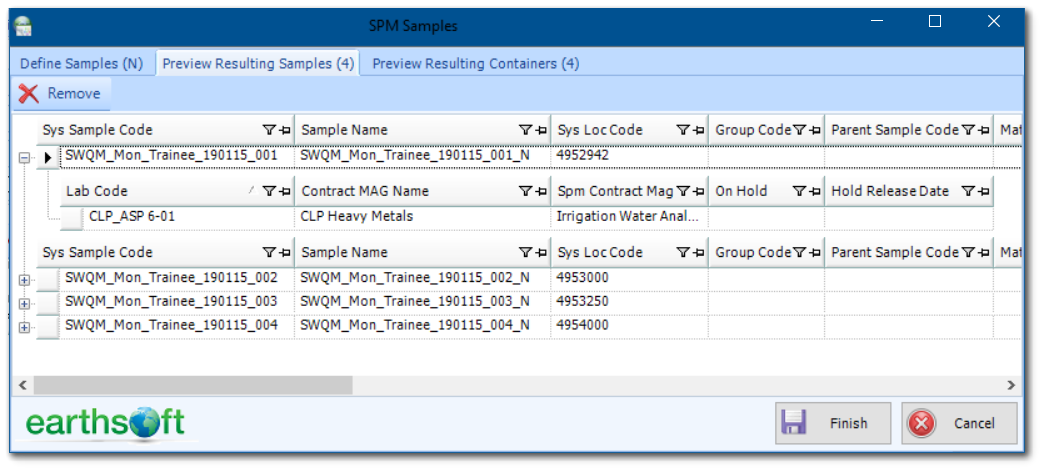
10.Select the Preview Resulting Samples tab to view the samples created. Nodes for individual samples can be expanded to display additional sampling information.
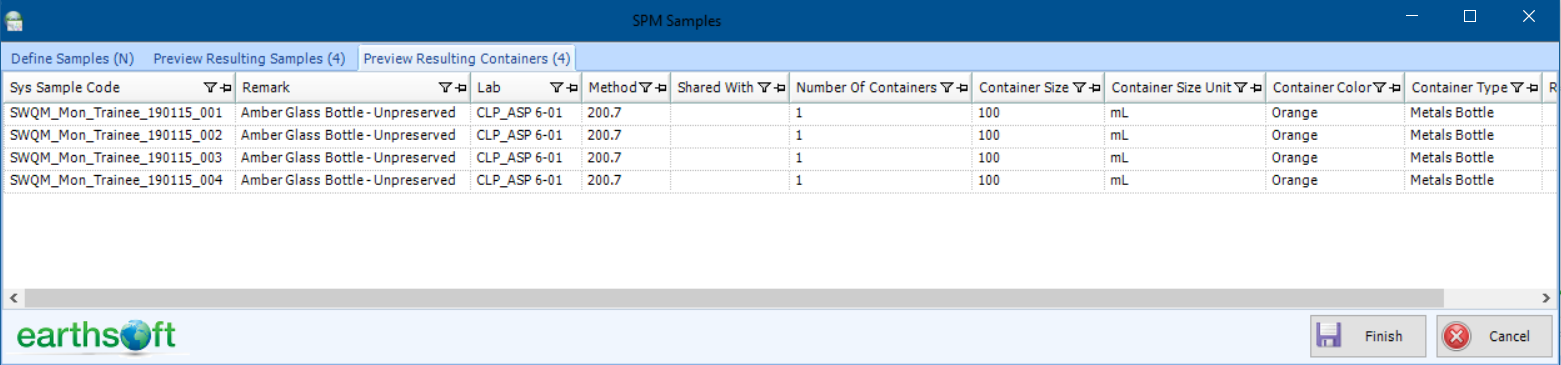
11.Select the Preview Resulting Containers tab to view the containers created, as defined by the contract for the plan.
12.Select the Finish button to return to the SPM Planned Task window.
13.Select the OK button to complete the planned task.
14.SPM will take a few moments to create the samples and return a confirmation message. Select the OK button.
|
To add land access requirements to a planned task, see the optional exercise Plan Land Access for Sampling Events |
|
Objective: Schedule Sampling Events |
After tasks have been planned and approved, any sampling events will need to be scheduled. Planned tasks cannot be tracked without being scheduled.
1.From the Planned Tasks group of the Plan ribbon, select Schedule ![]() .
.
2.From the SPM Scheduler window, select one planned task (or individual sampling event) to schedule.
For this exercise, select the first planned task “Task1.SWQM.M_<your initials>_MMYY_001”.
3.Select the Next button.
4.The window displays a list of planned tasks, with the scheduled start and end dates. View the schedule as a list or a calendar.
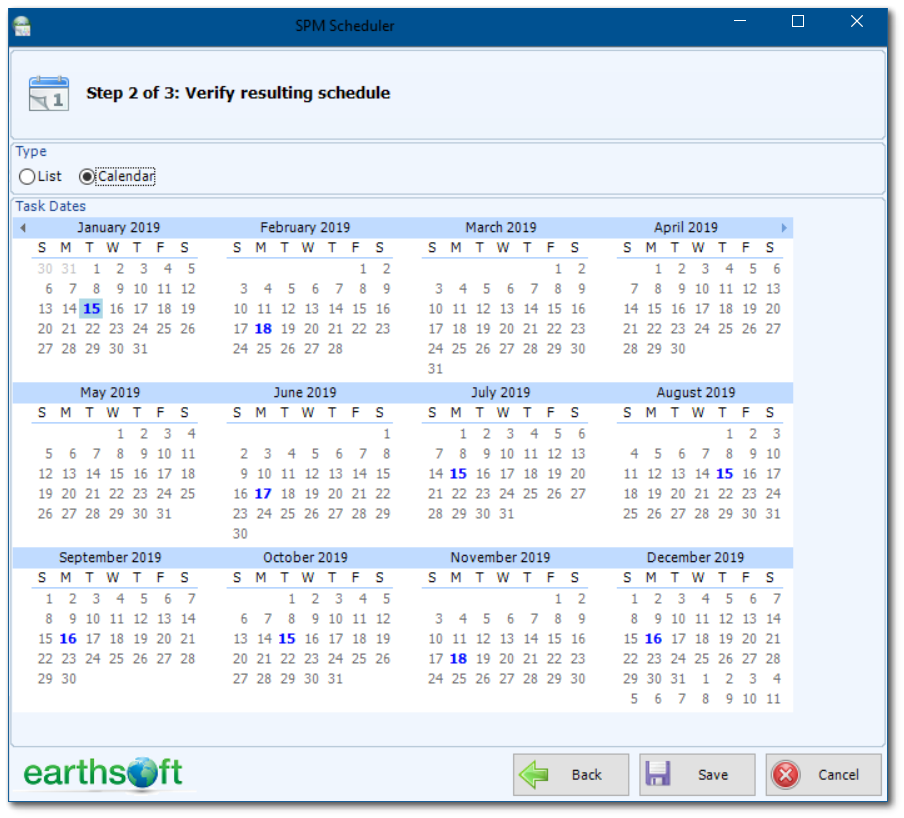
5.Select the Save button.
6.SPM will take a few moments to complete the scheduling and a progress bar provides the status of this process. Select the OK button on the Information dialog box that displays once scheduling has been completed.
7.Select the Calendar ribbon on the main SPM window.

8.Adjust individual scheduled sampling events for a longer duration and/or different dates by dragging or expanding the events on the calendar.
|
Objective: Prepare for Field Sampling with SPM |
EQuIS SPM includes several standard options for generating EDD templates, chains of custody, task lists, bottle requests, and container labels for one or more sampling events.
Tasks
•Generate EDGE Field EDD Templates
•Create Task Lists
•(Optional) Create Chains of Custody
Generate EDGE Field EDD Templates
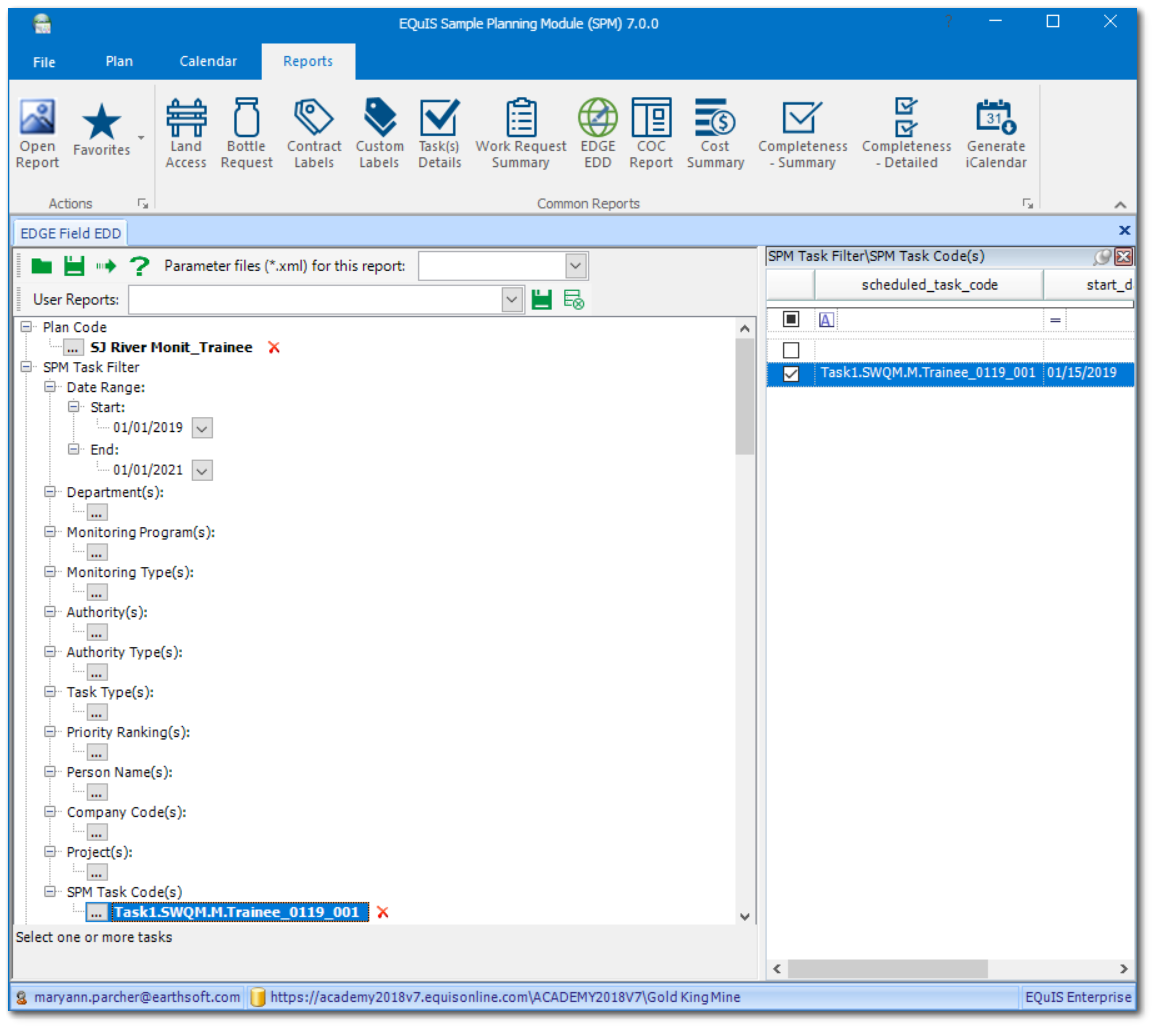
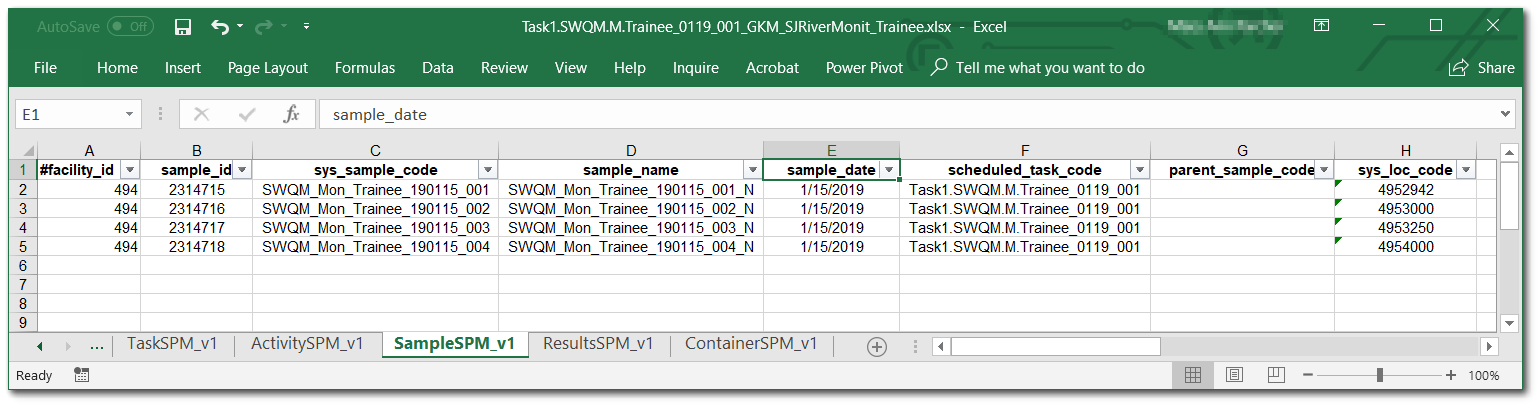
The EDGE EDD report in EQuIS SPM generates a Microsoft Excel file for the field crew to use in EDGE. The EDGE EDD report is a prepared template that populates multiple Excel worksheets with facility, plan, task, sample, and activity information. The field crew can open the created EDD in EDGE and begin filling in the field information without having to first set-up the task and locations. The EDGE EDD is facility-specific, but may include one or more sampling events.
1.Select the Reports ribbon on the EQuIS SPM window.
2.Select EDGE EDD ![]() from the Reports ribbon to open the EDGE Field EDD parameter selection window.
from the Reports ribbon to open the EDGE Field EDD parameter selection window.
3.Select the desired parameters. Note that a Plan Code and a Task Code are required.
For this exercise, select SJ River Monit_<your initials> as the Plan Code and Task1.SWQM.M_<your initials>_0119_001 as the SPM Task Code.
4.Select Go ![]() on the EDGE Field EDD ribbon. The report sends the selected information to an EDD in Microsoft Excel format, and is auto-opened in Microsoft Excel. The field crew may now import this EDD for data collection in EDGE. The file will automatically be named using the SPM Task Code and Plan Code.
on the EDGE Field EDD ribbon. The report sends the selected information to an EDD in Microsoft Excel format, and is auto-opened in Microsoft Excel. The field crew may now import this EDD for data collection in EDGE. The file will automatically be named using the SPM Task Code and Plan Code.
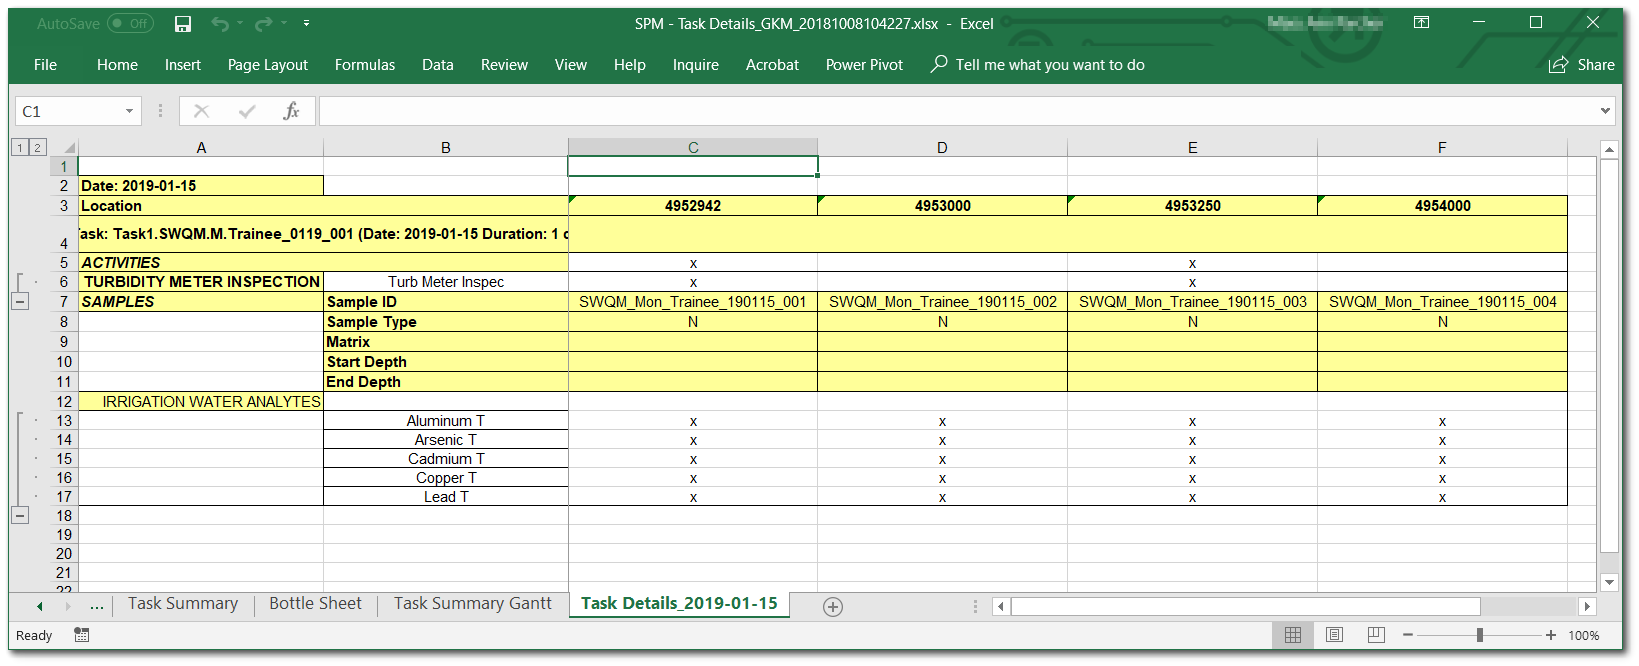
Create Task Lists
The Task(s) Details report produces a Microsoft Excel file that contains detailed summary information of planned tasks. The exported information includes monitoring schedule, task summary and details, bottleware summary, and a task Gantt chart. This report is a helpful field tool if EDGE is not being utilized.
1.Select the Reports ribbon on the EQuIS SPM window.
2.Select Task(s) Details ![]() from the Reports ribbon to open the SPM Task Details parameter selection window.
from the Reports ribbon to open the SPM Task Details parameter selection window.
3.Select the desired parameters. Note that a Plan Code and a Task Code are required.
For this exercise, select SJ River Monit_<your initials> as the Plan Code and Task1.SWQM.M_<your initials>_0119_001 as the SPM Task Code.
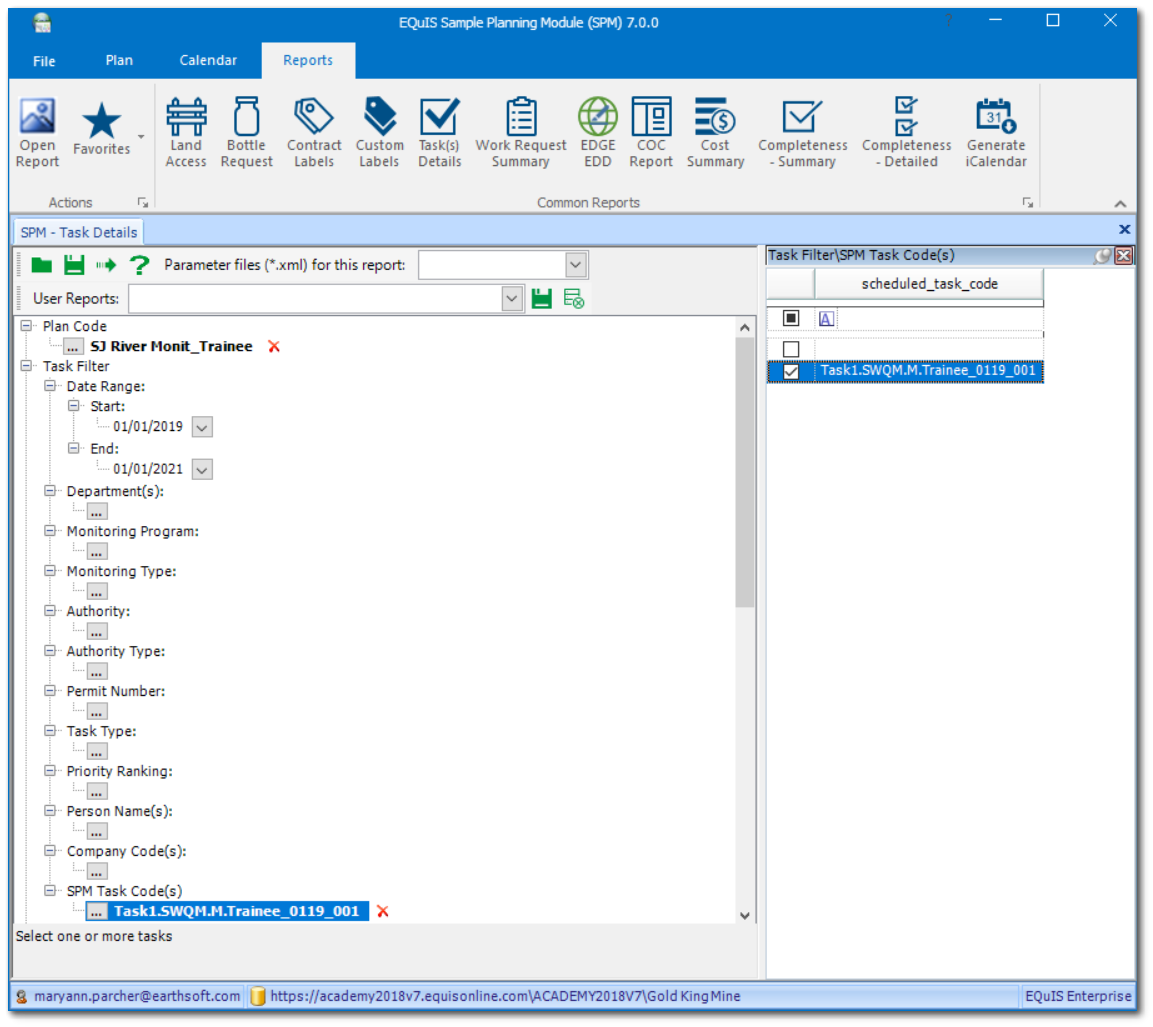
4.Select Go ![]() on the SPM Task Details ribbon. A report opens in Microsoft Excel showing details of the selected task(s).
on the SPM Task Details ribbon. A report opens in Microsoft Excel showing details of the selected task(s).
(Optional) Create Chains of Custody
SPM allows users to create COCs to attach to the samples in the field in the event EDGE is not part of the EQuIS workflow. Additionally, if the sample tracking component of Sample Receipt Notifications will be utilized, at least one COC must be created per task.
1.Select the Plan ribbon on the EQuIS SPM window.
2.Select COCs ![]() from the Plan group on the Plan ribbon.
from the Plan group on the Plan ribbon.
3.On the SPM COC Manager window, the scheduled tasks will appear in the Task Filter. The date range may need to be extended to reveal the target task.
For this exercise, Task1.SWQM.M_<your initials>_0119_001 should appear as the SCHEDULED_TASK_CODE.
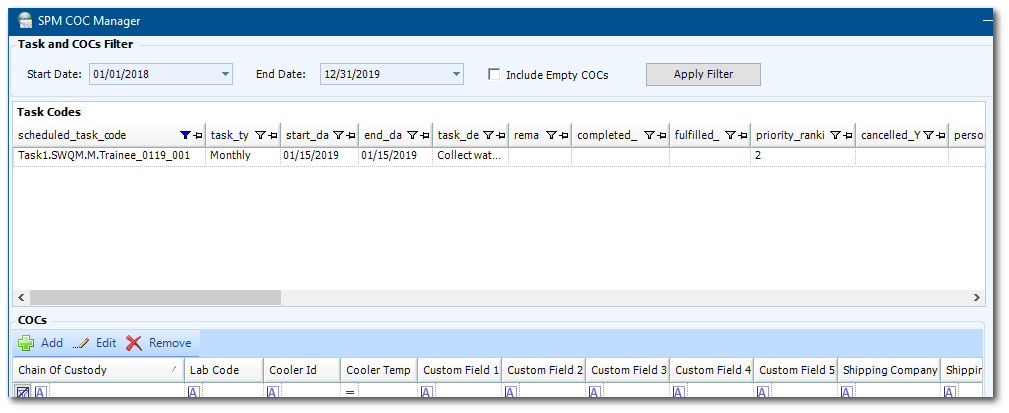
4.Select Add ![]() in the COC pane toolbar to create a new chain of custody for the listed task.
in the COC pane toolbar to create a new chain of custody for the listed task.
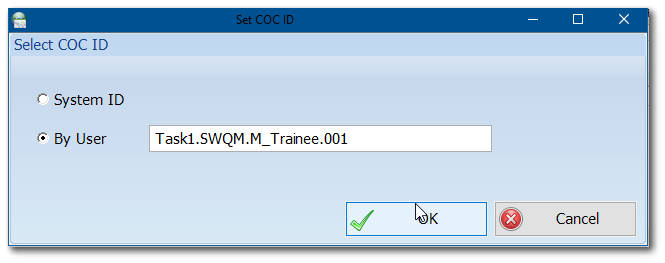
5.On the Set COC ID window, select the By User radio button.
6.Populate the COC ID field with the desired value and click the OK button.
For this exercise, enter Task1.SWQM.M_<your initials>.001 into the By User field.
7.The SPM COC Edit window opens to the COC Details tab. A warning message may appear directing the user to select a COC Lab Code. Select the laboratory configured in the contract related to the task and click the OK button in the lower right corner of the window.
For this exercise, select CLP_ASP 6-01 as the Laboratory and then click OK.
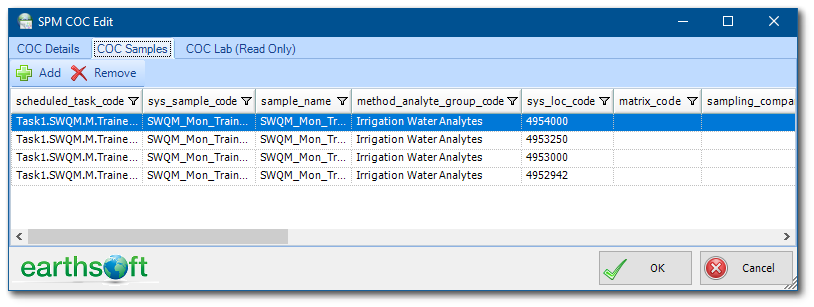
8.Select the COC Samples tab and select Add ![]() in the toolbar to open the List of Unassigned Samples window.
in the toolbar to open the List of Unassigned Samples window.
9.Highlight the samples to add to the new chain of custody.
For this exercise, select all available samples.

10.Once desired samples are highlighted, click OK.
11.The selected samples now appear in the COC Samples tab. Click OK to close the SPM COC Edit window.
12.Click the Close button to close the SPM COC Manager window.
|
Exporting the COC to Excel requires that a COC template be uploaded to the EQuIS database according to instructions here. |
|
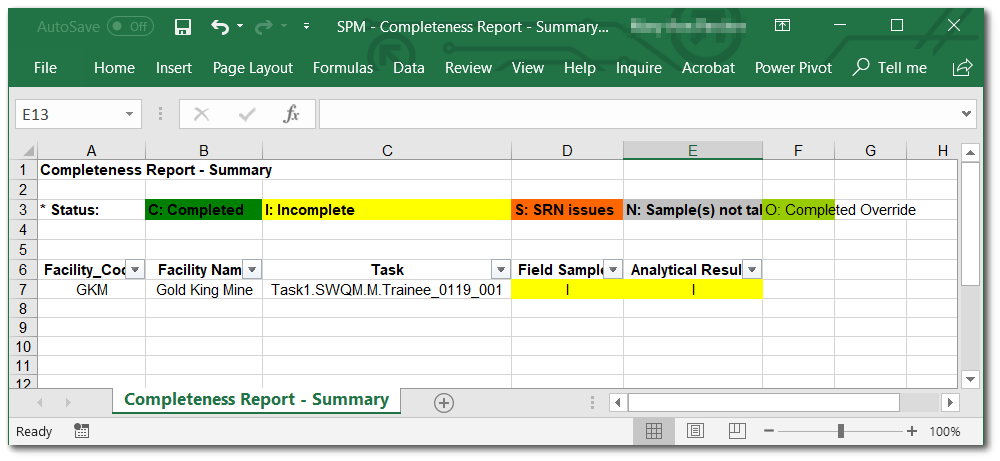
Objective: Generate Completeness Reports |
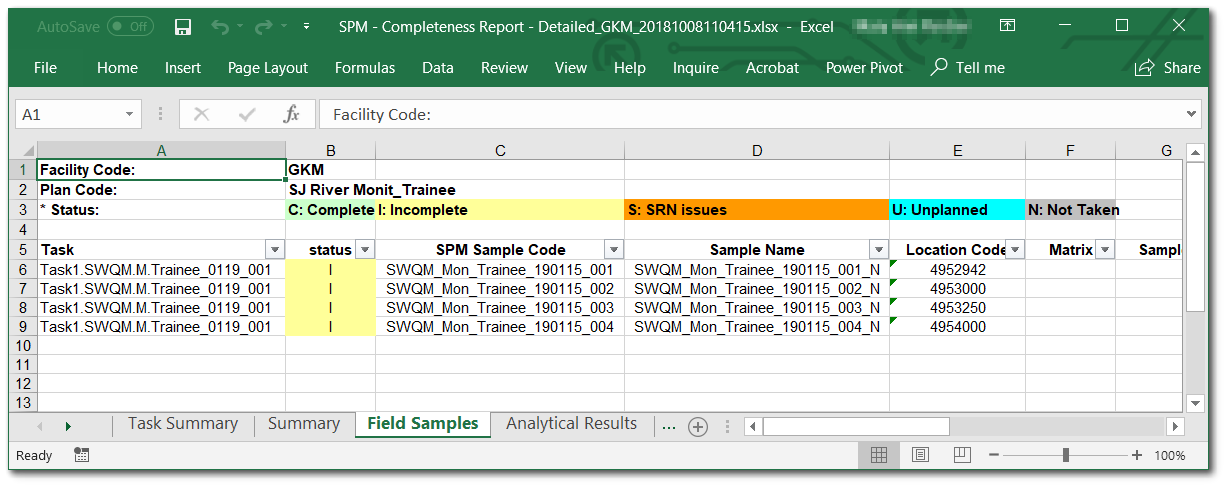
Track completeness of one or more sampling events with the SPM Completeness Reports. The Completeness Summary report produces a report summarizing the completeness status for the scheduled tasks for the specified facility. The Completeness Detailed report produces a report summarizing the completeness status for the chosen scheduled tasks for the specified plan, per sample and per result. The report uses color coding to show complete and incomplete tasks at a glance.
1.Select Completeness Summary ![]() report from the Reports ribbon on the EQuIS SPM window.
report from the Reports ribbon on the EQuIS SPM window.
2.Enter the desired report parameters.
For this exercise, ensure that the GKM facility is selected and that the date range encompasses the scheduled tasks.
3.Select Go ![]() to run the report. A report opens in Microsoft Excel showing the field status and lab status for each scheduled task within the date range selected. Review the highlighted status flags according to whether the task is complete or incomplete.
to run the report. A report opens in Microsoft Excel showing the field status and lab status for each scheduled task within the date range selected. Review the highlighted status flags according to whether the task is complete or incomplete.
4.Return to SPM.
5.Select Completeness Detailed ![]() report from the Reports ribbon.
report from the Reports ribbon.
6.Enter the desired Plan Code, SPM Task Code and Dates.
For this exercise, select SJ River Monit_<your initials> as the Plan Code and Task1.SWQM.M_<your initials>_0119_001 as the SPM Task Code.
7.Select Go ![]() to run the report. A report opens in Microsoft Excel showing the number of samples and locations scheduled and the percent completed.
to run the report. A report opens in Microsoft Excel showing the number of samples and locations scheduled and the percent completed.