Overview
Collecting field data and populating any field EDD with EDGE is completed using the following five-step procedure:
Populate the Field EDD
1. Launch EDGE and Load the EDGE Format
2. Load a Field EDD and Select a Task
3. Populate Tabs in EDGE with Field Data
Submit the Field EDD to EQuIS
4. Generate a Chain of Custody
5. Sign the Field EDD and Submit the EDD to the EQuIS Database
Exercise Scenario
As the field crew, we have been enlisted to conduct the field sampling at the GKM site. We are headed to the field to collect the requested surface water samples and perform field activities. We need to populate EDGE with our field data and activities as we collect them and then export our completed field EDDs to EQuIS and our COCs to the laboratories (along with our samples).
|
Understand how to use and populate EDGE with field data and provide the field data to laboratories and EQuIS. |
|
Exercise Objectives |
•Install and Launch EDGE
•Load the EDGE Format and Open Field EDD Templates
•Create and/or Select Tasks in EDGE
•Populate EDGE EDDs
•Create and Export Chains of Custody
•Save and Submit EDGE EDDs
Skills, Software and Permissions Required
•A computer or device (laptop, tablet) with Windows XP or higher
•.NET Framework 4.7.2 or higher
•EDGE 7
|
Objective: Install and Launch EDGE |
EDGE is not installed with an installation program. EDGE is delivered in a zip file. EDGE is then extracted and registered to a specific drive on your computer or to a field device, such as a laptop, tablet PC, USB drive, or SD Card.
1.Download the desired EDGE_7.x.zip file.
For this exercise, browse to the "Training Materials> EDGE Materials" directory and download the EDGE_7_Training.zip file.
2.Place the EDGE_7.x.zip in a location on the computer or field device where the user has full permissions (i.e.,\Documents or C:\EDGE).
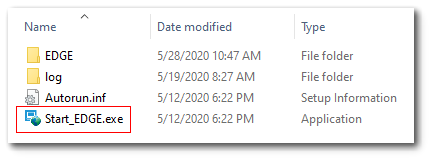
3.Extract the EDGE_7.x.zip, which will automatically create a sub-directory with the EDGE version indicated.
4.Open the directory with the EDGE version indicated and double-click on Start_EDGE.exe.
|
It may take a moment for EDGE to launch. Do not double-click the Start_EDGE.exe icon more than once. |
5.The EDGE application window opens. EDGE requires a license and registration prior to opening any formats. If EDGE is not already registered, an Evaluation prompt will open. Select Register on the Evaluation screen and the Software Registration screen will open.
6.Select the Workstation Licenses tab. Network licensing is not available for EDGE.
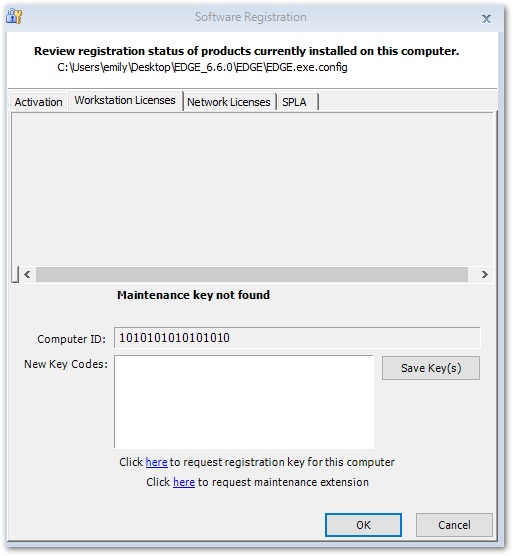
7.Contact EarthSoft (support@earthsoft.com) or the EQuIS Database Manager for a registration key. EarthSoft will send an email with the registration key codes enclosed.
8.Enter the license in the New Key Codes window of the Workstation Licenses tab.
9.Click the Save Key(s) button and then the OK button.
10.Select OK again to exit the registration screen.
|
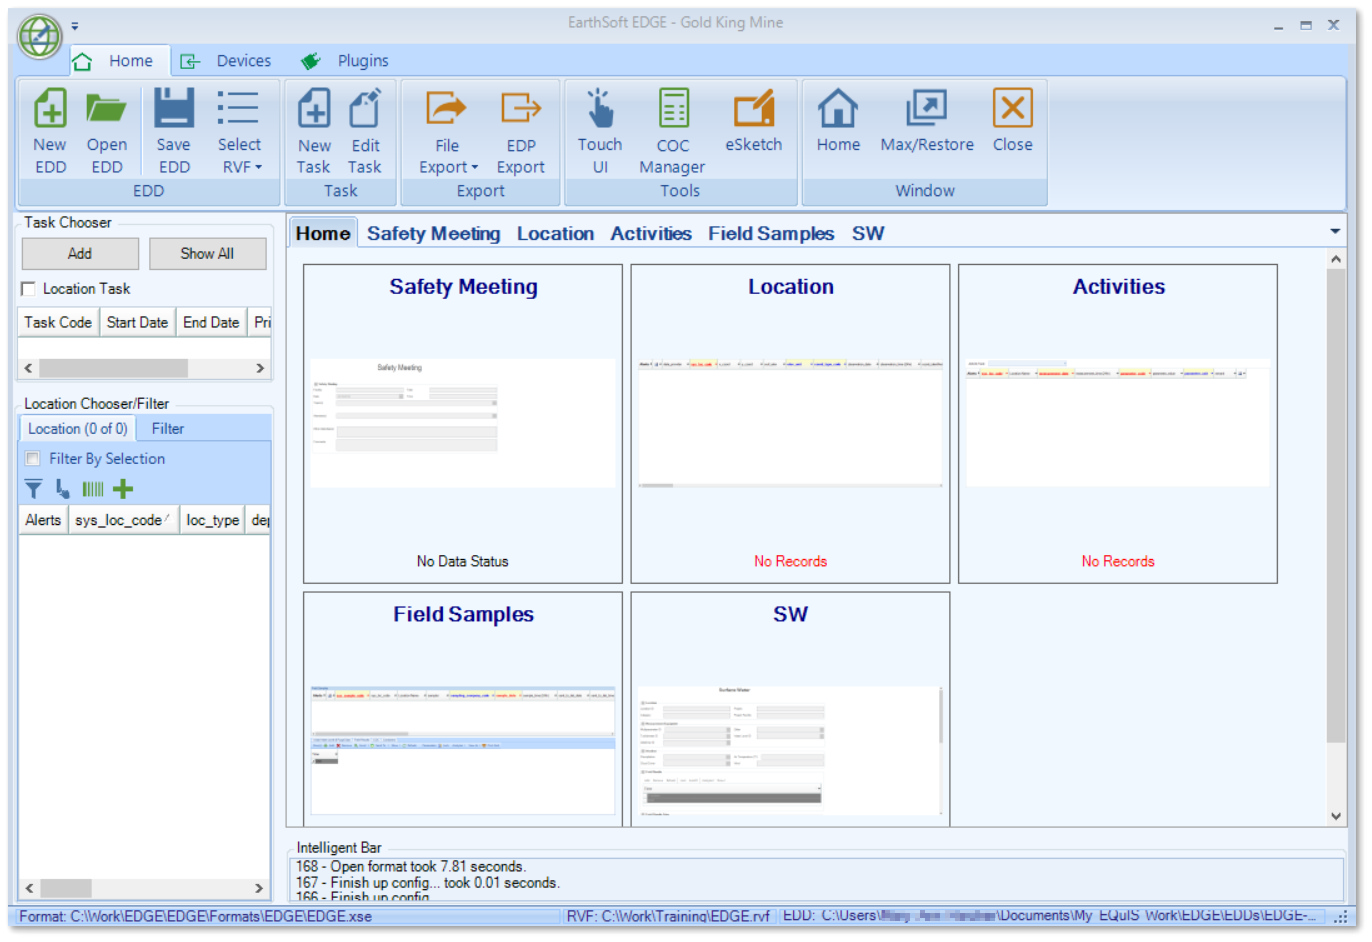
When EDGE opens, the EDGE window automatically maximizes to take advantage of screen space. To further expand the space during data collection, hide the toolbar ribbon by either double-clicking the Home tab or click the maximize button |
|
Objective: Load the EDGE Format and Open EDGE Field EDD Templates |
Tasks
•Load the EDGE Format
•Open EDGE Field EDD Templates
Load the EDGE Format
The EDGE Format will need to be loaded if this is the first time EDGE is launched. If EDGE was launched previously, the EDGE format will automatically load and this section may be skipped.
1.Select Open Format ![]() from the EDD group on the Home ribbon.
from the EDD group on the Home ribbon.
2.Navigate to the location of the EDGE Format and select the desired format, such as the EDGE.xse file (typically in \EDGE\Formats\EDGE). EDGE will load the format with the sampling tabs configured and automatically create a blank EDD.
For this exercise, select the EDGE.xse file.
Open EDGE Field EDD Templates
1.Select the Home ribbon and then Open EDD ![]() .
.
2.Navigate to a previously saved Field EDD template, as desired, and select Open. The data stored in the Field EDD template is displayed in the Task Chooser and the Location Chooser/Filter panes in EDGE. Any pre-populated sampling information is also placed into the visible tabs in EDGE.
|
For this exercise, browse to \EDGE_7\EDGE\Tutor folder in the EDGE Directory and open the Task1.SWQM.M_1018_013_GKM_SJRiverMonitoring.xlsx file. |
|
Objective: Create and/or Select Tasks in EDGE |
EDGE is governed by a task, which is an individual sampling event. Select an existing Task Code from the Task Chooser to activate the forms and begin entering field data. Add a new Task Code ad-hoc to the Task Chooser, as necessary.
Tasks
•Create New Tasks
•Select Existing Tasks
Create New Tasks
If a task is not included as part of the open Field EDD, one must be created before data can be entered in EDGE.
1.Select New Task ![]() from the Home ribbon of EDGE to create a new task.
from the Home ribbon of EDGE to create a new task.
2.Enter in the desired Task Code and populate other fields as desired.
|
For this exercise, enter "TASK2.SWQM.M_1018_013" in the Task Code and 10/15/2018 for the Start Date. |
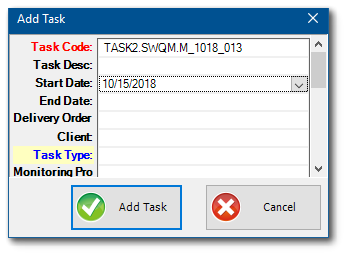
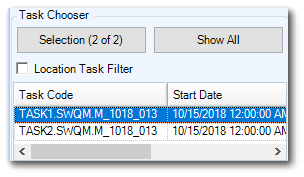
3.Select the Add Task button.
Select Existing Tasks
If the EDGE EDD contains one or more tasks, a specific Task Code must be selected before entering data.
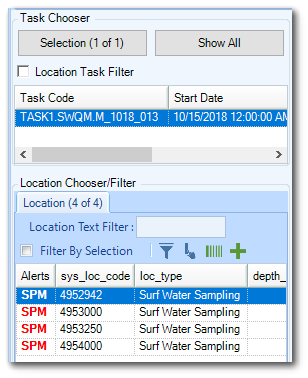
1.Single-click to highlight an existing desired Task Code from the Task Chooser in the top-left corner.
For this exercise, single-click to highlight the Task1.SWQM.M_1018_013 Task Code. |
|
|
Objective: Populate EDGE EDDs |
Once the Field EDD has been created and opened in EDGE, populate the EDD with data collected in the field such as samples, field results, and other activities.
Tasks
•Populate the Safety Meeting Form
•Add and View Locations in EDGE
•Populate the SW (Field Sample) Form
Populate the Safety Meeting Form
Complete activities that are for an entire Task, or complete location-specific activities. Use the Safety Meeting form to complete a safety meeting at the start of a sampling event (and/or at the start of each sampling day).
1.Select the Safety Meeting tab in the Data Tab area. The Form ribbon will appear.
2.Select New ![]() from the Record group of the Form ribbon in EDGE. The Safety Meeting form becomes active and the Facility and Task Code are pre-populated.
from the Record group of the Form ribbon in EDGE. The Safety Meeting form becomes active and the Facility and Task Code are pre-populated.
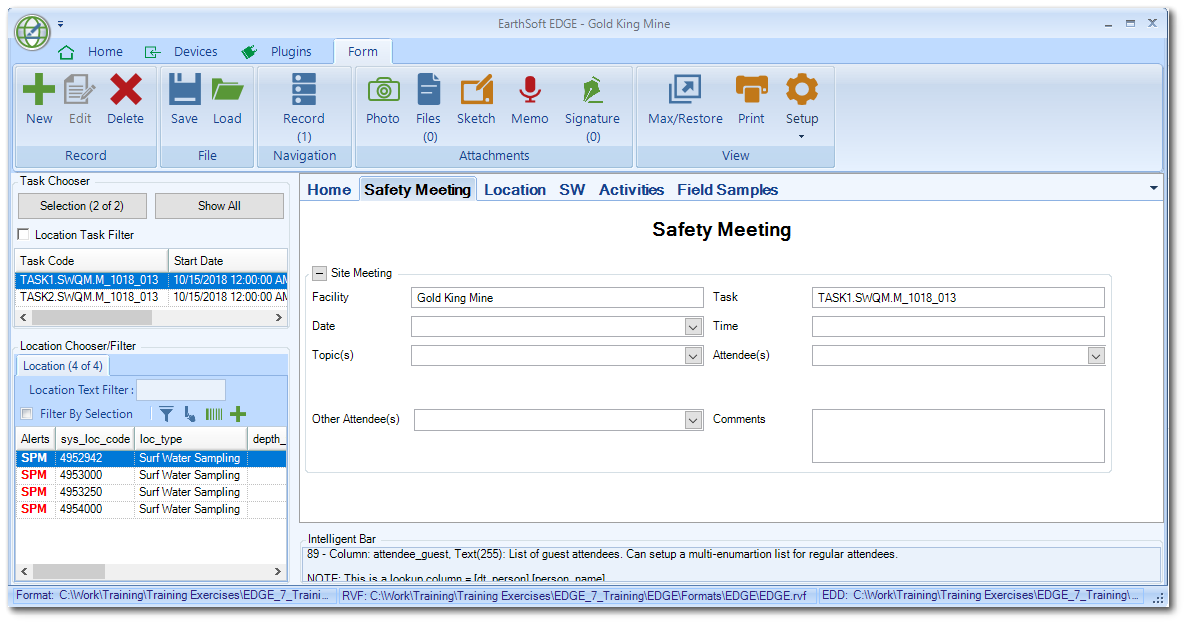
3.Enter today's date and time in the Date and Time fields, respectively.
For this exercise, set the Date to 10/15/2018 and the Time to 08:00.
4.Select the desired topic(s) covered during the safety meeting from the Topic(s) drop-down.
For this exercise, select Field Location Safety.
5.Select the Attendee(s) present during the safety meeting.
For this exercise, choose at least one of the Attendees available from the drop-down.
6.Populate the Other Attendee(s) and Comments fields, as necessary.
Add and View Locations in EDGE
All existing locations from the pre-populated EDD will be listed in the Location Chooser pane and the Location tab. If a needed location is not already in the EDD, it can easily be added through either the Location Chooser pane or Location tab. Both of these methods are explored in the training exercises.
Location Chooser Pane
1.Select the Location tab from the Location Chooser/Filter pane on the left-hand side of EDGE.
|
|
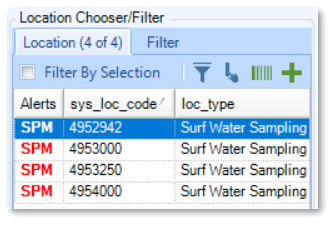
1.Note the Location tab is populated with any Locations imported with the open Field EDD.
2.Select Add ![]() from the Location Chooser toolbar.
from the Location Chooser toolbar.
3.Enter the desired SYS_LOC_CODE.
For this exercise, populate the SYS_LOC_CODE with "SW_<your initials>".
4.Select the Create button. Note a new record is added to the Location Chooser pane.
5.Select the Locations tab in the Data Tab area. For the new location, populate any pertinent details in the appropriate fields.
For this exercise, set the LOC_TYPE for SW1_<your initials> to be Surf Water Sampling.
Location Tab
1.Select Location ![]() from the Navigation group of the Form ribbon in EDGE. The Selection Location window opens with a map of the sampling area and the existing locations plotted on the map.
from the Navigation group of the Form ribbon in EDGE. The Selection Location window opens with a map of the sampling area and the existing locations plotted on the map.
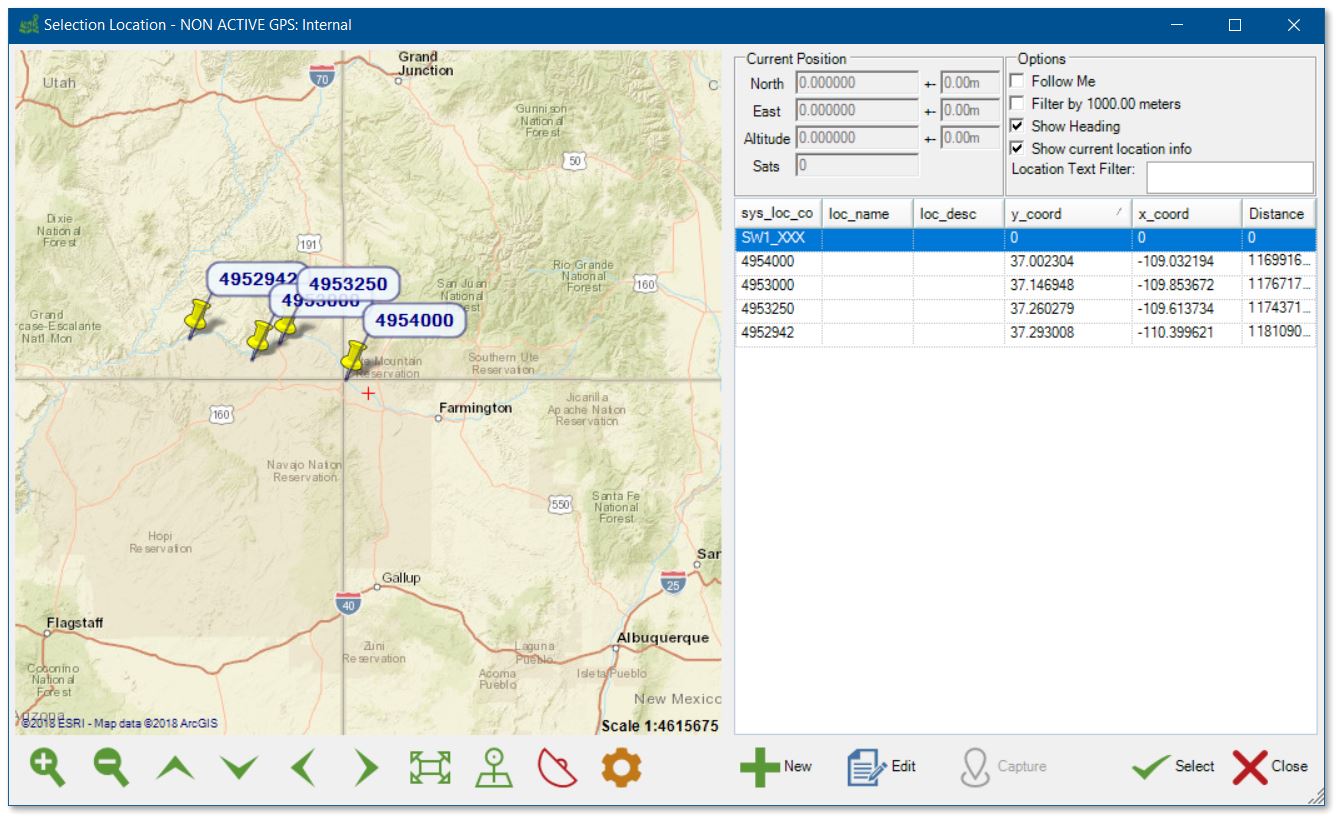
2.Zoom in ![]() on the map and place the red cross-hairs over the area of the desired location.
on the map and place the red cross-hairs over the area of the desired location.
3.Select New ![]() from the bottom of the Selection Location window.
from the bottom of the Selection Location window.
4.Enter the desired SYS_LOC_CODE.
For this exercise, populate the SYS_LOC_CODE with "SW2_<your initials>".

5.Select the Import Map button. Note the Latitude and Longitude are populated.
For this exercise, set the COORD_TYPE to LAT LONG.
6.Select the OK button. Note the new location is now on the map.
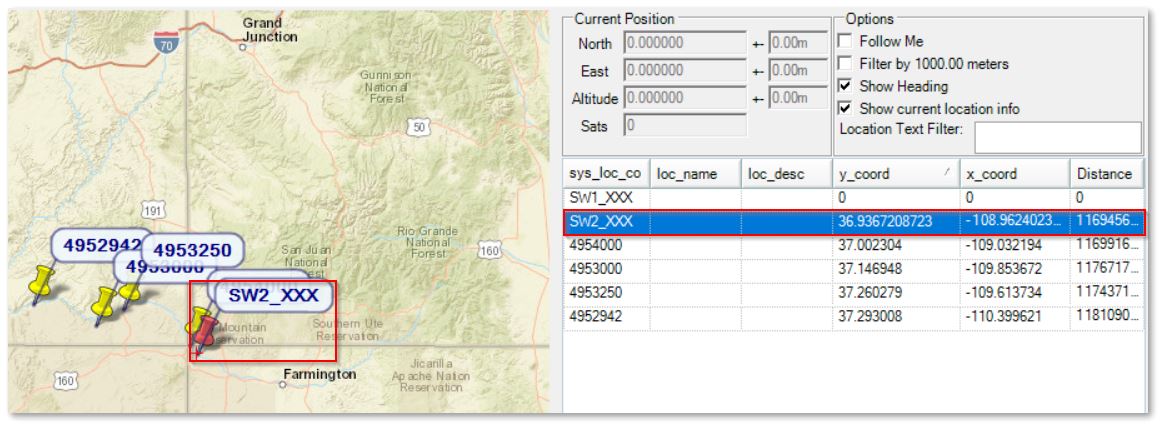
7.Select Close.
8.Select the Locations tab in the Data Tab area. For the new location, populate any pertinent details in the appropriate fields.
For this exercise, set the LOC_TYPE for SW2_<your initials> to be Surf Water Sampling.
Populate the SW (Field Sample) Form
The Field Samples tab and the SW form tab access the same information and are linked. The Field Samples tab displays the data in tabular form showing the field names and conventions, such as required fields. The SW tab replicates a field form and provides drop-down menus for certain items. Data enter in the SW tab is also populated in the Field Samples tab. If entering data directly in the Field Samples tab, checking the "Filter By Selection" box on the Location Chooser/Filter pane will limit the data displayed to the selected location.
1.Select the SW tab in the Data Tab area. The Form ribbon will appear.
2.Highlight any location where field sampling will occur in the Location Chooser/Filter pane and then select New ![]() from Record group of the Form ribbon. The SW form becomes active and the Location ID is pre-populated. Other fields may also be pre-populated depending on the EDGE configuration.
from Record group of the Form ribbon. The SW form becomes active and the Location ID is pre-populated. Other fields may also be pre-populated depending on the EDGE configuration.
For this exercise, highlight location 4952942 and select New from Record group of the Form ribbon.
3.If there are any errors, an Alerts box will appear in red denoting the number of errors and the tab header will become red as well. Resolve these errors by clicking on the Alerts box to open the Error Form window.
4.If activities were defined in SPM, a link to the Activities tab will appear in the SPM Forms section of the SW tab. Click on the link to determine if an activity needs to be performed. Return to the SW tab after any Activities have been addressed.
For this exercise, click the Activities present link. On the Activities tab for location 4952942, set the MEASUREMENT_DATE to 10/15/2018 and the PARAMETER_VALUE to Y. This denotes that the Turbidity Meter Inspection was conducted at this sampling location prior to taking a field measurement.
5.Return to the SW tab, and populate the required and desired fields for the sample. Note that the Sample ID (or SYS_SAMPLE_CODE) is populated automatically. The sample date and arrival time will also be automatically populated. Adjust the sample time as needed to reflect the sample collection.
|
On the SW tab, hover over an empty field with the mouse to display notes about the field. Required fields will be denoted. |
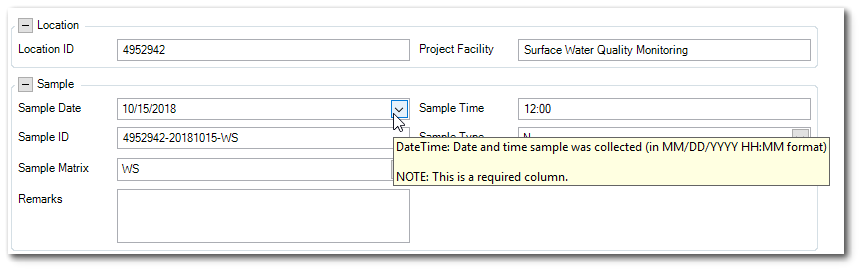
For this exercise, change the Sample Date to 10/15/2018 and set the Sample Time to 12:00. Enter other information as desired to see how drop-down menus work.
6.In the Field Results section of the form, enter data in the section as necessary. Select the Analytes drop-down menu to show field parameters as needed. Individual field parameters can be shown or entire groups of parameters can be shown.
7.After the desired field parameters are visible, select Add to enter data for the current location. The Show drop-down menu can be used to display a Units row and other information.
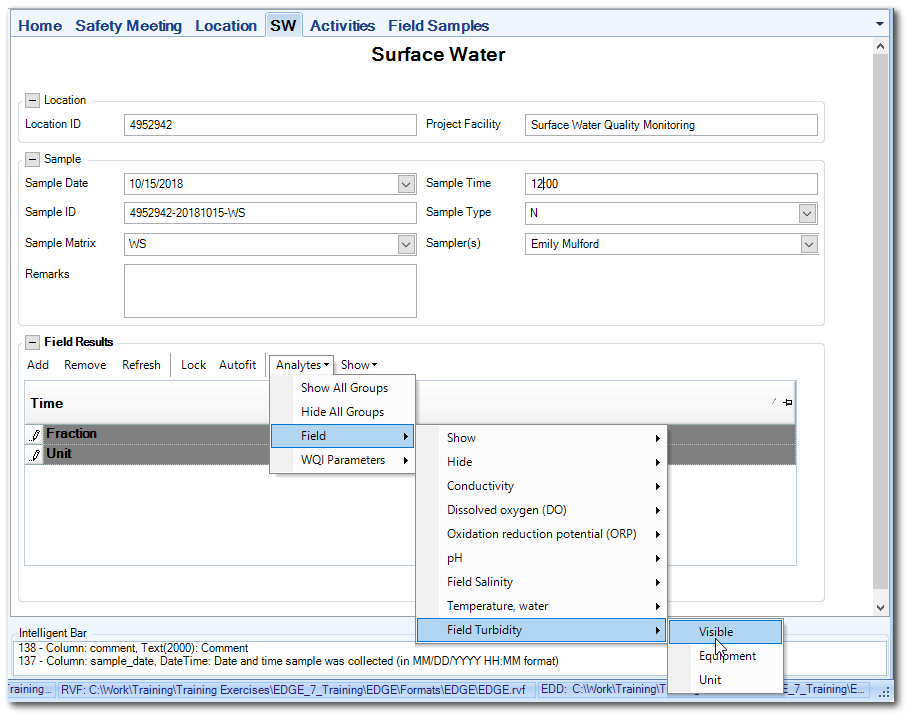
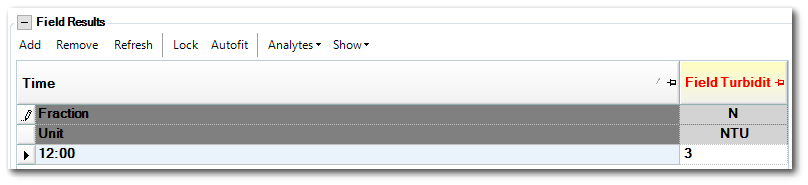
For this exercise, add Field Turbidity. Select NTU as the Unit and enter a value of "3" for the Field Turbidity. The time field automatically records the current time. To be consistent with this record, set the Time to 12:00.
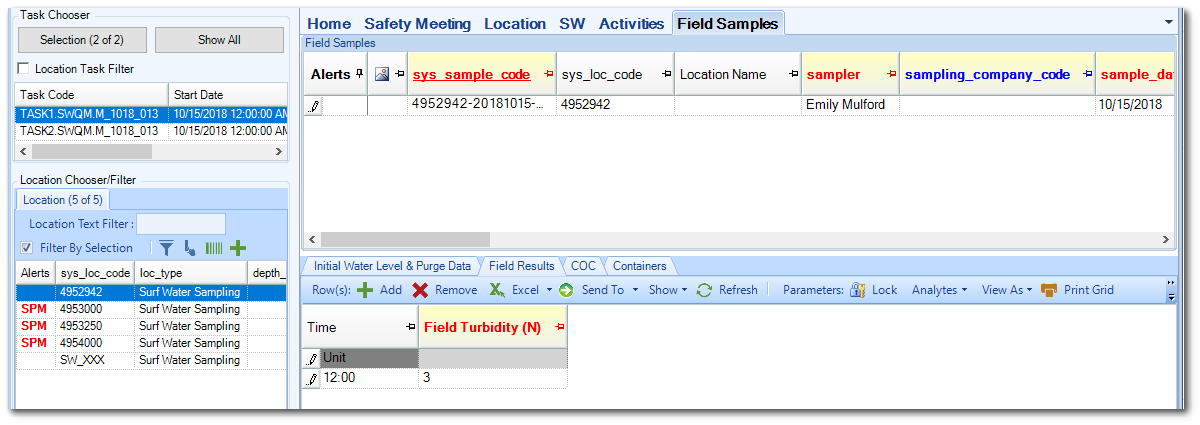
8.Click on the Field Samples tab. Scroll through the fields to see that the data entered on the SW tab are now displayed. Select the Field Results tab in the lower pane of the Field Samples tab to see data for field parameters.
For this exercise, check the Filter By Selection box on the Location Chooser/Filter pane and ensure that location 4952942 is selected. Select the Field Samples tab and review the new data.
9.Repeat Steps 1 through 7 as needed for all sampling locations.
For this exercise, repeat the above steps for location 4953000.
10.Select Save ![]() from the File group on the Form ribbon to save all the new data into the EDGE EDD.
from the File group on the Form ribbon to save all the new data into the EDGE EDD.
|
Objective: Create and Export Chains of Custody |
An electronic Chain of Custody (eCOC) can be exported directly from EDGE and sent to a laboratory for adoption into its LIMS. There are two types of eCOC that may be exported:
•eCOC (Excel) – Exports to Microsoft Excel for easier review of the eCOC for accuracy.
•eCOC (XML) – The official eCOC that may be sent to laboratories.
Tasks
•Build Chains of Custody
•Export the COC from EDGE to Microsoft Excel
Build the Chain of Custody
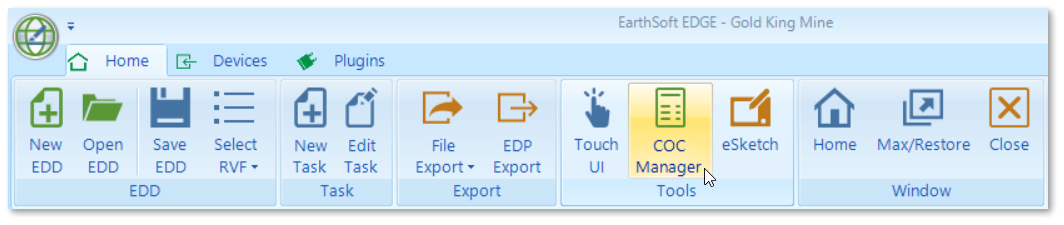
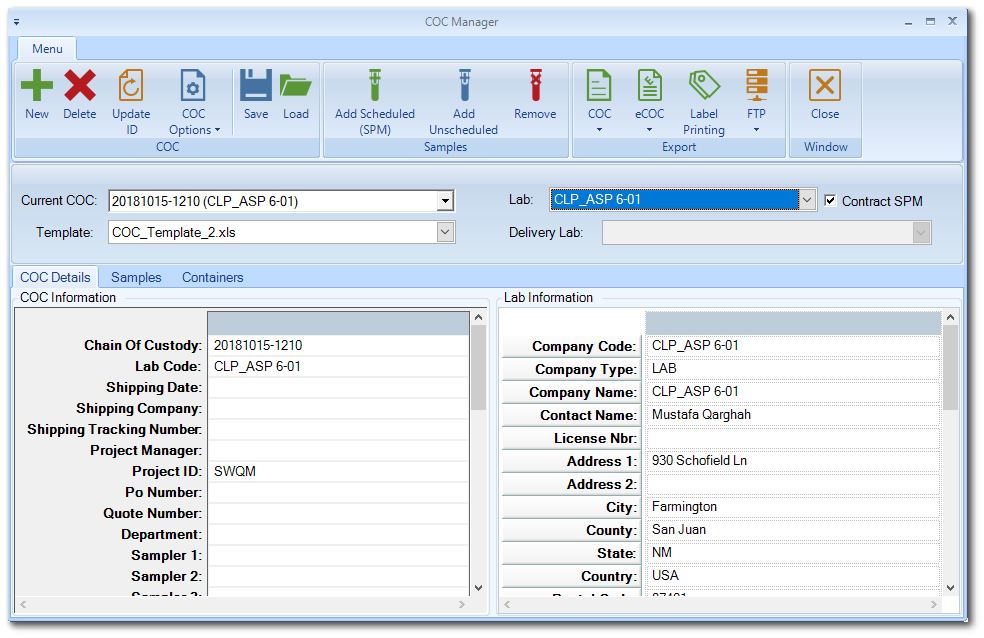
1.Select the Home ribbon and then COC Manager from the Tools group to open the COC Manager.
2.Select New ![]() to generate a new COC number. The "Set ID for New COC" window will open.
to generate a new COC number. The "Set ID for New COC" window will open.
3.Ensure the System ID option is selected and populated, and then select the OK button. Note that the COC Details tab will be partially populated.
4.From the Lab drop-down, select the laboratory to which the samples will be sent. Note that the Lab Information section is populated.
For this exercise, select the CLP_ASP 6-01 lab.
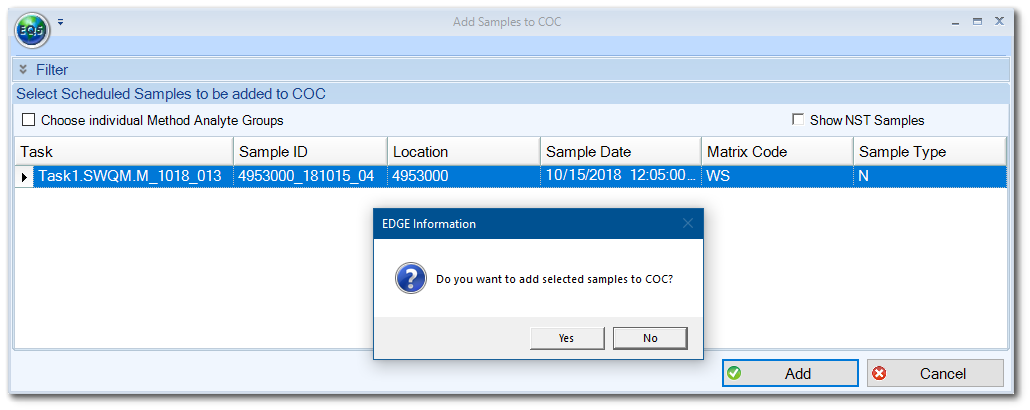
5.Select the Samples tab. Select Add ![]() from the Samples group in the ribbon to add samples from the EDGE EDD to the COC. If the EDGE EDD was exported using the EDGE Field EDD Report and contains sampling information from the Sample Planning Module, then both scheduled and unscheduled samples can be added.
from the Samples group in the ribbon to add samples from the EDGE EDD to the COC. If the EDGE EDD was exported using the EDGE Field EDD Report and contains sampling information from the Sample Planning Module, then both scheduled and unscheduled samples can be added.
For this exercise, select Add Scheduled.
6.Single-click on one or more samples from the Samples list. To add all the samples, hold the Shift key, single-click the first sample listed, and then single-click on the last sample listed. Select the Add button to add the highlighted samples to the COC.
For this exercise, highlight the sample associated with Location 4953000 and select the Add button. When the "Do you want to add selected samples to COC?" dialog box opens, click on the Yes button.
7.If SPM was not used or if the sample was not scheduled in SPM, then the desired analytes must be defined. Select Add Unscheduled to add additional samples.
8.Select the desired Analyte Suite or Individual Analyte from the All Groups or Single Analyte lists, respectively or from the SPM Group if an unscheduled sample.
For this exercise, select the sample associated with location 4952942 and assign CLP Heavy Metals from the SPM Groups tab.
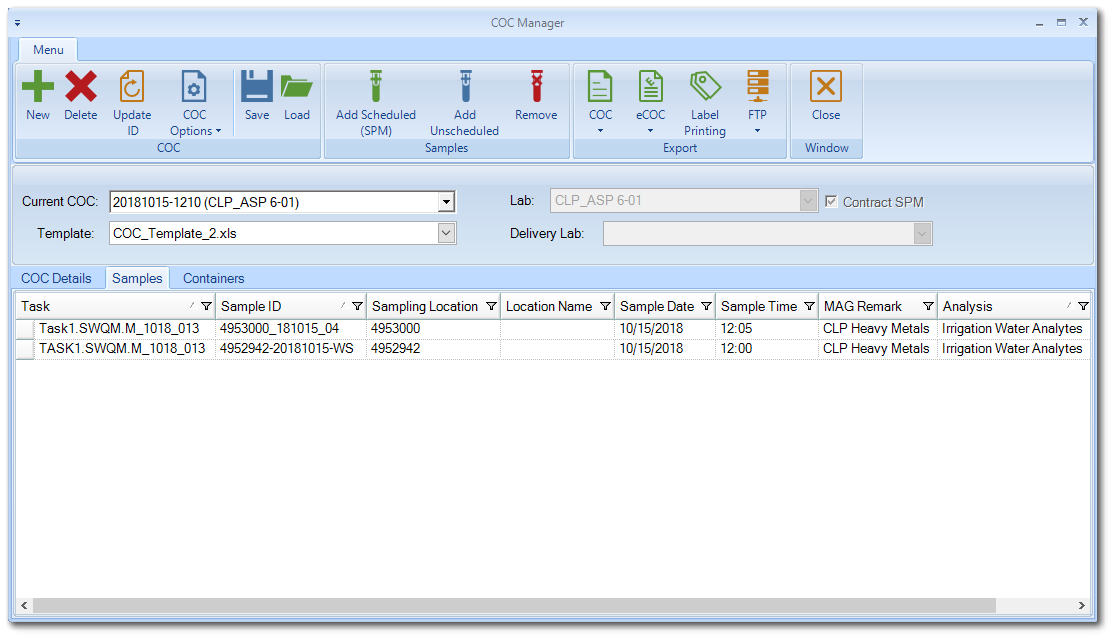
9.Click the Assign Analysis button. The select samples will appear in the Assigned Lab Analysis pane with the selected analytical methods.
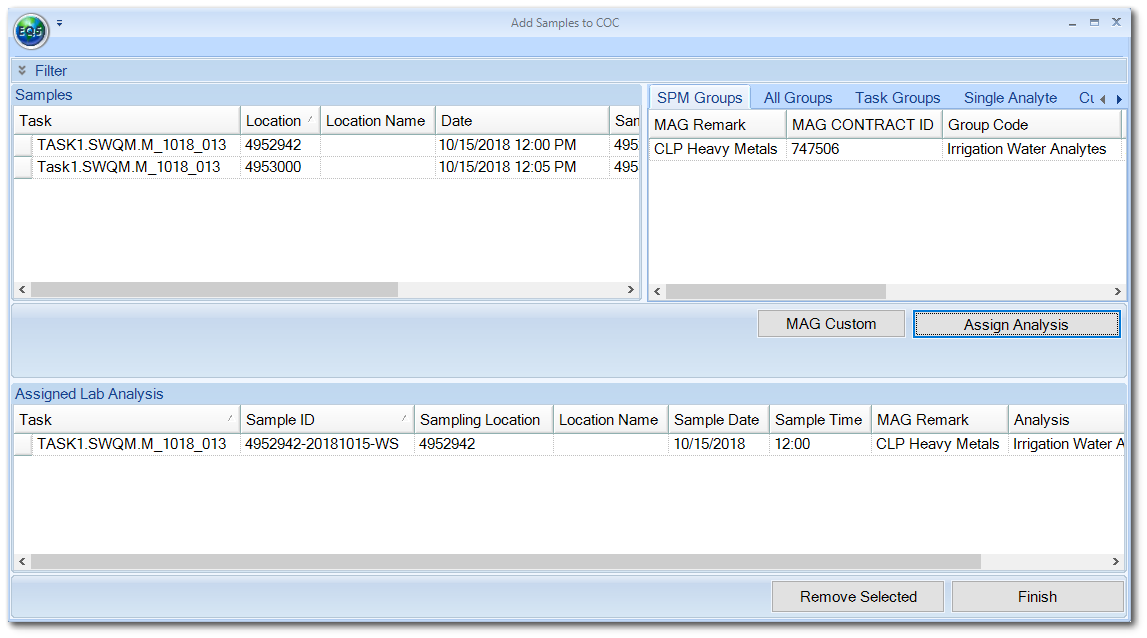
10.Select the Finish button to return to the main COC Manager page. The added samples appear in the Samples tab.
Export the Chain of Custody
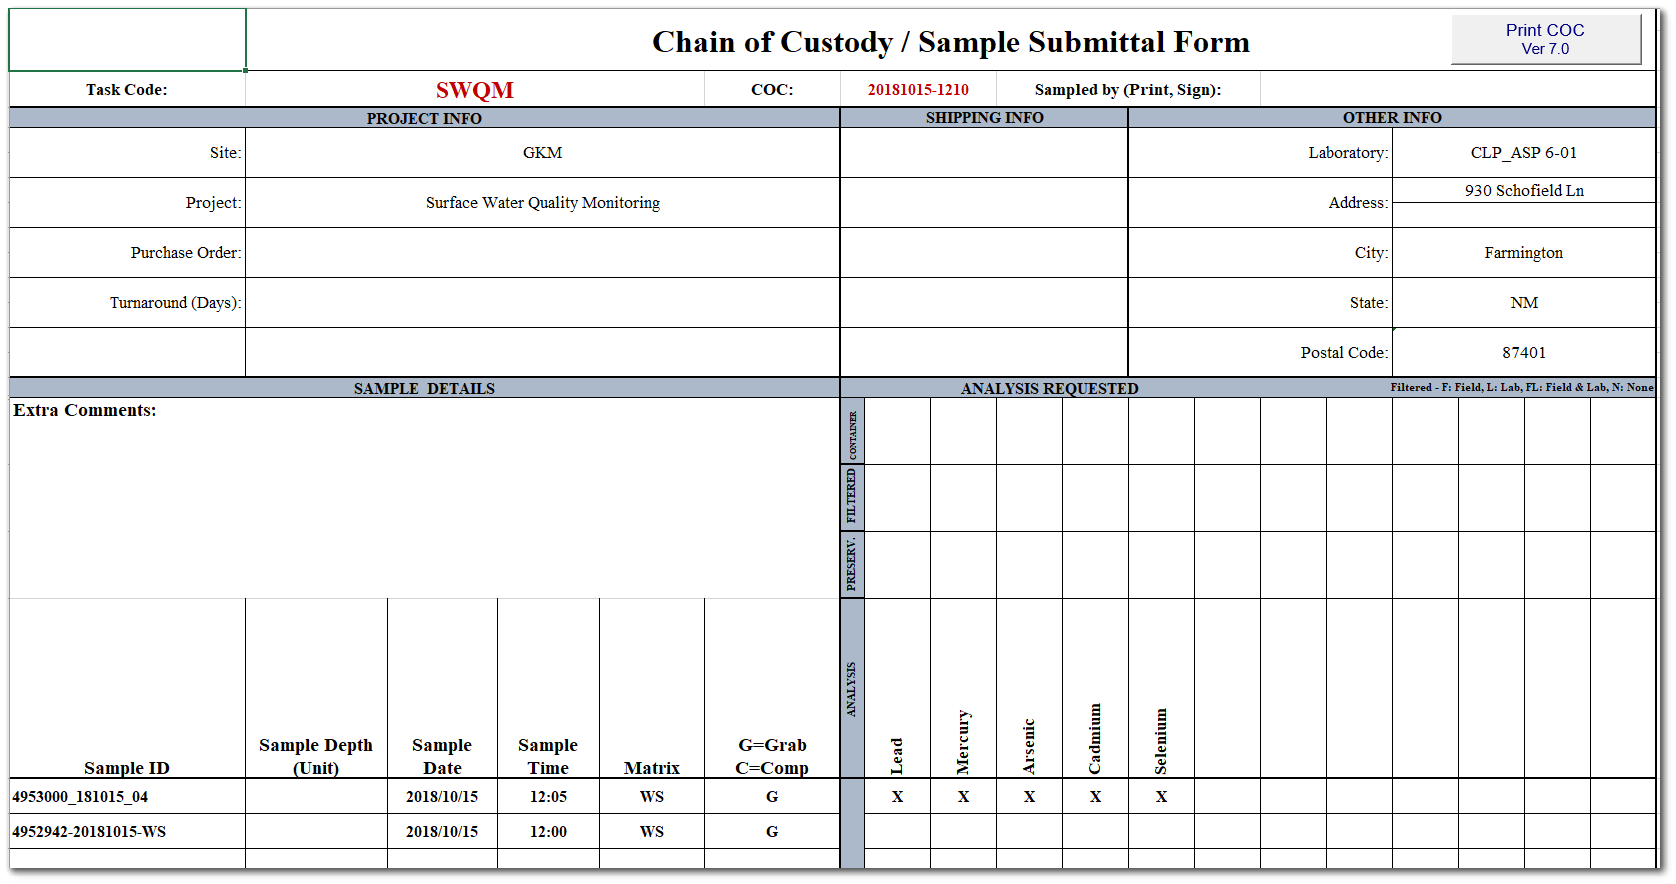
The Chain of Custody form can be exported as a Microsoft Excel spreadsheet. The final format will be determined by the file selected in the Template field. The output file is named based on the COC number.
1.Select COC from the Export group on the Menu ribbon and then Export.
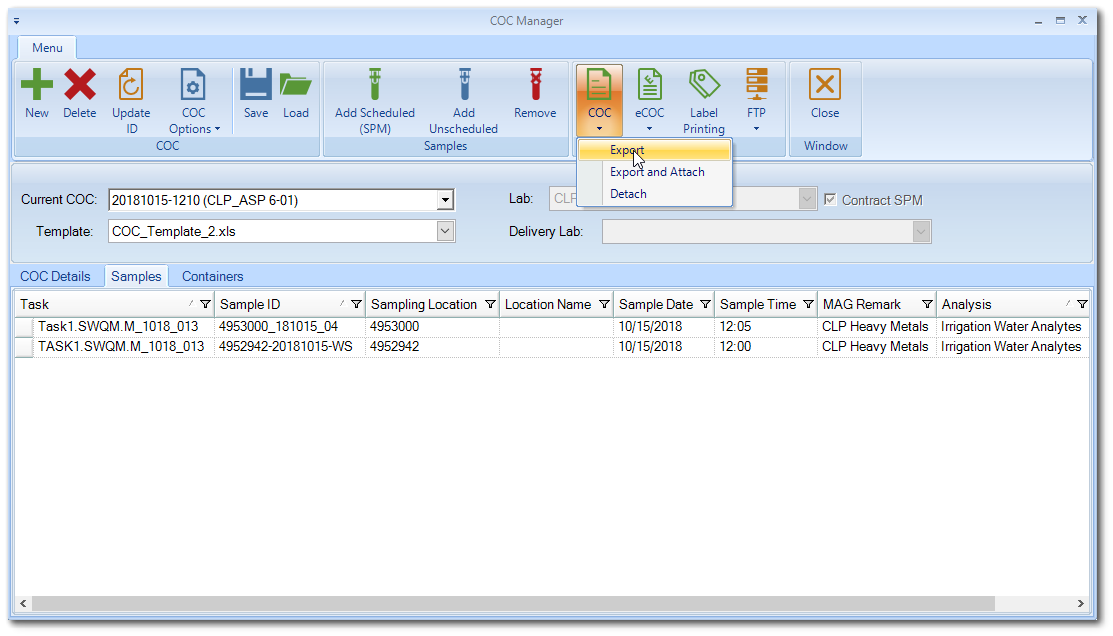
2.Microsoft Excel will open and the completed COC will be loaded. Save the COC to the desired location and/or print it out to provide it to the laboratory.
3.Exit Microsoft Excel after the COC is saved or printed.
4.Select Close ![]() from the Window group in the COC Manager to return to the main EDGE window.
from the Window group in the COC Manager to return to the main EDGE window.
|
Objective: Save and Submit EDGE EDDs |
Tasks
•Save an EDGE EDD
•Sign and Submit (or export) an EDGE EDD
Save an EDGE EDD
1.Select the EDGE Application Menu ![]() and Save EDD As
and Save EDD As ![]() .
.
2.Rename the EDD, select the desired location for the file and select the Save button.
3.Note that the name of the EDD listed on the bottom-right portion of the Status bar has been updated with the new file name and location.
Sign and Submit an EDGE EDD
1.Select the Home ribbon and then EDP Export ![]() from the Export group. The Prepare EDD for Sign and Submit window will open.
from the Export group. The Prepare EDD for Sign and Submit window will open.
2.Ensure at least one task is selected (or All tasks, by default) and then select the Sign and Submit button.

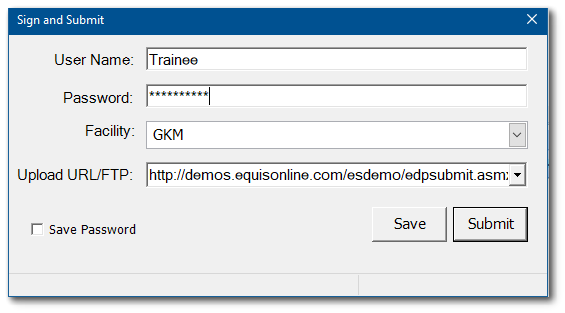
3.In the Sign and Submit window, enter in the User Name and Password provided by the EQuIS Enterprise Administrator.
4.Choose the Facility to which the EDD will be uploaded. This field will be populated if the facility is part of the EDGE EDD.
5.To upload the EDD directly to EQuIS Enterprise, enter the Upload URL/FTP site provided by the EQuIS Enterprise Administrator and then select the Submit button.
6.Alternatively, select Save to save the EDD to the local machine and upload it manually later.