Overview
Build custom forms in Microsoft Visual Studio for use in EQuIS Professional. When designing a form, it is best to conceptualize the design and use of the form prior to actually building it. Consider the following when designing a form:
•Who will be using it?
•What permissions need to be considered?
•What level of User Interface (UI) components will be required to meet user skill levels?
•What does the form need to accomplish?
|
Sketch out the new form prior to starting to build it. |
Exercise Scenario
We need to design a form that will enable EQuIS Professional users to add new companies and contractors to the EQuIS database without having to open RT_COMPANY.
|
Learn how custom forms can facilitate data input and/or data reporting and analysis. |
|
Exercise Objectives |
•Setup New Projects for Forms in Microsoft Visual Studio
•Design and Name Custom Forms
•Add EQuIS Connection and DataSource to Custom Forms
•Add Code to Form Objects in Microsoft Visual Studio
•Build and Compile Forms and Test Form Use in EQuIS Professional
Skills, Software and Permissions Required
•EQuIS Professional 7 must be installed on the workstation
•.NET Framework 4.7.2 or higher must be installed on the workstation
•Administrator permissions are required for the desired facilities
•Microsoft Visual Studio 2015 (Professional or Enterprise) or higher must be installed on the workstation
|
Objective: Setup New Projects for Forms in Microsoft Visual Studio |
1.Launch Visual Studio.
2.Select File> New> New Project.
3.Define the Framework, at the top of the New Project window, to be .NET Framework 4.
4.From the available Templates, expand Visual Basic.
5.Select the Windows Form App template.

6.In the Name box at the bottom, give the new project an appropriate name.
For this exercise, call the project "Company Form <your_initials>".
7.Choose the desired directory path where the project should be saved in the Location box.
8.Select the OK button.
9.Double-click on My Project in the Solution Explorer.
10.In the window that opens, go to the Application tab and delete the Root namespace.

11.In the Assembly Name, give the form the desired name, and end the name with .Forms.
12.Change the Application Type to Class Library.
13.Select the Compile tab.
14.For the Build Output Path, select Browse.
15.Browse to the C:\Program Files\EarthSoft directory, highlight the EQuIS folder and choose Select Folder.
16.Select the Debug tab.
17.Select Start external program and then select Browse.
18.Browse to the C:\Program Files\EarthSoft\EQuIS directory and select the EQuIS.exe file and then the Open button.
19.Select the References tab.
20.Select Add...
21.Select Browse and navigate to the C:\Program Files\EarthSoft/EQuIS directory.
22.Select the EarthSoft.Common.dll and select Add.
23.Select the OK button.
24.Double-click on the newly added reference, and from the Properties pane, change the "Copy Local" option to False.
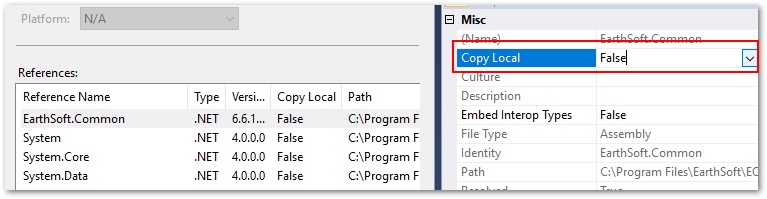
25.Select Save ![]() .
.
26.Select Build> Build Solution.
|
Objective: Design and Name Custom Forms |
Tasks
•Design a Custom Form
•Name a Custom Form
Design a Custom Form
1.Select the Form1.vb [Design] tab.
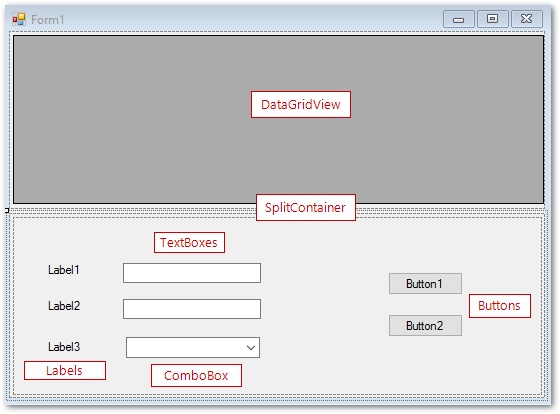
2.From the Toolbox pane, drag and drop specific items into the form, as desired.
For this exercise, do the following:
a.Find SplitContainer in the Toolbox and draw a box in the form to add the split container.
b.With the new Container selected, from the Properties pane on the right, change the "Orientation" to Horizontal.
c.Find DataGridView in the Toolbox, and draw a box in Panel1.
d.Find TextBox in the Toolbox and draw two boxes in Panel2.
e.Find ComboBox (drop-down box) in the Toolbox and draw another box in Panel2.
f.Find Label in the Toolbox add three labels in Panel2, adjacent to the Text and Combo boxes.
g.Find Button in the Toolbox and add two buttons in Panel2.
3.Modify the Properties of each added item in the Properties pane, such as the Anchoring and the Text of each object.
4.Modify the Properties of the overall Form to set "Show in Taskbar" to False.
5.Select Save ![]() .
.
Name a Custom Form
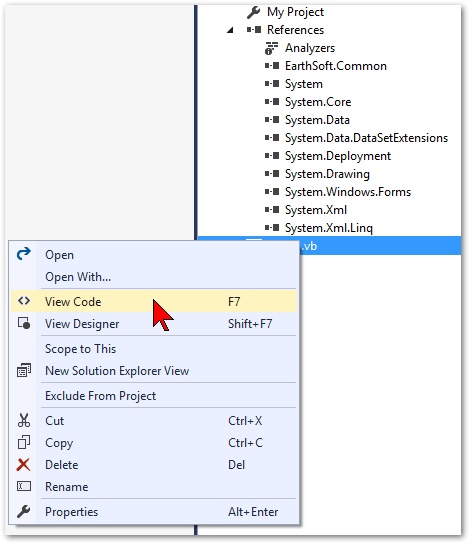
1.Right-click on the Form1.vb in the Solution Explorer on the right-hand side and select View Code.
2.Select the Form1.vb tab.
3.To line 1, add a user-friendly name, where the name of the Form is in between "".
For this exercise, add the below to Line 1
<System.ComponentModel.Description("Company Form")>
|
Objective: Add EQuIS Connection and DataSource to Custom Forms |
1.On line 4, implement the IDataEntryForm by adding the following and then selecting Enter:
Implements EarthSoft.Common.Forms.IDataEntryForm
2.On line 8, add the below, which will get the connection from EQuIS:
Private _Connection As EarthSoft.Common.Data.Connection
3.Update approximately lines 9-16 to the following:
Public Property Connection() As EarthSoft.Common.Data.Connection Implements
IDataEntryForm.Connection
Get
Return Me._Connection
End Get
Set(ByVal value As EarthSoft.Common.Data.Connection)
Me._Connection = value
End Set
End Property
4.Update approximately lines 18-25 to the following:
Public Property Name_() As String Implements
EarthSoft.Common.Forms.IDataEntryForm.Name
Get
Return Me.Text
End Get
Set(ByVal value As String)
Me.Text = value
End Set
End Property
5.Update approximately lines 27-34 to the following to set the visibility of the form:
Public Property Visible_() As Boolean Implements
EarthSoft.Common.Forms.IDataEntryForm.Visible
Get
Return Me.Visible
End Get
Set(ByVal value As Boolean)
Me.Visible = value
End Set
End Property
|
Objective: Add Code to Form Objects in Microsoft Visual Studio |
1.On approximately line 35 (directly after the lines in the previous section), add the following code, to create a dataset to hold the data:
Private _Dataset As New System.Data.DataSet
Private Sub Form1_Load(ByVal sender As Object, ByVal e As System.EventArgs)
Handles Me.Load
End Sub
2.To get the location of the desired tables to be used in the Form, add the following on line 38 where the desired EQuIS tables are in between "":
Me.Connection.Fill(Me._Dataset, "rt_company",
EarthSoft.Common.Data.Connection.FillModes.CurrentFacility)
Me.Connection.Fill(Me._Dataset, "rt_company_type",
EarthSoft.Common.Data.Connection.FillModes.CurrentFacility)
3.Bind the table to the grid by adding the following code on line 40 where the desired EQuIS table is in between "":
Me.DataGridView1.DataSource = Me._Dataset.Tables("rt_company").DefaultView
4.Choose to display select columns by adding the below code on line 41 where the desired EQuIS columns are in between "":
For this exercise, list COMPANY_CODE, COMPANY_NAME and COMPANY_TYPE as the visible columns.
For Each col As Windows.Forms.DataGridViewColumn In Me.DataGridView1.Columns
Select Case col.Name
Case "company_code", "company_name", "company_type"
col.Visible = True
Case Else
col.Visible = False
End Select
Next
5.Set-up the ComboBox (drop-down list) by first linking to the desired EQuIS table on line 49:
ComboBox1.DataSource = Me._Dataset.Tables("rt_company").DefaultView
ComboBox1.DisplayMember = "company_type"
6.To enable one of the buttons to add new records to a desired table in EQuIS, include this code on starting on line 52:
Private Sub Button1_Click(sender As Object, e As EventArgs) Handles Button1.Click
Try
'Make Company Code required in the form
If String.IsNullOrEmpty(TextBox1.Text.Trim) Then
EarthSoft.Common.Message.Show("Company Code is required.")
Exit Sub
End If
'Create an Empty Row with the Table's Schema
Dim newCompany As DataRow = Me._Dataset.Tables("rt_company").NewRow
newCompany("company_code") = TextBox1.Text
newCompany("company_name") = TextBox2.Text
newCompany("company_type") = ComboBox1.Text
'Add the row to the reference table
Me._Dataset.Tables("rt_company").Rows.Add(newCompany)
'Added to clear boxes when Add is clicked
TextBox1.Text = String.Empty
TextBox2.Text = String.Empty
Catch ex As Exception
'show the message to the user
EarthSoft.Common.Message.Show(ex)
End Try
End Sub
7.To enable the second button to save changes to a desired table in EQuIS, include this code on starting on line 80:
Private Sub Button2_Click(sender As Object, e As EventArgs) Handles Button2.Click
Dim transaction As IDbTransaction = Nothing
Try
'create a transaction to make the save atomic
transaction = Me.Connection.BeginTransaction
'save any changes to the EQuIS database
Dim count As Integer = Me.Connection.Save(Me._Dataset.Tables("rt_company"),
transaction)
'commit the transaction
transaction.Commit()
'notify the user
EarthSoft.Common.Message.Show(String.Format("Saved {0} row(s).", count))
Catch ex As Exception
'oops... something went wrong... rollback the transaction
If Not transaction Is Nothing Then transaction.Rollback()
'show the message to the user
EarthSoft.Common.Message.Show(ex)
End Try
End Sub
8.Save ![]() the changes to the solution.
the changes to the solution.
|
Objective: Build and Compile Forms and Test Form Use in Professional |
1.Select Build> Build Solution.
2.Select Debug> Start Debugging.
3.The EQuIS Professional login screen appears. Login to the desired EQuIS database and facility.
4.Select Forms ![]() .
.
5.Open the newly created form.
For this exercise, select the Company Form.
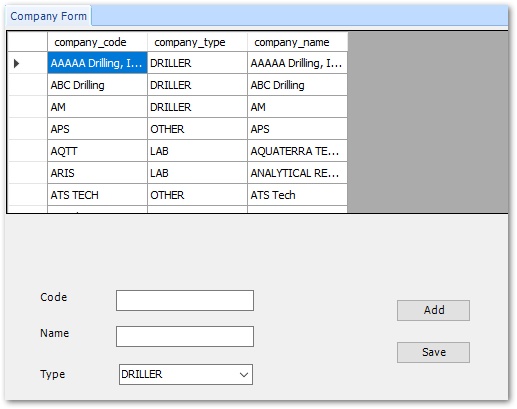
6.Run through the different functions of the form to ensure it is working as expected.
7.Close the form, EQuIS Professional and Visual Studio, when finished testing.