Overview
Checking any EDD with EDP Standalone is performed while not connected to the EQuIS database. EDP Standalone is used by data providers to check EDDs and resolve errors prior to the submission of EDDs to an EQuIS database. Typically, EDDs that pass EDP Standalone checks are submitted to EQuIS via Enterprise EDP.
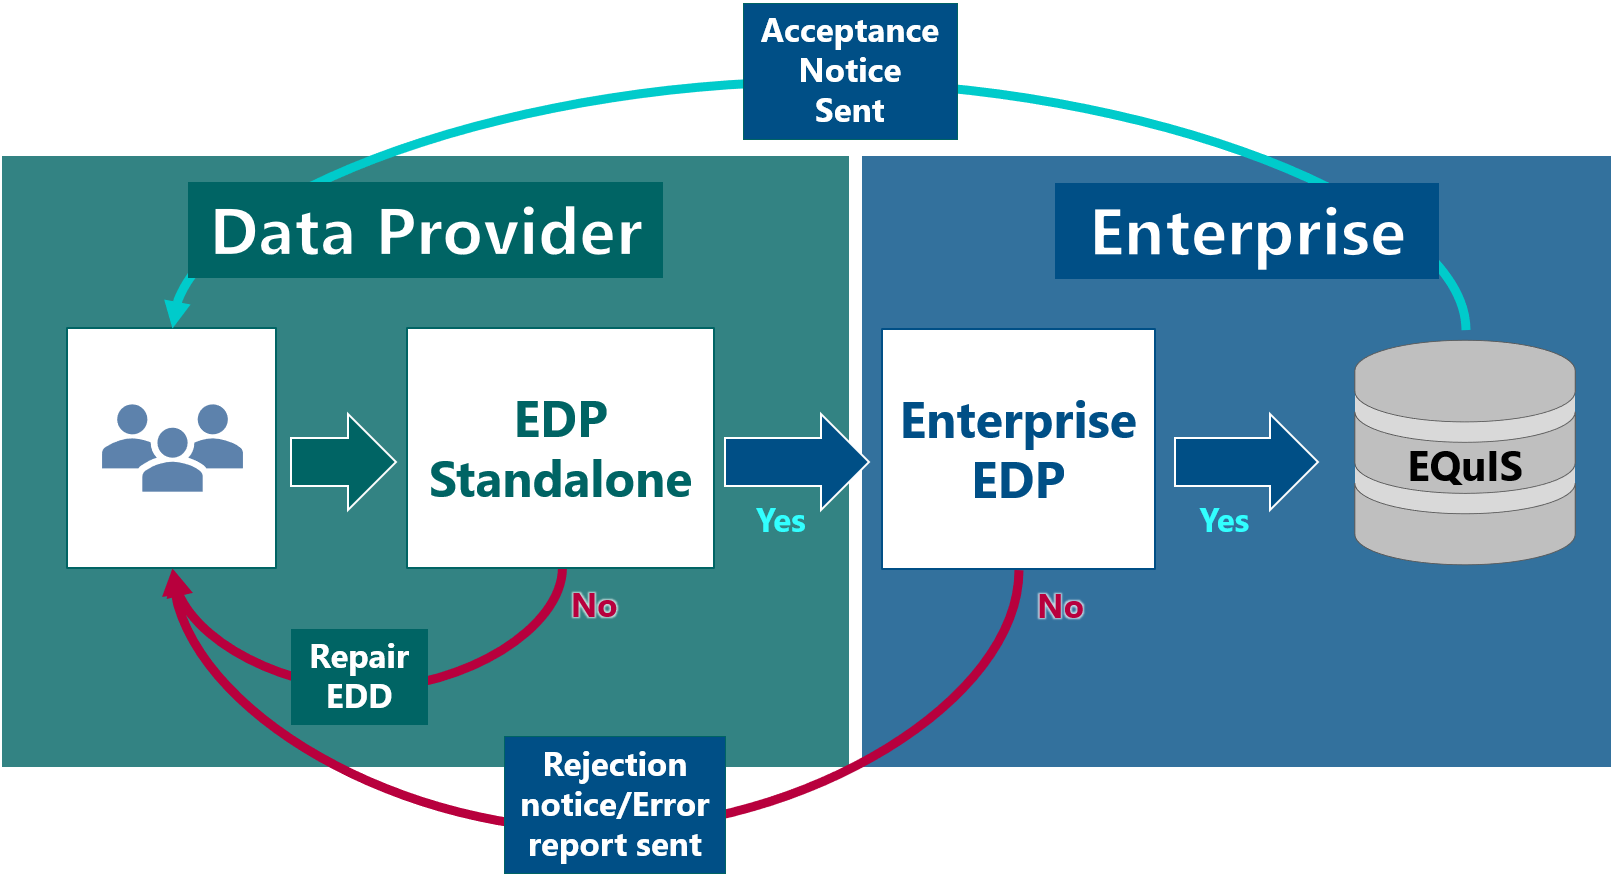
EDP Standalone Workflow
Review of EDDs via EDP Standalone is completed using the following workflow:
1. Launch EDP and load an EQuIS Format
2. Load the EDDs
3. Resolve data errors (if any)
4. Sign and Submit the EDD to clients
Exercise Scenario
We have completed analysis of some samples and have produced an EDD of the results. As the data provider, we must check the EDD for errors using EDP Standalone.
|
EQuIS data providers check EDDs for data quality and then submit the EDDs to their clients rather than uploading directly into an EQuIS database. |
|
Exercise Objectives |
•Launch EDP Standalone and Load an EQuIS Format
•Create Blank EDDs and EDD Descriptions
•Open EDDs in EDP Standalone
•Resolve Data Errors in EDDs in EDP Standalone
•Create EDD Packages with EDP Standalone
Skills, Software and Permissions Required
• EDP Standalone 7 must be installed on the workstation
•.NET Framework 4.7.2 or higher must be installed on the workstation
|
Objective: Launch EDP Standalone and Load an EQuIS Format |
Tasks
•Launch EDP Standalone
•Load an EQuIS Format
•Load Reference Value File
Launch EDP Standalone
1.Open the Windows Start menu.
2.Choose All Programs> EarthSoft> EDP Standalone.
|
Maximize the EDP window to view all icon labels on the Home ribbon. When the EDP window is not maximized, hover the mouse over icons to view label. |
Load an EQuIS Format
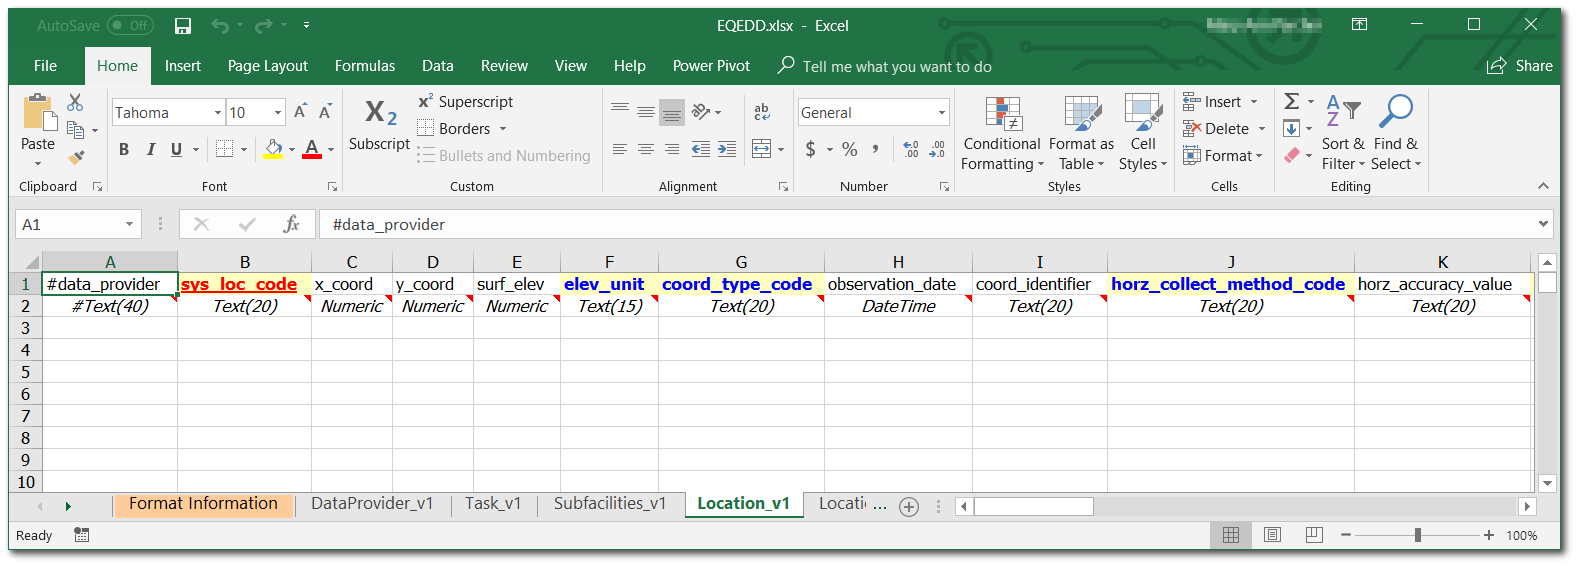
The EQuIS format file is the essence of data checking in EDP and EQuIS. Structured in XML, the EQuIS format file set contains the definitions and restrictions for each individual field in available data tables. The format files control data checks, such as range checking, reference values, formatting and enumerations. Data providers may submit data for EQuIS in any one of a number of standard or custom EQuIS formats. It is essential that the correct EQuIS format file is applied for data to be successfully uploaded into the EQuIS database.
1.Select Format ![]() from the Open group of the EDP Home ribbon.
from the Open group of the EDP Home ribbon.
2.Browse to the desired Format directory and select the format to open. Standard EarthSoft formats are typically located in the EQuIS install folder, C:\Program Files\EarthSoft\EQuIS\Formats\EarthSoft.
For this exercise, browse to the EQEDD Format directory in the EQuIS install folder, typically
C:\Program Files\EarthSoft\EQuIS\Formats\EarthSoft and open "EQEDD.zip".
Load Reference Value File
For each EQuIS database, reference values are defined. These reference values are required to process an EDD for errors. Since EDP Standalone is not linked to a specific EQuIS database, the desired Reference Value File (.rvf) must be loaded into EDP.
1.Click on the File Menu to reveal the application backstage and select Open> Reference Values (.rvf).
2.Browse to the desired Reference Value File (.rvf) and double-click on the file to open it.
For this exercise, browse to the "Training Materials> EDP Materials" directory and download the "EQEDD.rvf" file.
|
Objective: Create Blank EDDs and EDD Descriptions |
The Blank EDD and EDD Description tools facilitate data collection and processing. The Blank EDD tool creates an empty Excel template that follows the format file’s specific layout for data entry. The EDD Description tool defines the specifications of the format. These tools are very useful references and may be incorporated into broader Standard Operating Procedures (SOPs). See this article for additional information on both tools.
Tasks
•Create a Blank EDD Template
•Create an EDD Description File
Create a Blank EDD Template
1.Select Blank EDD ![]() from the Tools group of the Home ribbon.
from the Tools group of the Home ribbon.
|
Selecting the arrow next to the Blank EDD |
2.In the Save dialog, name the Blank EDD file, choose the desired location, and select Save.
|
By default, the Blank EDD will try to save to the same directory as the EQuIS Format. Browse to a different location (e.g., C:\Documents\My EQuIS Work) if computer permissions restrict saving to the default directory. Hold the Shift key to save to the Temp directory. |
A Microsoft Excel file is created with the format columns and field types, along with the color-coding as displayed in EDP to indicate required fields, primary keys, and look-up values. Separate worksheets are named for each section of the format file. The blank EDD file may be loaded into EDP for data checking after data has been entered.
Create an EDD Description File
1.Return to EQuIS EDP Standalone.
2.Select EDD Description ![]() from the Tools group of the Home ribbon.
from the Tools group of the Home ribbon.
3.In the Save dialog box, name the EDD Description file as desired and then select Save.
|
By default, the EDD Description will be named after the EQuIS Format (for example, "EQEDD.xls"), similar to the Blank EDD. Change the file name of the EDD Description to avoid saving over the Blank EDD file. |
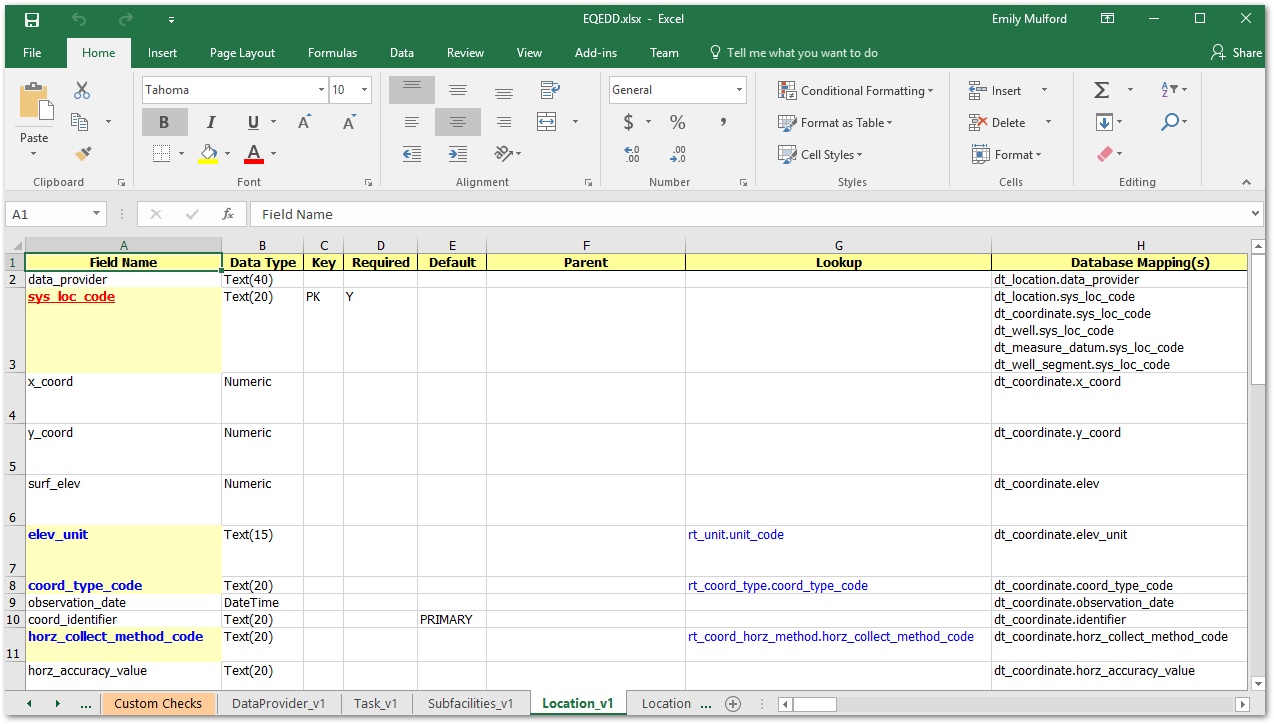
Information about the currently loaded format file (EQEDD) is exported into a Microsoft Excel spreadsheet, including whether a field is a primary key (i.e., required), data type, related look-up tables, and EQuIS Schema mapping. The EDD description file includes a separate worksheet detailing each section of the EQuIS format file.
|
Objective: Open an EDD in EDP Standalone |
EDP Standalone highlights errors with different colors to signify the error type, facilitating error correction. Errors may be corrected easily, directly within EDP Standalone.
EDD errors often occur because of issues with formatting, logic, or terminology. Some common EDD errors include:
Error Color/Type |
Reason for Error |
|---|---|
Missing Required Field |
A cell is not populated and the field is required to be populated by the format. |
Value Not Found in List |
The contents of the cell should match one of the available options in the drop-down list for that cell and they currently do not. (Note the drop-down list comes from an enumeration list.) |
Value Exceeds Field Length |
The number of characters in the cell exceed the number allowed for that field in the format. |
Orphan Row |
The contents of the cell should match the contents of the parent cell and currently do not. |
Reference Value Not Found |
The contents of the cell should match one of the available options in the drop-down list for that cell and they currently do not. (Note the drop-down list comes from a look-up table.) |
1.Select EDD ![]() from the Open group of the EDP Home ribbon.
from the Open group of the EDP Home ribbon.
2.Browse to the desired EDD file (typically an .xls, .zip or multiple .txt files) and double-click on the file to open it.
For this exercise, browse to the Training Materials> EDP Materials directory and open the "Tutorial_EDD_Errors.Gold_King_Mine.EQEDD.xls" file.
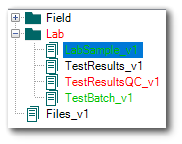
3.Data will load into one or more sections of the format, depending on which sections were populated in the EDD file. Populated section names will be Red or Green, depending on if they contain errors or are error-free, respectively. Empty sections of the format will remain black.
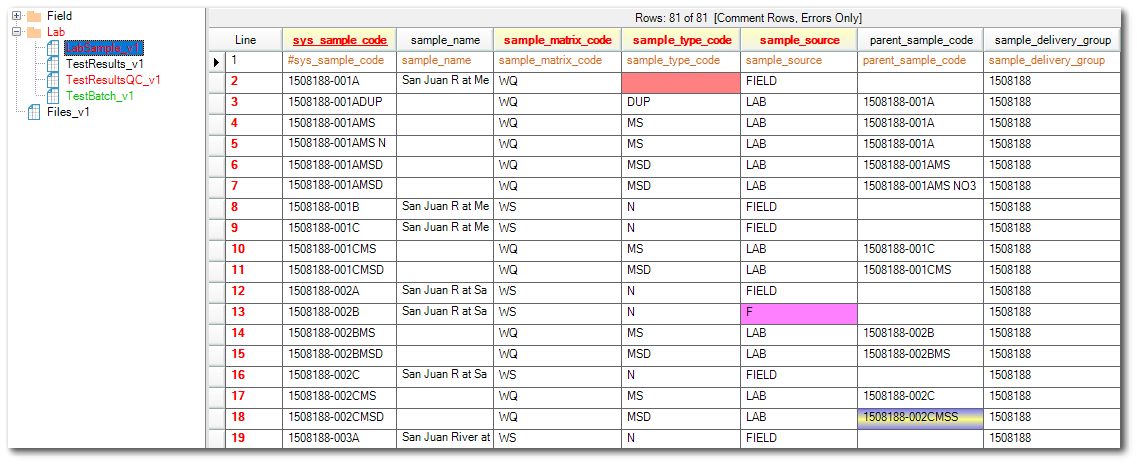
For this exercise, data will load into the Lab sections of the format (LabSample_v1, TestResultsQC_v1, and TestBatch_v1), with the LabSample_v1 and TestResultsQC_v1 section names highlighted in Red, indicating errors. All Field sections are empty.
4.Single-click on the top-most Red section (if any) to view the data in that section. Since data in the various tables are related, it is important to resolve data errors in a top-down manner.
For this exercise, single-click on the LabSample_v1 section to view the data in that section.
|
The default appearance of the Column Headers, Errors, and Informational messages can be modified to enhance the user experience. This functionality can be accessed by clicking on the File tab then selecting the Options button and expanding the Appearance menu. |
|
Objective: Resolve Data Errors in EDP |
Troubleshoot and resolve data errors within an EDD. Two different cells with the same error type may or may not be resolved in the same way. The steps below are recommendations for this scenario but may vary with other EDDs.
In this scenario, there are several errors within the EDD that need to be resolved.
|
When resolving errors, remember that edits made to data files within EDP are not automatically saved. If data files are modified, save the data files frequently during the EDP session. |
Tasks
•Resolve Missing Required Field Errors
•Resolve Value Not Found in List Errors
•Resolve Value Exceeds Field Length Errors
•Resolve Orphan Row Errors
•Resolve Reference Value Not Found Errors
•Save Corrected EDD
Resolve Missing Required Field Errors
1.Select Errors Only from the View group on the EDP Home ribbon to display only the problematic data.
|
If desired, toggle off the display of the Comment Rows by selecting or clearing the Comment Rows check box in the View group. |
2.Hover the mouse over any cells highlighted with Red to reveal the error type of "Missing required field."
For this exercise, hover the mouse over the sample_type_code field in Row 2.
3.Populate these fields with the appropriate values and note that the errors are resolved.
For this exercise, populate the sample_type_code field in Row 2 with N (for "Normal"), and then single-click in another field and note that the error is resolved.
Resolve Value Not Found in List Errors
1.Hover the mouse over any cells highlighted with Fuchsia to reveal the error type of "Value not found in list".
For this exercise, note the SAMPLE_SOURCE field is highlighted in fushia for Row 13.
2.Select the drop-down list and select an appropriate value from the drop-down list.
For this exercise, select FIELD from the drop-down list.
Resolve Field Length Errors
1.Hover the mouse over any cells highlights with Yellow to reveal the error type of "Value exceeds field length."
For this exercise, note that Row 17 has an error in the COMPOSITE_YN field, which is highlighted in yellow.
2.Hover the mouse over the column header of the field to reveal a tool-tip, which indicates the limit of the field
For this exercise, hover over the COMPOSITE_YN field and note that the length of this field should be 1 and that “No” is a length of 2 and is causing the error.
3.Change the contents of the cell to an appropriate value that is equal to or shorter than the length of the field.
For this exercise, change “No” to “N”. (Note that Row 17 disappears from view, as all the errors in the row have been resolved.)
Resolve Orphan Row Errors
1.Turn Errors Only off to better troubleshoot any Orphan Row errors.
|
Depending on the error, it may be helpful to turn Errors Only off to view all the data and compare rows with errors to error-free rows. |
2.Hover the mouse over any cells highlighted with a Purple gradient to reveal the error type of "Orphan Row."
For this exercise, note that Row 18 has an error in its PARENT_SAMPLE_CODE field.
3.Any value in the orphan row cell must match the corresponding value in the parent of this record.
For this exercise, any value in PARENT_SAMPLE_CODE must match the corresponding value in the SYS_SAMPLE_CODE record that is the parent of this record.
|
Generate an EDD Description to help determine the parent of the orphan. |
4.Change the cell to match the appropriate parent reference.
For this exercise, the corresponding PARENT_SAMPLE_CODE record is “1508188-002CMS.” Change the PARENT_SAMPLE_CODE field to “1508188-002CMS.” Note that all errors in the LabSample_v1 section are now resolved and the section is highlighted green. |
|
5.Resolve any other Orphan Row errors in other sections.
For this exercise, select the TestResultsQC_v1 section of the EDD and note that Row 16 has another “Orphan row” error.
Any value in SYS_SAMPLE_CODE in this section of the format must match one of the corresponding SYS_SAMPLE_CODES in the LabSample_v1.
The corresponding parent SYS_SAMPLE_CODE record in the LabSample_v1 section is “1508188-001AMS”. Change the SYS_SAMPLE_CODE field in this section to “1508188-001AMS”.
6.After resolving data errors, click Refresh ![]() > Refresh Table from the Data group to refresh the section if the changes are not reflected.
> Refresh Table from the Data group to refresh the section if the changes are not reflected.
Resolve Reference Value Errors
The error message “Reference Value Not Found” in EDP indicates that the reference value is incorrect, or does not exist in the reference value file.
1.While viewing an EDD in EDP, hover the mouse over any “Reference value not found” errors in the EDD.
For this exercise, in the TestResultsQC_v1 section, note that Row 7 contains an error (the number 7 is highlighted in red). Use the scroll bar to scroll to the right to look for the error. The highlighted cell shows a TEST_TYPE = INITIALL. |
|
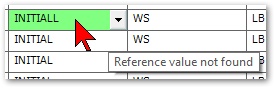
2.Check the drop-down menu to see if there is a synonymous value for the flagged value.
Note the remainder of the values show the TEST_TYPE = INITIAL, which is in the drop-down list.
3.Where applicable, apply the synonymous value to resolve the error.
Click in the highlighted cell and change the TEST_TYPE to INITIAL. After this change is made, click on another cell.
Save Corrected EDD
1.Once the errors in each section are resolved, select the Save option from the application backstage, accessible from the File menu in the top-left corner.
2.Save the work as an Excel Workbook (.xls) by changing the file type.
3.Re-name the saved EDD and save any additional changes to the EDD to this file.
|
It is a good idea to preserve the original EDD by renaming the EDD after making modifications. The original EDD remains available for reference, which is useful when communicating with data providers. |
|
Prior to uploading EDDs, review data for potential errors that might not be flagged as errors by EDP. Examples of these other potential issues are correct sampling dates, matrix types being consistent with sample type, etc. |
|
Objective: Create EDD Packages with EDP Standalone |
Use the built in Sign and Submit function within EDP Standalone to create an EDD package automatically and prepare it for submission to EQuIS Enterprise. The EDD package consists of a .zip file with individual .txt files for each table in the EDD as well as a user certificate. The .zip file name reflects the date and time, facility name, and format file used to create the file.
1.Verify that all of the errors are resolved by ensuring each populated format section of the EDD is Green.
2.Click on the File Menu to open the application backstage and select Sign and Submit.
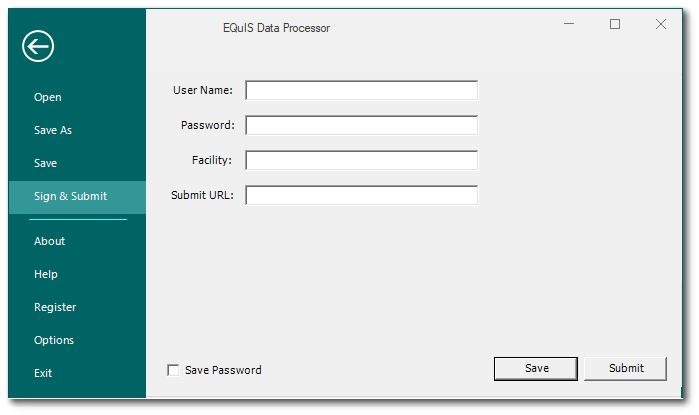
3.Enter the EQuIS Enterprise Username and Password, as well as the Facility Code for the data package. If applicable, enter a Submit URL.
4.Click the Save button.
5.Provide a filename and location where the file will be saved.
6.Click the Save button.
7.Select the OK button.
|
See Upload EDDs–Enterprise for more information on importing EDDs. |