Overview
Use the Explorer widget for browsing, searching and organizing items. Create folders, which can then be used to group items. Also, create new files and facilities.
The Explorer widget is divided into sections, as depicted in the image below:
•Tree of all file folders and contents (left pane)
•Table of Information (main pane)
•Top frame that contains Search options and the New File/New Facility buttons
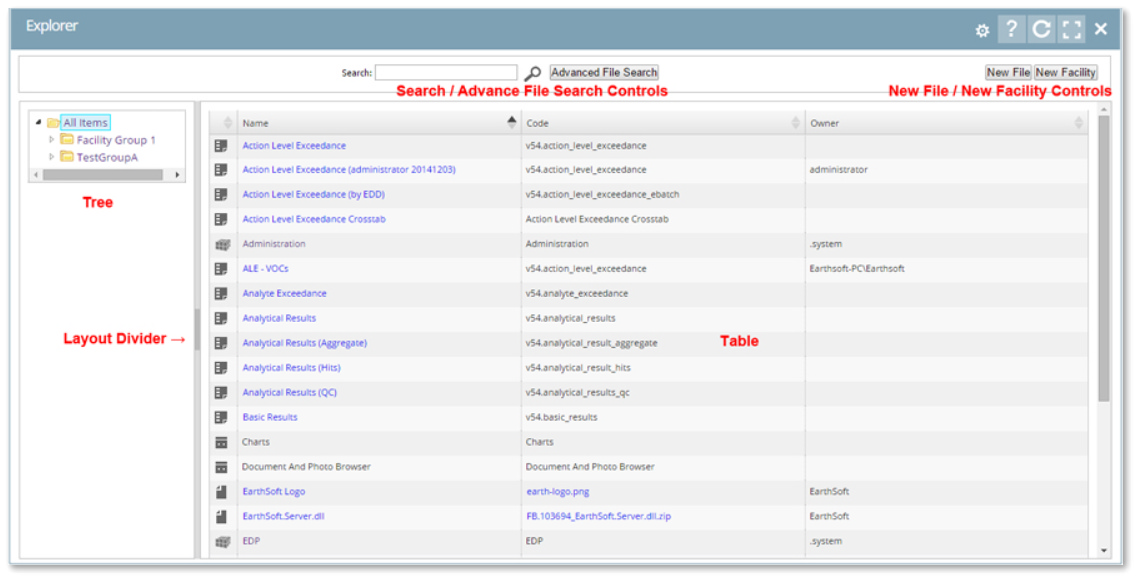
In the left section labeled Tree, the existing folder structures are displayed. By clicking a node, the table is populated with the contents of that folder.
The table portion of the widget displays the icon of each object type along with the object name, description, and owner.
Object Type |
Name |
Code |
Owner |
|---|---|---|---|
Dashboard
|
Dashboard Title |
Dashboard Title |
Creator of Dashboard |
Facility
|
Facility Name |
Facility Code |
Facility Project Manager |
File
|
File Title |
File Name |
File Author |
Report
|
For user (pick) reports, this is the Report Name. For base (build) reports, this is the Report Display Name. |
For user (pick) reports, this is the base report specific name. For base (build) reports, this is the specific name of the report. |
If created in Enterprise, the creator of the user report. Otherwise, left blank. |
Widget
|
Widget Type Name |
Widget Type Name |
N/A |
Exercise Scenario
We need to learn more about the Gold King Mine project that is being managed with EQuIS and how to use tools on the dashboard. Understanding the Explorer widget will us to manage files and provide information to stakeholders.
|
Learn how the Explorer widget works and how to access objects via the widget. |
|
Exercise Objectives |
•Create and Manage New Folders with the Explorer Widget
•Run Ad-hoc Tabular Reports with the Explorer Widget
Skills, Software and Permissions Required
•Internet Explorer 10 (or higher), Google Chrome, Mozilla Firefox or Microsoft Edge
•Editor permissions to desired facilities
•Editor permissions to desired dashboards and reports
•Viewer permissions to the groups and folders object type
•Viewer permissions to all non-administrator widgets
•Creator permissions on the dashboard, EDDs and reports object types
|
Objective: Create and Manage New Folders with the Explorer Widget |
1.Select the Dashboards drop-down menu from the top-right corner of the current dashboard.

2.The Dashboards window will open and show the dashboards and folders currently available. Select the Explorer (default) dashboard.
3.Expand the All Items folder in the tree on the left-hand side of the Explorer widget to view the current sub-folders.
4.Right-click on the All Items folder and select New Folder from the context menu.
5.Name the new folder as desired and then select the OK button. View the new folder under the All Items folder.
For this exercise, name the new folder "Training Exercises".
6.Move any reports, dashboards or other desired items into the newly created folder by dragging and dropping the items into the folder on the left-hand side.
7.Select the folder to display any items within the folder.
8.To delete, rename, cut, copy or paste any existing folders, right-click on the desired folder and select the appropriate option from the context menu.
|
Objective: Run Ad-hoc Tabular Reports with the Explorer Widget |
1.Navigate to any desired dashboard in EQuIS Enterprise. Select Add Widget ![]() from the Dashboard ribbon. Select the Explorer widget. The widget will appear on the dashboard. Move the widget to the desired location on the dashboard.
from the Dashboard ribbon. Select the Explorer widget. The widget will appear on the dashboard. Move the widget to the desired location on the dashboard.
For this exercise, return to the "Gold King Mine <your initials>” dashboard and add an Explorer widget. Move the widget to beneath the GKM Overview HTML widget in the Reports section of the dashboard.
2.Click on the All Items folder and find any item that has the Report ![]() icon listed next to it.
icon listed next to it.
For this exercise, click on the All Items folder and find one of the reports generated during a previous exercise.
3.Single-click on the Report Name to open the Report Editor window to view or edit the report parameters or download report output.
4.Choose or edit the report parameters as desired.
5.Select View or Download to download the report output.
6.Select Save, Save As or Cancel to return to the Explorer widget and the dashboard.