Overview
Import data from gINT project databases into EQuIS via the EQuIS Data Processor (EDP). Create boring logs, fence diagrams, reports, and "tables" of EQuIS data with the EQuIS for gINT interface.
Exercise Scenario
There is data from a gINT database that is not yet in EQuIS. The data needs to be imported into the EQuIS database. Then, data may be used from EQuIS to create boring logs and other output with the gINT Library.
|
Exercise Objectives |
•Import gINT Data into EQuIS via EDP
•Export Data from EQuIS with the gINT Interface
Skills, Software and Permissions Required
•EQuIS Professional v6.6 or higher installed on the workstation
•.NET Framework v4.0 or higher installed on the workstation
•gINT v8.0 or higher installed on the workstation
•Read/write permissions are needed for importing gINT data into EQuIS for the desired facilities
•Read permissions are needed for exporting EQuIS data using the gINT interface for the desired facilities
•Access to the Plus Graphics, Plus Data & Graphics, Premier Graphics, Premier Data & Graphics or Ultimate EQuIS Professional Library
•Proficiency with EQuIS Professional EDP is recommended—see the Check and Import EDDs— Professional exercise for additional practice
|
Objective: Import gINT Data Into EQuIS via EDP |
Tasks
•Open a gINT EDD Format in EQuIS Professional EDP
•Import gINT data into EQuIS
Open a gINT EDD Format in EQuIS Professional EDP
|
32-bit EQuIS Professional must be used with gINT. 64-bit EQuIS Professional comes with a 32-bit version. |
1.Log-in to EQuIS Professional in 32-bit mode following these steps:
a.Open Windows Explorer.
b.Browse to C:\Program Files\EarthSoft\EQuIS.
c.Double-click on the EQuIS_x86.exe application.
d.Log in to the desired facility.
For this exercise, log into any facility—the EDD will create the new facility needed automatically.
2.Select EDP ![]() from the Home ribbon.
from the Home ribbon.
3.Select Format ![]() from the Open group of the EDP toolbar.
from the Open group of the EDP toolbar.
4.Browse to the desired gINT import format.
For this exercise, browse to the "gINT_std_us.xse file".
|
This format (EQuIS_6.x_formats_gINT.zip) must be downloaded from the EarthSoft Community Center. The file may be found on the Downloads dashboard, under |
5.Single-click to select the format file and select the Open button.
Import gINT data into EQuIS
1.Select EDD ![]() from the Open group of the EDP toolbar.
from the Open group of the EDP toolbar.
2.Browse to the desired gINT project database (.gpj file) and double-click on the file to open it.
For this exercise, browse to the RockyFlats_gint.xls file and double-click on the file to open it.
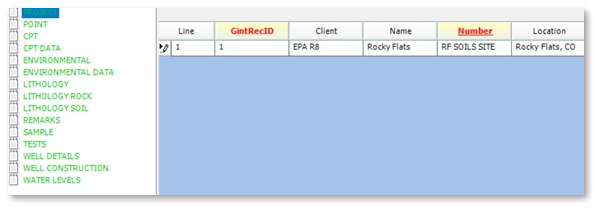
3.Data will load into several sections of the format, depending on which sections were populated in the EDD file. Populated section names will be Red or Green, depending on if they contain errors or are error-free, respectively.
4.Single-click on the top-most section to view the data in that section.
5.Resolve any data errors highlighted in the red sections.
6.Once the errors in each section are resolved, select Save> EDD option from the Application menu in the top-left corner.
7.Save the work as an Excel Workbook (.xls) by changing the file type.
8.Re-name the saved EDD and save any additional changes to the EDD to this file.
|
It is a good idea to preserve the original EDD by renaming the EDD after making modifications. That way, the original EDD is available for reference, which is useful when communicating with data providers. |
9.Select the Professional ribbon.
10.Select Create ![]() from the Package group of the Professional ribbon to create the package and check it against the rules of the EQuIS database.
from the Package group of the Professional ribbon to create the package and check it against the rules of the EQuIS database.
11.If there are no errors listed, select the Finish button.
|
This EDD format creates a new facility in the EQuIS database. |
12.Select Commit ![]() from the Package group of the Professional ribbon and select the appropriate commit type to commit the package to the EQuIS database.
from the Package group of the Professional ribbon and select the appropriate commit type to commit the package to the EQuIS database.
For this exercise, select Insert and Update.
13.If there are no errors listed, select the Finish button.
14.Close EDP and return to the main EQuIS Professional application.
|
Objective: Export Data from EQuIS with the gINT Interface |
Tasks
•Access the EQuIS for gINT Interface in EQuIS Professional
•Select Data within the EQuIS for gINT Interface
•Export Data from the EQuIS for gINT Interface
Access the EQuIS for gINT Interface in EQuIS Professional
1.Log in to EQuIS Professional in 32-bit mode following these steps:
a.Open Windows Explorer.
b.Browse to C:\Program Files\EarthSoft\EQuIS.
c.Double-click on the EQuIS_x86.exe application.
2.Select the desired facility with the Plus Graphics, Plus Data & Graphics, Premier Graphics, Premier Data & Graphics or Ultimate license libraries.
For this exercise, login to the Rocky Flats facility in the EQuIS training database.
3.From within EQuIS Professional, select the Logs & Diagrams ribbon.
4.Select the gINT icon to launch the EQuIS for gINT interface ![]() .
.
|
Note the gINT icon will not be visible or available in EQuIS Professional if gINT is not installed on the same workstation as EQuIS Professional. |
5.If prompted, browse to the desired gINT Template (.gdt file).
For this exercise, browse to the "gint std us.gdt" template.
6.Select the Open button.
|
Switch .gdt files by single-clicking on the current .gdt listed under the gINT Template section on the right-hand side of the EQuIS for gINT interface. |
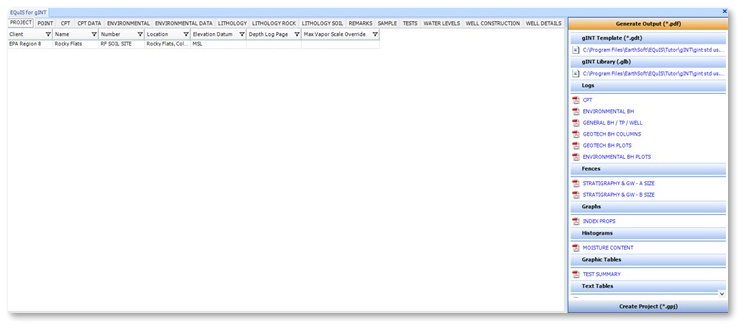
7.Single-click on the gINT Library (.glb) section to browse to the desired gINT Library.
For this exercise, browse to the "gint std us.glb" library.
8.Select the Open button.
9.Note that the Library as well as the various output options available from the library load in the Generate Output (*pdf) section.
Select Data within the EQuIS for gINT Interface
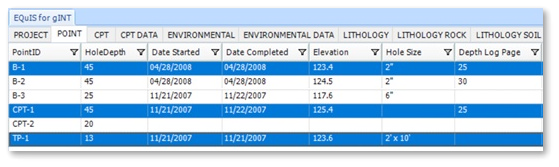
1.Select the Point tab.
2.Select the desired locations (hold down the Ctrl key to select multiple locations).
For this exercise, highlight the points B-1, B-2 and B-3.
3.Review the additional tabs to view the other data that may be exported, depending on which type of output is selected.
Export Data from the EQuIS for gINT Interface
1.Choose from the Generate Output menu on the right side of the screen to export data out of EQuIS and in a specific format.
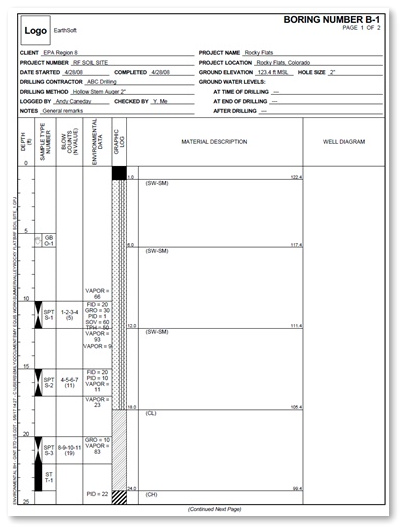
For this exercise, select Environmental BH Plots on the right side of the screen to export data out of EQuIS and into the Environmental Borehole Plot template.
2.Note that any exported logs, fences or graphs will be created in .pdf format.
3.To create a gINT Project (.gpj file), expand Create Project (*.gpj) from the bottom right-hand corner of the interface.
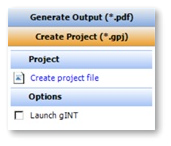
4.Optionally, check the Launch gINT option and then select Create project file.