Overview
The EZView widget queries and downloads EQuIS reports and creates EIAs to automatically send reports. A primary purpose of the widget is to run the selected report and then export the report output to third party programs, such as Excel (.xls) workbooks, ArcGIS shapefiles (.shp), tab delimited (.txt) files, and Google Earth (.kmz) files.
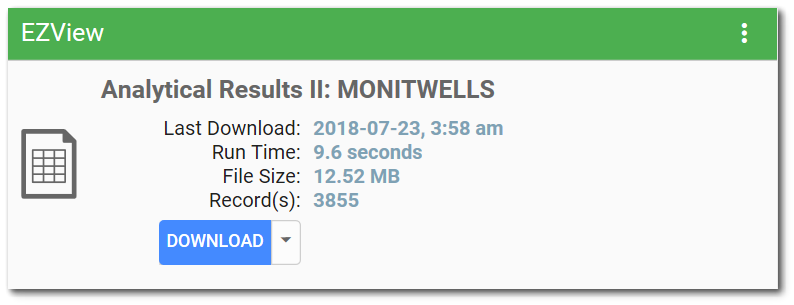
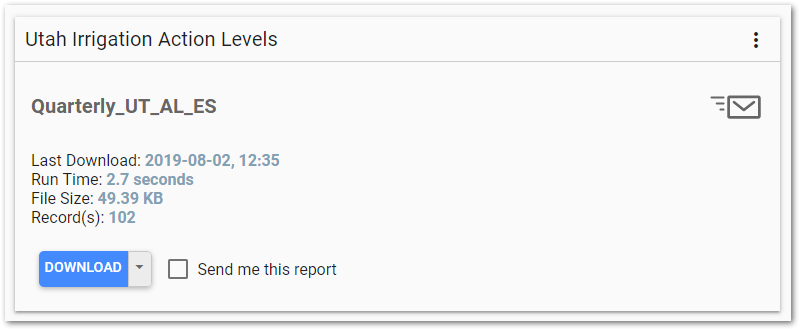
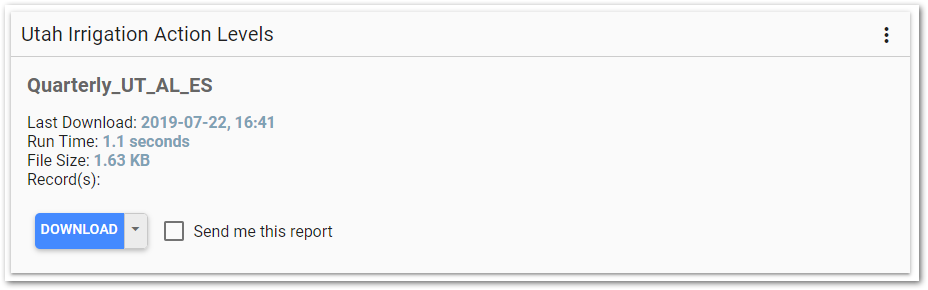
The EZView widget displays the report icon on the left. The report icon will include an envelope if an EIA is defined for the widget. The right side of the widget includes the following:
•The name of the selected report.
•Last Download – The date and time (end-user browser local time) that the report was last downloaded.
•Run Time – The run time (i.e., elapsed time) indicates how long it took the report to run the last time it was downloaded (excludes download time).
•File Size – The file size of the report output the last time it was downloaded.
•Record(s) – If applicable, the number of records in the tabular output of the report the last time it was downloaded.
•Download – Export the report output by clicking on this button to open a drop-down menu with download options. Export the report data to a variety of output types (e.g., txt, csv, xlsx, shp, kmz) for import into third party programs for additional review and/or manipulation. The available export types depend on whether the report outputs tabular or non-tabular data. A non-tabular report will only display the download option(s) for the file type that it generates. For example, the "Google Earth: Locations" report only generates .kmz files, and therefore, only the .kmz button will be available.
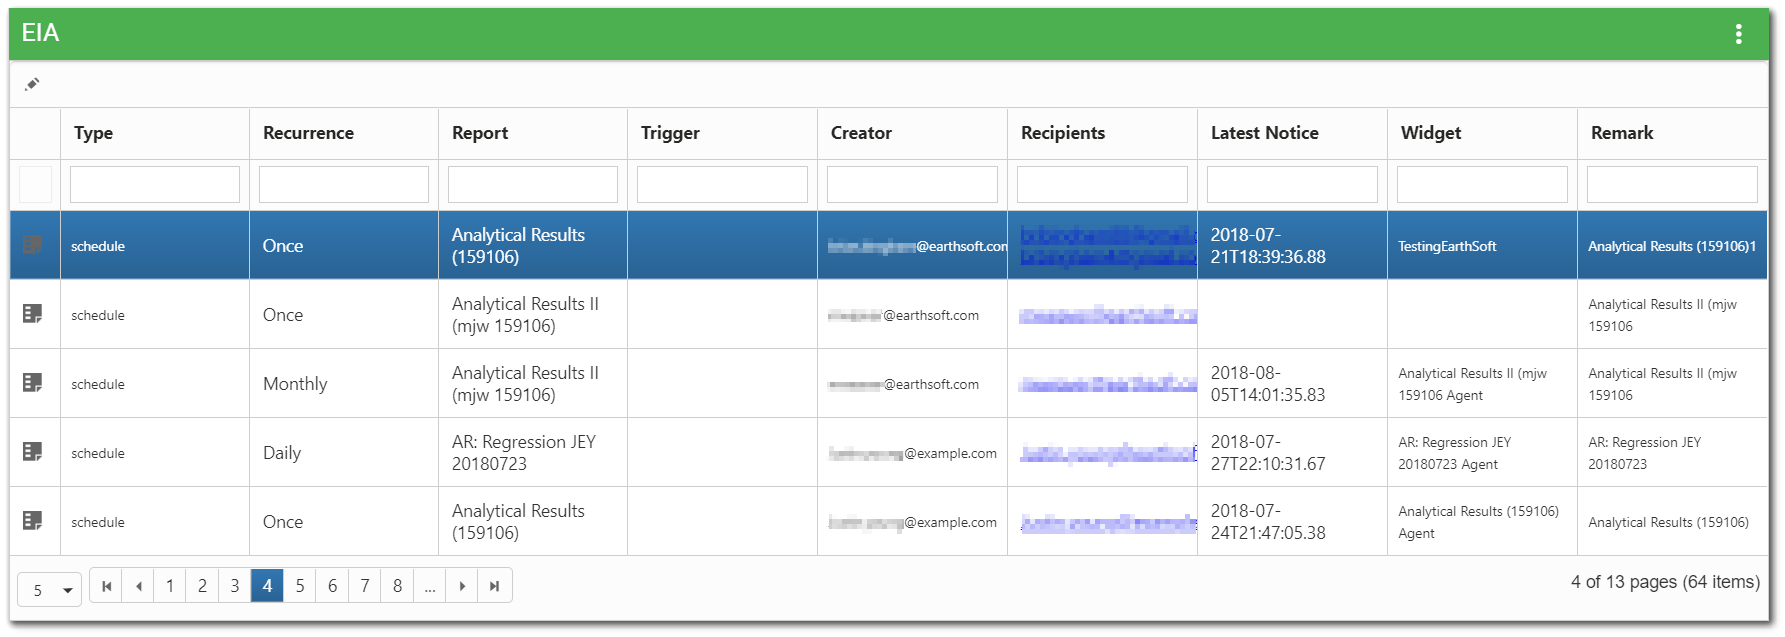
After EIAs are created in the EZView widget, the status of EIAs can be monitored using the EIA widget. EIAs can also be edited from the EIA widget. The EIA widget has no specific properties that can be modified other than the widget title and color.
Exercise Scenario
For the Utah Location Group we want to compare the Irrigation Water Analytes group (which contains the known GKM contaminants) to the Short-Term and Long-Term Irrigation Waters action levels. We will use an EZView widget to generate a report in Excel. For any data that will be uploaded with new EDDs, we will set the EZView widget to trigger an EIA when the action levels are exceeded.
|
Learn how to create and export analytical results using an EZView Widget, and to create |
|
Exercise Objectives |
•Build, Save, and Export a Report with the EZView Widget
•Build Triggered and Scheduled EIAs with the EZView Widget
Skills, Software and Permissions Required
•Google Chrome, Mozilla Firefox, or Microsoft Edge
•Editor permissions to desired facilities
•Editor permissions to desired dashboards and reports
•Viewer permissions to the groups and folders object type
•Viewer permissions to all non-administrator widgets
•Creator permissions on the dashboard, EDDs and reports object types
|
Objective: Build, Save and Export a Report |
The EZView widget can be used to build a report. A set of report parameters can be saved as a User Report, which can then be downloaded to variety of file types.
1.Navigate to any desired dashboard in EQuIS Enterprise.
For this exercise, return to the "Gold King Mine - Utah <your initials>” dashboard.
2.Select More Options ![]() on the right-side of the dashboard header and then select Edit from the drop-down menu to open the Dashboard Editor.
on the right-side of the dashboard header and then select Edit from the drop-down menu to open the Dashboard Editor.
3.Select ![]() to open the Widget Chooser.
to open the Widget Chooser.
4.Add an EZView widget in the desired location on the dashboard.
For this exercise, add an EZView widget in the Reports section on the dashboard.
5.Select Save to close the Dashboard Editor and save the changes to the dashboard.
6.Select More Options ![]() in the upper right corner of the widget to open the drop-down menu and then select the Edit menu option. The widget title can be modified as well as the color of the widget.
in the upper right corner of the widget to open the drop-down menu and then select the Edit menu option. The widget title can be modified as well as the color of the widget.
For this exercise, rename the widget to "Utah Irrigation Action Levels".
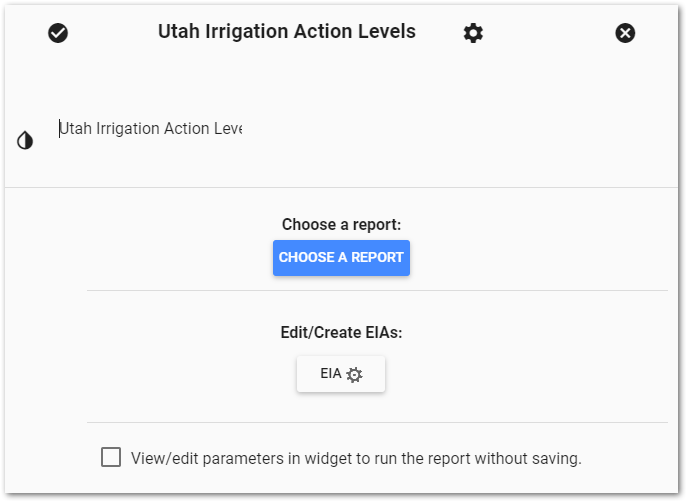
7.To select a report, click Choose A Report. The Report Chooser will open and display available reports. Published reports for the selected EQuIS database can be viewed in either tiled or grid view.
8.Select the desired system report.
For this exercise, select the Action Level Exceedance II with Parameters report.
9.To change the report parameters, select ![]() to open the Report Parameter Editor for the selected report.
to open the Report Parameter Editor for the selected report.
10.The parameters are grouped and each group can be expanded to show all parameters by clicking on the arrow (![]() ) to the left of the group. Selected parameter values are listed next to the parameter name. If no value is shown, then no value has been set. To edit the parameter value, click on the drop-down next to the parameter and select the values by highlighting those values.
) to the left of the group. Selected parameter values are listed next to the parameter name. If no value is shown, then no value has been set. To edit the parameter value, click on the drop-down next to the parameter and select the values by highlighting those values.
11.Expand the appropriate groups to select the desired parameters.
|
If the desired parameter value is not visible from the drop-down list, go to the next page or increase the items per page being displayed. The search pane can also be used to find desired parameters. To select multiple parameters, hold the CTRL key while selecting parameters. |
For this exercise, select the following parameters:
Parameter |
Selection |
|---|---|
Facility |
Gold King Mine |
(Location) Group(s) |
Utah |
Matrix(es) |
WS |
Fraction(s) |
T |
(Analyte) Group(s) |
Irrigation Water Analytes |
(Result) Unit |
ug/L |
Action Level(s) |
Long-Term Irrigation Waters, Short-Term Irrigation Waters |
|
To view the report (either prior to or instead of saving), select View at the top of the Edit Report Parameters window. Note that the report opens in a separate grid window. Close the View window to return to the Edit Report Parameters window. |
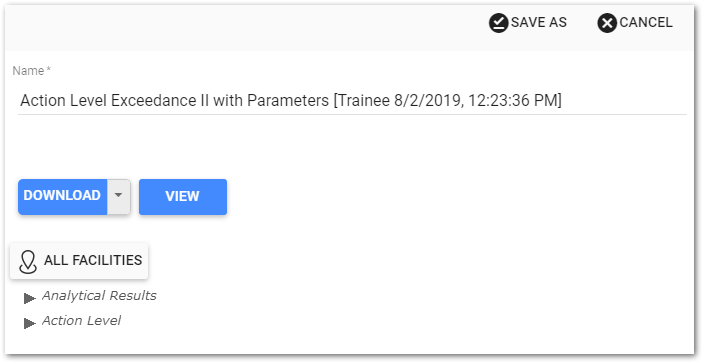
12.Change the Report Name as desired at the top of the Edit Report Parameters window.
For this exercise, change the Report Name to "QUARTERLY_UT_IRRIGATION<YOUR INITIALS>.”
13.Select Save As to return to the Widget Editor window.
14.Select Save ![]() to return to the dashboard. Note the EZView widget now displays the new report.
to return to the dashboard. Note the EZView widget now displays the new report.
|
Both the Widget Editor window and the Edit Report Parameters window can be closed without saving any changes by selecting |
15.The new report displayed in the EZView widget can be run and downloaded in a variety of formats. To export to the desired format type, click on the drop-down arrow next to Download and then choose the appropriate file extension. The newly created file can either be saved or opened as desired.
For this exercise, export a report to Microsoft Excel by selecting .XLSX from the drop-down menu. Open the file to view in Excel.
|
Objective: Build Triggered and Scheduled EIAs with the EZView Widget |
EQuIS Information Agents (EIAs) are reports that are auto-generated when certain events occur, such as the exceedance of an action level, a specified date, or new data arriving to the system. Generate these reports from previously saved user reports and learn how to schedule EIA reports and send EIA reports to specified users. EIA notices can be viewed in the Notices widget or can be emailed to designated recipients.
Tasks
•Enable EIAs in an EZView Widget
•Build a Scheduled EIA
•Build an EDD EIA
•Build a Triggered EIA
Enable EIAs in an EZView Widget
1.Select More Options ![]() in the upper right corner of an EZView widget to open the drop-down menu and then select the Edit menu option to open the Widget Editor window.
in the upper right corner of an EZView widget to open the drop-down menu and then select the Edit menu option to open the Widget Editor window.
For this exercise, select to edit the Utah Irrigation Action Levels EZView widget created in the previous exercise.
2.Select ![]() to edit or create EIAs. A window opens to create and set the properties for an EIA on the current widget. There are two tabs in the EIA window—the Data tab and the EQuIS Information Agent tab.
to edit or create EIAs. A window opens to create and set the properties for an EIA on the current widget. There are two tabs in the EIA window—the Data tab and the EQuIS Information Agent tab.
3.On the Data tab, any existing EIAs will be visible. Select the Create new EIA agent radio button to create a new EIA.
4.Select the EQuIS Information Agent tab to set the properties of the EIA.
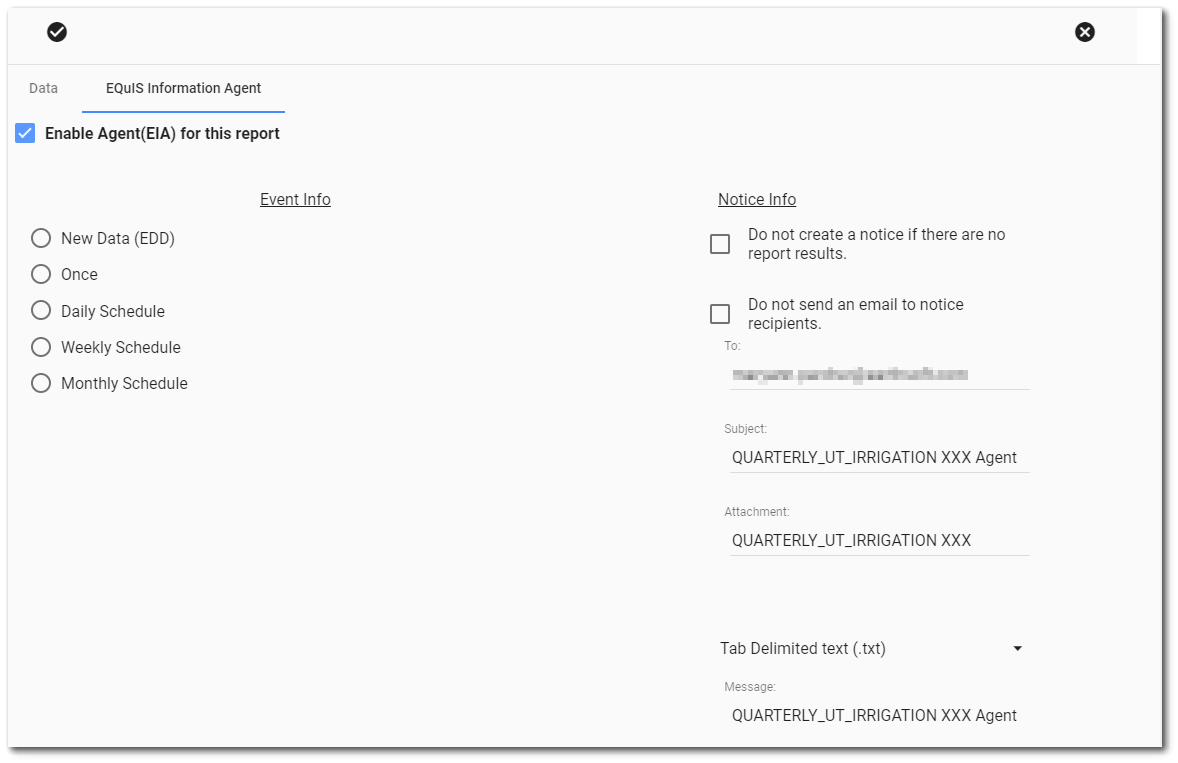
5.The Notice Info will be automatically populated with the EZView report information and the user's email address.
Build a Scheduled EIA
Scheduled EIAs will send a report on a regularly defined interval.
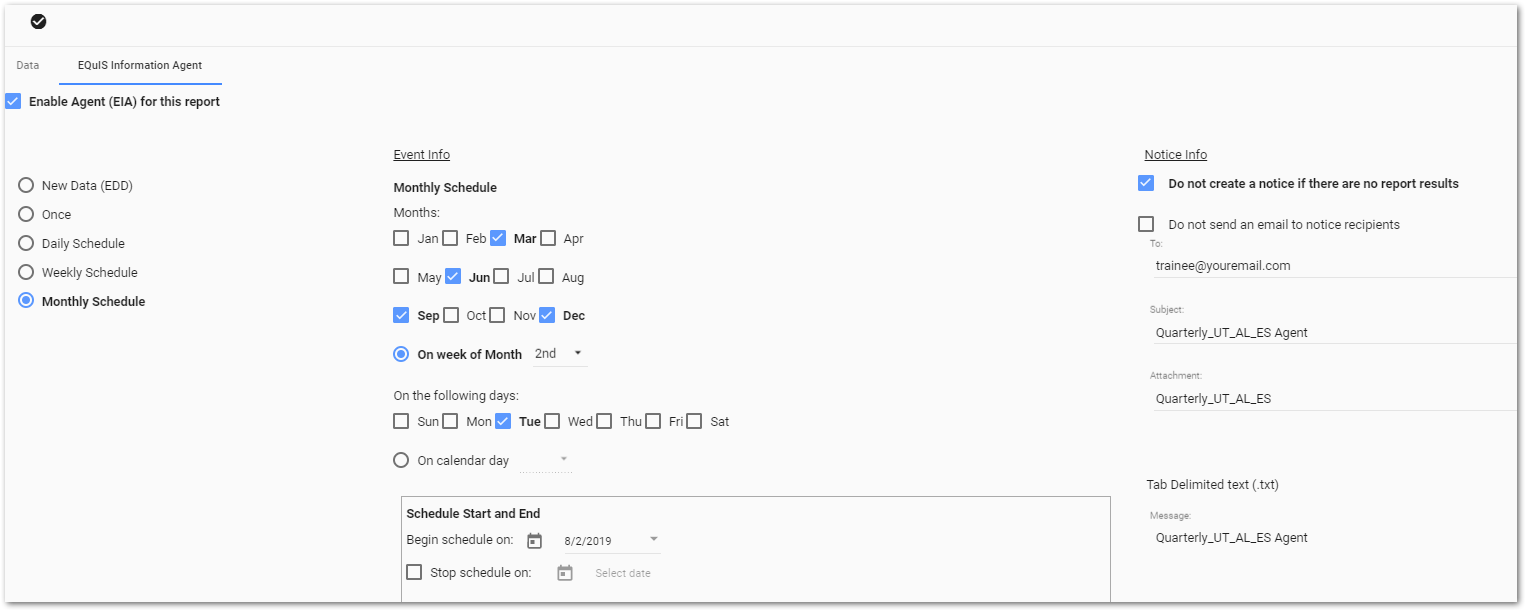
1.Select at what regular interval the EIA should run:
•Once on a specified day
•Daily Schedule
•Weekly Schedule on a specified day
•Monthly Schedule on a specified date
For this exercise, select Monthly Schedule.
2.Set the Event Info as desired. Different options will be available depending on the EIA interval selected in the previous step.
For this exercise, a quarterly sampling schedule will be defined for the second week of the month.
a.Under Months, ensure that Mar, Jun, Sep and Dec are checked.
b.Check the On week of Month radio button and set the drop-down menu to the 2nd week.
c.Under On the following days, check only Tue.
3.Under the Notice Info pane, determine if an email will be sent and then enter the email addresses of the desired recipients in the To field, and edit the Subject, Attachment and Message as desired. There is an option to not create a notice if the there are no report results.
For this exercise, check the Do not create a notice if the there are no report results option. The email information should already be set with the user and report information.
4.Select Save ![]() to save the new agent and to return to the main Widget Editor.
to save the new agent and to return to the main Widget Editor.
Build an EDD EIA
EDD EIAs will send a notice when new data is successfully loaded into EQuIS via EQuIS Enterprise EDP.
1.Select ![]() to edit or create EIAs. A window opens to create and set the properties for an EIA on the current widget. There are two tabs in the EIA window—the Data tab and the EQuIS Information Agent tab.
to edit or create EIAs. A window opens to create and set the properties for an EIA on the current widget. There are two tabs in the EIA window—the Data tab and the EQuIS Information Agent tab.
2.On the Data tab, any existing EIAs will be visible. Select the Create new EIA agent radio button to create a new EIA.
3.Select the EQuIS Information Agent tab.
4.Select New Data (EDD).
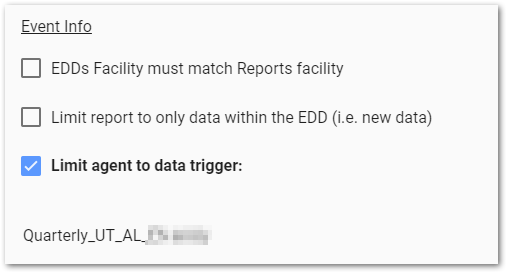
5.In the Event Info section, choose the following Event Info as desired:
a.EDDs facility must match Report’s facility: If checked, limits the generated report to run only when the facility defined in the report matches the facility of the EDD. If this box remains unchecked, the generated report will run upon acceptance of any EDD, regardless of facility.
b.Limit the report to only data within the EDD (i.e. new data): If checked, limits the generated report only includes new data. If this box remains unchecked, the generated report will display all data in the EQuIS database and incoming EDD matching the previously defined criteria.
c.Limit agent to data trigger: If checked, generates a report when new EDDs are successfully loaded into EQuIS Enterprise and some other defined criteria is also met.
For this exercise, check the EDDs facility must match Report’s facility and Limit the report to only data within the EDD (i.e. new data) options.

6.Under the Notice Info pane, determine if an email will be sent and then enter the email addresses of the desired recipients in the To field, and edit the Subject, Attachment and Message as desired. There is an option to not create a notice if the there are no report results.
For this exercise, check the option to not create a notice if the there are no report results. The email information should already be set with the user and report information.
7.Select Save ![]() to save the new agent and to return to the main Widget Editor. Another EIA will be set to deliver the chosen report every time a new EDD arrives via EQuIS Enterprise EDP.
to save the new agent and to return to the main Widget Editor. Another EIA will be set to deliver the chosen report every time a new EDD arrives via EQuIS Enterprise EDP.
Build a Triggered EIA
Triggered EIAs will send a report when new EDDs are successfully loaded into EQuIS Enterprise and some other defined criteria is also met.
1.Select ![]() to edit or create EIAs. A window opens to create and set the properties for an EIA on the current widget. There are two tabs in the EIA window—the Data tab and the EQuIS Information Agent tab.
to edit or create EIAs. A window opens to create and set the properties for an EIA on the current widget. There are two tabs in the EIA window—the Data tab and the EQuIS Information Agent tab.
2.On the Data tab, any existing EIAs will be visible. Select the Create new EIA agent radio button to create a new EIA.
3.Select the EQuIS Information Agent tab.
4.Select New Data (EDD).
5.In the Event Info section, select Limit agent to data trigger. Select other Event Info options as needed.
6.Review the Trigger Report Must be Selected options in the drop-down menu and select a trigger as desired:
a.Report triggers itself: If EQuIS Enterprise EDP accepts an EDD, this trigger will generate a report if data in the EDD matches the parameters in the report defined on the Data tab of the EZView widget.
b.Other User Reports: If EQuIS Enterprise EDP accepts an EDD, this trigger will generate a report if data in the EDD matches the parameters in a different user report selected from the drop-down.
For this exercise, select the Quarterly_UT_AL<Your Initials> trigger option.
7.Under the Notice Info pane, determine if an email will be sent and then enter the email addresses of the desired recipients in the To field, and edit the Subject, Attachment and Message as desired. There is an option to not create a notice if the there are no report results.
For this exercise, check the Do not create a notice if the there are no report results option. The email information should already be set with the user and report information.
8.Select Save ![]() to save the new agent and to return to the main Widget Editor. The EIA will be set to deliver the chosen report every time a new EDD arrives via EQuIS Enterprise EDP and the trigger conditions are met.
to save the new agent and to return to the main Widget Editor. The EIA will be set to deliver the chosen report every time a new EDD arrives via EQuIS Enterprise EDP and the trigger conditions are met.
9.Select Save ![]() again to return to the dashboard. Note the EZView widget now has an envelop icon, indicating one or more EIAs associated with the widget.
again to return to the dashboard. Note the EZView widget now has an envelop icon, indicating one or more EIAs associated with the widget.