Overview
For any project, an Environmental Data Management Plan (EDMP) should be developed to define standards for data structure, content, and format, and to support data quality objectives. The EDPM needs to consider the reporting and output requirements of the project and clearly define the data owners and recipients. The EDMP should state the relationship to the Quality Assurance Project Plan (QAPP) or other data quality documentation. The data dictionary establishes field definitions and other information pertaining to content requirements, such as example valid values for standard terms (chemical name, analytical method, units, etc.). The database schema, in conjunction with the data dictionary, define where and how the data is stored.
When setting up a new EQuIS database and the facilities (i.e., projects) within that database, use project EDMPs and QAPPs to determine the needed Schemas, format files, and reference values. If EDGE and/or Collect are used for field data collection, these EQuIS applications can be configured by EQuIS administrators to have specific project requirements to assist field crews. If data validation is required and DQM is part of the workflow, the DQM module also needs to be configured.
|
Determine data management objectives before implementing and configuring an EQuIS database. |
Create a New Database
Creating a new EQuIS database requires (at a minimum) DBCreator SQL Server permissions and should only be performed by database administrators. Comprehensive directions on creating a new EQuIS database are available in the help documentation and are not provided here.
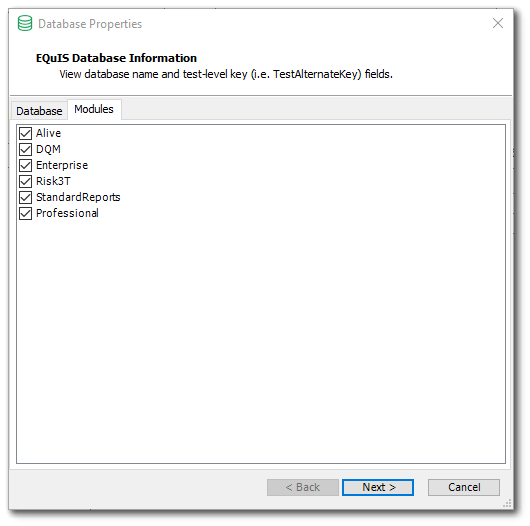
During the database creation process, the database Schemas must be selected and the Test Alternate Key must be defined. The standard EQuIS Schemas are "Professional", "Enterprise", and "StandardReports", and must be included with any database. The three Schemas are designed to create a relational database and are dependent on one another. To exclude one or more will result in error. Schema modules that are not checked will not be included in the new EQuIS database. Additional Schemas may be added to the database later if not initially selected during the database creation process.
|
|
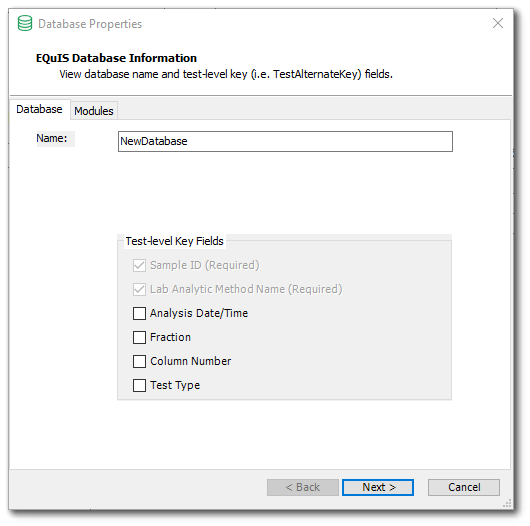
The Test Alternate Key (also referred to as test-level key or index) consists of the group of fields used to determine record uniqueness in the DT_TEST table for each facility. Prior to setting up an EQuIS database, determine which fields are necessary to uniquely identify each test/analysis. EQuIS requires that the Sample ID and Lab Analytic Method fields are included. Optional fields include: Analysis Date/Time, Fraction, Column Number, and Test Type. As part of the test alternate key, the fields chosen will be required in all data sets. It is typically recommended to choose the minimum number of fields required for uniqueness and to meet data needs.
While it may be possible to change the test alternate key at a later time, it is not advisable. It is best to determine the permanent test alternate keys when the database is created. After the database is populated with data, it is only possible to add or remove fields from the test alternate key if the addition or deletion of fields does not cause a conflict with the existing data. Otherwise, removing a field from the test alternate key after data is entered into the database will create many duplicate entries that must be resolved. Please note that once a test alternate key has been added to the database and new data has been loaded, it may no longer be possible to remove a test alternate key.
Establish Reference Values
The reference tables within EQuIS contain the reference values, valid values, and/or look-up values. The values include lists of units, location types, coordinate types, sample types, analytes, CAS numbers, matrices, analytical methods, etc. Reference tables are not initially populated with values in a new database. This feature is designed so the database owner may populate reference tables with values that align with particular project needs. Each EQuIS database has only ONE set of reference values for ALL of the facilities (i.e., projects) in that database. Establishing reference values is a critical action item and these values are typically defined at the beginning of a project by the project administrator(s).
Database vocabulary will be established by adding reference values to a new EQuIS database. Reference values are stored in Reference Tables, designated with the RT_ prefix (e.g., rt_analyte). Reference values are frequently provided in EQuIS applications as pull-down lists. Requiring selection from a list (rather than open text entry) ensures consistency in spelling, which ensures consistency in data. In EQuIS Professional, reference values are found in individual reference tables within the database. In EDP Standalone and EDGE, reference values are accessed via a (*.RVF) reference values file.
There are two ways to add reference values to EQuIS—using EQuIS Data Processor (EDP) or EQuIS Professional. When creating a new project, it is easier to use EDP to add new reference values if working with a list or spreadsheet.
Add Reference Values using EDP
To load reference values as an EDD, use the refvals.xsd format. This format contains all standard EQuIS reference tables and reflects the table structure as it exists in the database. Each reference table exists as its own section in the format file. To load reference data using the refvals.xsd format file, EDD files containing the new reference values must first be created. This method is preferred, and users often obtain *.RVF files from regulatory agencies to get started.
Open EQuIS Professional EDP ![]() and select Format
and select Format ![]() in the Open group of the EDP Home ribbon. Browse to the desired Format directory and select the refvals.zip Format.
in the Open group of the EDP Home ribbon. Browse to the desired Format directory and select the refvals.zip Format.
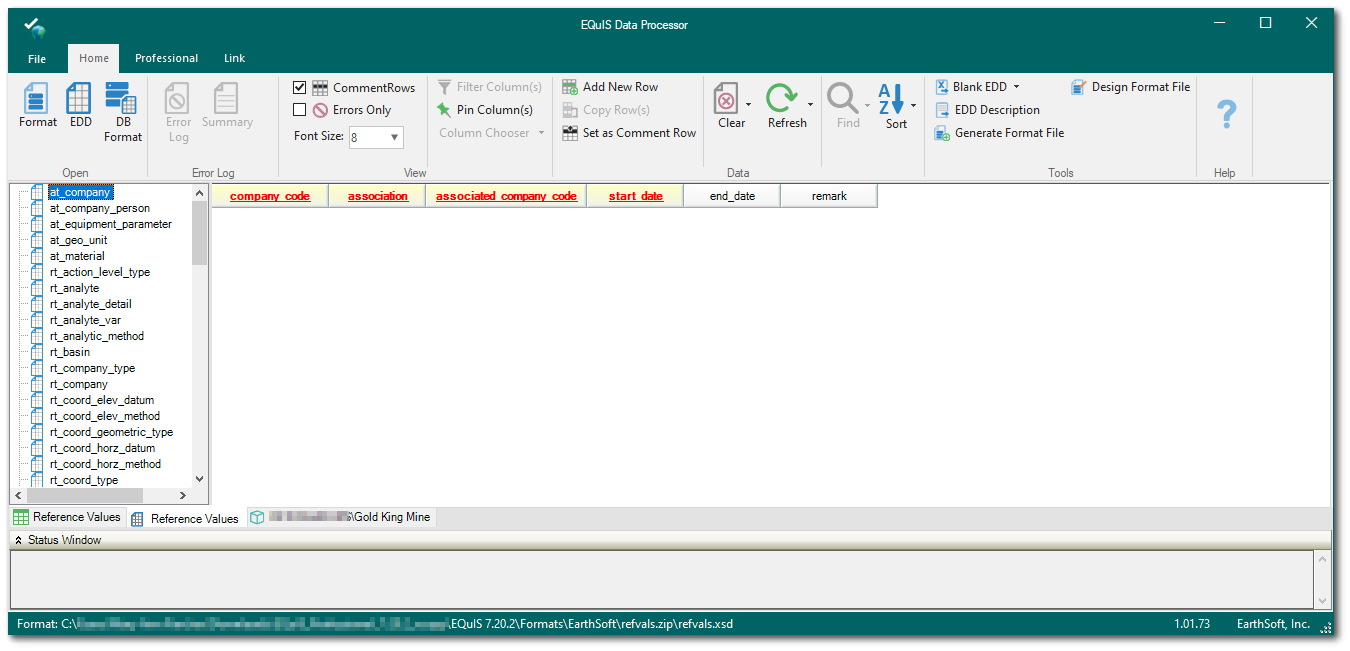
Select EDD ![]() in the Open group of the EDP Home ribbon and browse to the desired EDD file (typically an .xls, .zip, or multiple .txt files) containing the reference values.
in the Open group of the EDP Home ribbon and browse to the desired EDD file (typically an .xls, .zip, or multiple .txt files) containing the reference values.
|
When creating EDD files, the included values must match the expected values in the appropriate sections of refvals.xsd. When creating EDD files as Microsoft Excel files, the Worksheet name(s) must match the appropriate section name(s) in refvals.xsd. |
Select the Professional ribbon and click Create ![]() located in the Package group to open a processing window. When processing is complete, this window displays a record of how many rows were loaded into the Database Preview tab. Click the Finish button if there are no records with a Status of ERROR.
located in the Package group to open a processing window. When processing is complete, this window displays a record of how many rows were loaded into the Database Preview tab. Click the Finish button if there are no records with a Status of ERROR.
Click Commit ![]() in the Package group and select the appropriate commit type. A processing window appears that contains a record of how many values were loaded into each table within the EQuIS database. Click the Finish button if there are no records with a Status of ERROR. Verify the reference values were populated by opening the reference tables which were populated in the EDD.
in the Package group and select the appropriate commit type. A processing window appears that contains a record of how many values were loaded into each table within the EQuIS database. Click the Finish button if there are no records with a Status of ERROR. Verify the reference values were populated by opening the reference tables which were populated in the EDD.
|
For more guidance about checking and loading an EDD format, see Check and Import EDDs. |
Add Reference Values in EQuIS Professional
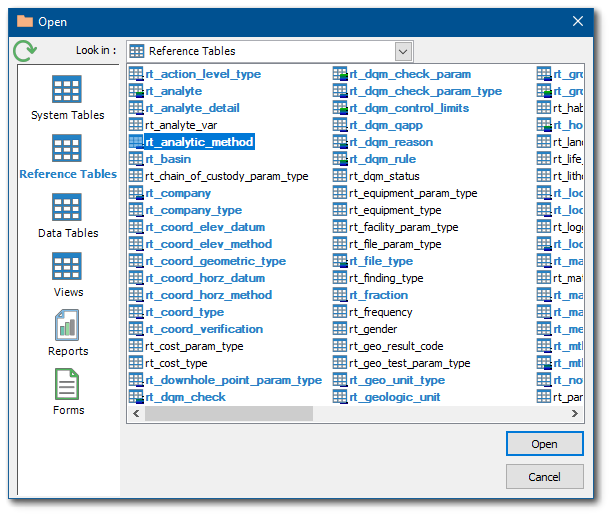
Individual reference values can be added manually within Professional by selecting Tables ![]() from the Open group on the Home ribbon and choosing Reference Tables on the left side-bar menu. Open the table to which the reference value will be added.
from the Open group on the Home ribbon and choosing Reference Tables on the left side-bar menu. Open the table to which the reference value will be added.
Click the Add... button to add a new line to the table. Populate all of the required fields, designated as RED_BOLD, before clicking Save ![]() on the toolbar.
on the toolbar.