Overview
EQuIS formats may be customized to add or change requirements and logic, to add additional fields, change mapping and look-ups, or include conditional checks. EarthSoft strongly recommends that any format to be edited is renamed to distinguish between the original and customized format.
|
Developers or EQuIS Power Users customize EQuIS Formats for use in EDP. |
|
Exercise Objectives |
•Review EQuIS Format Concepts
•Create New Projects (in Visual Studio)
•Rename EQuIS Formats
•Add Fields to EQuIS Formats
•Add Look-ups and Enumerations to Fields
•Add Format Sections to Groups
•Create Custom Checks
Skills, Software and Permissions Required
•EQuIS Professional 7 must be installed on the workstation
•.NET Framework 4.7.2 or higher must be installed on the workstation
•Visual Studio Professional 2015 or higher must be installed on the workstation
•Read/write permissions are required for the desired facilities
|
Objective: Review EQuIS Format Concepts |
EQuIS Format File Overview
Format files may be encrypted or unencrypted. Unencrypted format files may be edited or customized, whereas encrypted files cannot be changed. Custom Handler code contains the custom business rules that apply to the format and is compiled in the format .dll file. The EQuIS format file always includes the Format Definition File, but may also include other files. The following files may be included in the format file set:
•The Format Definition file (.xsd or .xse)
•The Enumeration file
•Export file (*-export.xml)
•The Reference Value file (.rvf) – Only needed when using EDP Standalone or not connected to a database.
Simple checks, such as range checking, reference values, formatting and enumerations, are included in the format definition file. Enumerations are a way to enforce vocabulary on fields that have no reference tables. Enumerations can also restrict the vocabulary of fields that do have existing reference tables. They are used in EDP and in EDGE to enforce specific look-up values for key fields.
The enumeration file is an auxiliary file (e.g., "EQEDD-enum.xml"), remains unencrypted, and is editable by the user. The enumeration file must be in the same directory as the rest of the format files and properly named and referenced within the format file, otherwise an error will occur when opening the format.
For each EQuIS database, reference values are defined and can be exported to a reference value file. These reference values are required to process an EDD for errors. The reference value file is needed when not connected to a database.
Viewing Format Files
Format files are written in extensible markup language (XML). Unencrypted XML format files can be read using a text editor. Obtain an unencrypted version of the format file to view it in a text editor.
Select an Appropriate Format File
When customizing an EQuIS format file, start with an existing standard format. Review the different standard formats and select the format closest to the desired result. In addition to the format structure, also consider if the following attributes are present and/or desired:
•Required fields
•Custom fields
•Format variations
•Field position
•Field names and data types
•Look-up tables
For this exercise, select an unencrypted version of the EFWEDD format, appropriate for the version of EQuIS currently installed.
|
Objective: Create New Projects in Visual Studio |
1.Open Visual Studio.
2.Select File> New> New Project.
3.From the top of the New Project window, select the .NET Framework 4.
4.Select the Visual Basic> Class Library template.
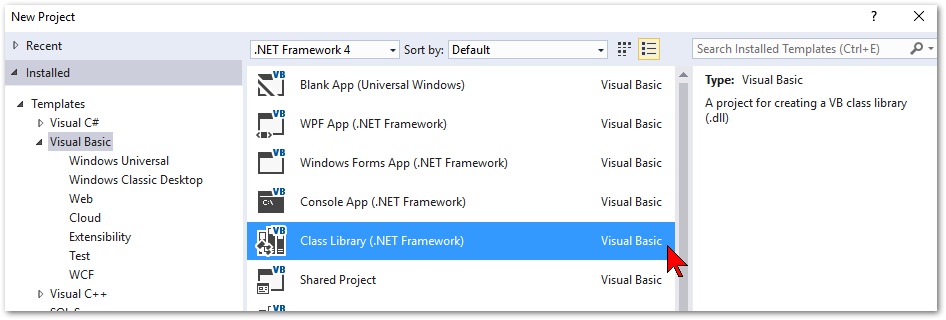
5.Name the new project with the desired format name.
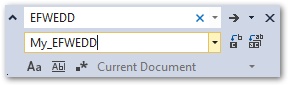
For this exercise, name the new project "My_EFWEDD".
6.Save the project to the desired location on the workstation.
7.Select OK.
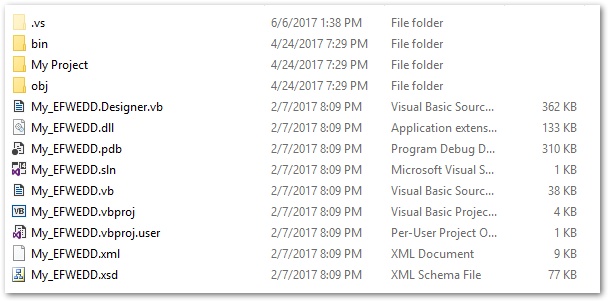
8.Open Windows Explorer and browse to the unencrypted EFWEDD format.
9.Copy the "EFWEDD.xsd" and "EFWEDD.vb" files into the Project (My_EFWEDD) directory.
10.Rename the copied files to match the Project name.
For this exercise, name the files "My_EFWEDD.xsd" and "My_EFWEDD.vb".
11.Return to Visual Studio and select Refresh ![]() from the Solution Explorer on the right-hand side.
from the Solution Explorer on the right-hand side.
12.Select Show All Files ![]() from the Solution Explorer.
from the Solution Explorer.
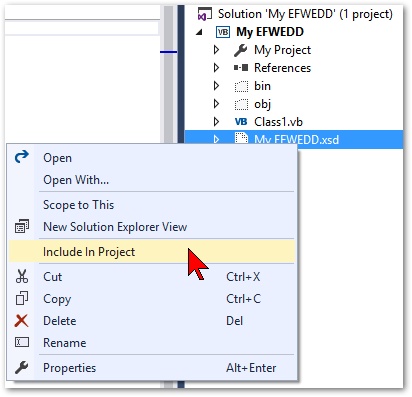
13.Right-click on the .xsd file ("My_EFWEDD.xsd") now visible in the Solution Explorer and select Include in Project.
14.Expand My Project and delete the sub-files within the directory.
15.Double-click on My Project to open it.
16.On the Application tab, delete the text in the Root namespace.
17.On the Compile tab, delete the text in the Build output path.
18.Select the Debug tab, and select Start External Program.
19.Select Browse and browse to the "EQuIS.exe" file (typically located in C:\Program Files\EarthSoft\EQuIS).
20.Highlight the file and select Open.
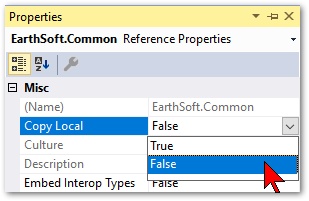
21.Select the References tab.
22.From the bottom of the References list, select Add.
23.Select Browse.
24.Browse to C:\Program Files\EarthSoft\EQuIS and select the "EarthSoft.Common.dll" file and the "EarthSoft.EDP.dll" file.
25.Select Add and then OK.
26.Select both new references and, in the Properties window on the right-hand side, change the Copy Local to False.
27.Save ![]() all changes.
all changes.
28.Select Build> Build Solution.
|
Objective: Rename EQuIS Formats |
1.From the Solution Explorer on the right-hand side, double-click on the "My_EFWEDD.xsd" file to open it.
2.Select CTRL + H to open the Find and Replace tool.
3.Enter "EFWEDD" in the Find field, and enter the desired EDD format name in the Replace field, and select Replace All.
For this exercise, enter "My_EFWEDD" in the Replace field.
4.Select OK on the number of occurrences replaced.
5.From the Solution Explorer, double-click on the .vb ("My_EFWEDD.vb") file to open it.
6.Repeat steps 2-4 for the custom handler.
7.Save the changes in both files.
8.Select Start ![]() to launch EQuIS Professional.
to launch EQuIS Professional.
9.Login to EQuIS Professional and select the desired facility.
10.Launch EDP ![]() and select Format
and select Format ![]() .
.
11.Browse to the new format file.
For this exercise, browse to the "My_EFWEDD.xsd" file.
12.Verify the format opens correctly.
13.Close EQuIS and return to Visual Studio.
|
Objective: Add Fields to EQuIS Formats |
When adding fields to EQuIS formats, it is recommended to start with an existing field and then copy and paste it in the desired position of the section.
Tasks
•Setting Up a New Custom Field
•Add Mapping to a New Custom Field
Setting Up a New Custom Field
1.Return to the "My_EFWEDD.xsd" file.
2.Right-click, and select Outlining> Toggle All Outlining.
3.Expand the schema id section (approximately line 3).
4.Expand the element name="My_EFWEDD"... section (approximately line 6).
5.Expand the complexType (line 16) and then the sequence (line 17) sections.
6.Expand the element name="EFW2FSample" section (approximately line 24) to find the section in the format to which a field will be added.
7.Expand the complexType (line 91) and then the sequence (line 92) sections.
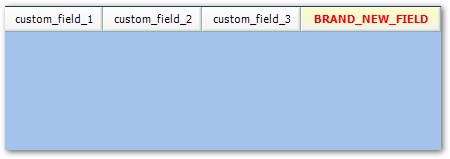
8.Find element name="CUSTOM_FIELD_3" (line 349) and copy (CTRL + C) the line.
9.Add a line directly underneath it and then paste (CTRL + V) the copied line.

10.Rename the new field to "BRAND_NEW_FIELD" and change nillable to "false".
11.Revise any other desired properties, such as
a.Length: maxLength value
b.Description: documentation
Add Mapping to a New Custom Field
When the new field is populated with data, it must be mapped to one or more fields in the EQuIS database.
1.Expand the annotation section for the format section (line 25) and the appinfo section (line 27).
2.In the CREATE section, find the desired edd:table mode, or create a new line for the table. For example, expand the DT_SAMPLE section (line 55).
3.Copy and paste the last line in the section (line 74).
4.Rename the copied source to the name of the new field ("BRAND_NEW_FIELD"), and the target to the field name in the EQuIS database ("CUSTOM_FIELD_4").
5.Select to Save the changes.
6.Select Start ![]() to launch EQuIS Professional.
to launch EQuIS Professional.
7.Login to EQuIS Professional and select the desired facility.
8.Launch EDP ![]() and select Format
and select Format ![]() if the format does not load automatically.
if the format does not load automatically.
9.Browse to the EFW2FSample section.
10.Verify the field is added and functions as desired.
11.Close EQuIS and return to Visual Studio.
|
Objective: Add Look-ups and Enumerations to Fields |
Instead of allowing for free text to be entered into fields, look-ups or enumeration lists ("drop-downs") may be added to a field to provide a list of valid values for that field.
Tasks
•Add Look-ups to Existing Fields
•Add Enumerations to Existing Fields
Add Look-ups to Existing Fields
Look-ups are lists of values that may be pulled directly from specified reference tables in EQuIS. Look-ups may also include a secondary column that is not part of the value being used, but is simply included for ease-of-use.
1.Return to the "My_EFWEDD.xsd" file.
2.Find the existing Look-ups for the EFW2FSample section (lines 29-42).
3.Copy an existing look-up and paste it on a new line below.
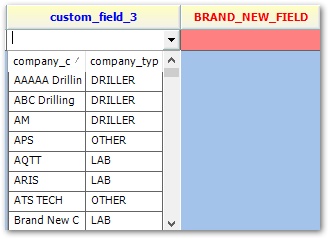
4.Change the target to the desired table ("RT_COMPANY").
5.Change the source to the desired EDD field ("CUSTOM_FIELD_3").
6.Change the source target to the desired EQuIS field within the target table ("COMPANY_CODE").
7.(Optional) Add a reference column to the drop-down by adding the following to the end of the target:
include_columns="COMPANY_TYPE"
8.Select Start ![]() to launch EQuIS Professional.
to launch EQuIS Professional.
9.Login to EQuIS Professional and select the desired facility.
10.Launch EDP ![]() and select Format
and select Format ![]() if the format does not load automatically.
if the format does not load automatically.
11.Browse to the EFW2FSample section.
12.Verify that CUSTOM_FIELD_3 now includes a drop-down that displays the desired values.
13.Close EQuIS and return to Visual Studio.
Add Enumerations to Existing Fields
Enumerations are lists of individual values that may be defined by the Programmer and they are not necessarily present in any EQuIS reference table.
1.Return to the "My_EFWEDD.xsd" file.
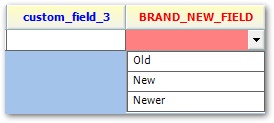
2.Find the desired field, such as "BRAND_NEW_FIELD" (line 363).
3.Within the simpleType attribute (line 367), under the restriction base, add the following three lines:
<xs:enumeration value="Old" />
<xs:enumeration value="New" />
<xs:enumeration value="Newer" />
4.Save the changes to the .xsd.
5.Select Start ![]() to launch EQuIS Professional.
to launch EQuIS Professional.
6.Login to EQuIS Professional and select the desired facility.
7.Launch EDP ![]() and select Format
and select Format ![]() if the format does not load automatically.
if the format does not load automatically.
8.Browse to the EFW2FSample section.
9.Verify that the "BRAND_NEW_FIELD" now includes a drop-down that displays the desired values.
10.Close EQuIS and return to Visual Studio.
|
Objective: Add Format Sections to Groups |
Collect format sections into logical groups for improved usability within EDP.
1.Return to the "My_EFWEDD.xsd" file.
2.Find the desired section to be added into a group, such as the EFW2FSample section (line 24).
3.Under the appinfo (line 27) section, add a new line and then add:
<edd:group>Field Group</edd:group>
Where "Field Group" is the desired name of the group.
4.Save the changes to the .xsd.
5.Select Start ![]() to launch EQuIS Professional.
to launch EQuIS Professional.
6.Login to EQuIS Professional and select the desired facility.
7.Launch EDP ![]() and select Format
and select Format ![]() if the format does not load automatically.
if the format does not load automatically.
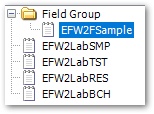
8.Browse to the EFW2FSample section.
9.Verify the EFW2FSample section now appears under the Field Group folder on the left-hand side of EDP.
10.Close EQuIS and return to Visual Studio.
|
Objective: Create Custom Checks |
Custom and/or conditional checks may be added in to the custom handler file to include additional layers of checks in the format. In this section, add a conditional check to require CUSTOM_FIELD_3 when CUSTOM_FIELD_2 is populated in the modified EFW2FSample format section.
1.Open the "My_EFWEDD.vb" file.
2.Find and expand the AddDataHandlers section (line 88).
3.Find the name of the check Check_EFW2FSample (line 101).
4.Find the method of the same name within the handler and expand the section (line 201).
5.Add a new line under the last existing check, and add:
Case "CUSTOM_FIELD_2", "CUSTOM_FIELD_3"
6.Find and expand the Custom Checks section (line 264).
7.Find ERR26 (line 453) and copy the check.
8.Paste the copied check directly underneath the copied check.
9.Rename the new check to ERR27 (line 474).
10.Delete lines 475-477.
11.Delete current lines 476-480.
12.Replace the current lines 476-478 with:
If Not .IsNull("CUSTOM_FIELD_2") AndAlso .IsNull("CUSTOM_FIELD_3") Then
13.Rename "END_DEPTH" on line 477 and line 479 to "CUSTOM_FIELD_3".
14.Replace "CustomError13" with "CustomError33" on lines 477 and 479.
15.Find the EFW2FSample_Refresh section (line 661).
16.Copy an existing case and paste the copied rows directly underneath the copied case.
17.Rename the new case to "CUSTOM_FIELD_2".
18.In line 671 rename "END_DEPTH" to "CUSTOM_FIELD_3" and change the error number to ERR27.
19.Return to the new custom check (line 474).
20.Add this comment to line 482:
'CUSTOM_FIELD_3 is required if CUSTOM_FIELD_2 is populated.
21.Copy this new line and return to the desired case and method within the custom handler (line 217).
22.Under the case, add a new line:
ERR27(e) 'ERR27: CUSTOM_FIELD_3 is required if CUSTOM_FIELD_2 is populated.
23.To specify the error message returned to the user, find and expand the ErrorMessage section (line 132).
24.At the end of the section, add:
Case EddErrors.CustomError33
Return "If CUSTOM_FIELD_2 is populated, CUSTOM_FIELD_3 is required."
25.Save the changes to the .vb.
26.Select Build> Rebuild Solution.
27.Select Start ![]() to launch EQuIS Professional.
to launch EQuIS Professional.
28.Login to EQuIS Professional and select the desired facility.
29.Launch EDP ![]() and select Format
and select Format ![]() if the format does not load automatically.
if the format does not load automatically.
30.Browse to the EFW2FSample section.
31.Add a row, populate CUSTOM_FIELD_2, and verify that the error is thrown with CUSTOM_FIELD_3.
32.Close EQuIS Professional and close Visual Studio.